
- ADS Watch and Record TV shows on CD or DVD Hardware User's Guide

page 24
page 25
Format Video Bit Rates Audio Bit Rates
VCD 1.15 Mb/sec. 224 kbits/sec.
SVCD 1.5 Mb/sec. - 2.5 Mb/sec. 128-384 kbits/sec.
DVD 2 Mb/sec. – 5 Mb/sec. 192 – 448 kbits/sec.
Audio Bit Rates
The audio format is always compressed in MPEG-1 Layer 2 audio. CapWiz also automatically
sets the audio sampling rate to 44.1 Khz for VCD and SVCD settings and 48 Khz for DVD video.
We give you the choice to select the audio bit rate for your custom video captures in the range
from 192 kbits/sec to 384 kbits/sec.
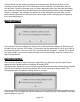
Use Variable Bitrate
Capturing with variable bit rate will result in overall smaller le sizes than using constant bit rates.
When the Variable bit rate setting is enabled Instant DVD examines the frames of video being
captured and will automatically increase the bit rate in areas of fast motion or action and
decrease the bit rate in areas where not much is changing. This will result in improved overall
quality and an overall smaller le size. The default capture settings are set to constant bit rate.
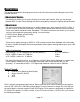
Video Preprocessing Filters
DVD Xpress includes video preprocessing lters which provide the ability to remove some of the
noise found on old video tapes, TV reception or other noisy video sources.
Spatial Filtering
This refers to ltering pixel data that are all located in the same video frame. The Spatial lter is a
low-pass lter. This lter removes part of the high frequency noise components. Too much
ltering can reduce image sharpness to the point of looking very smooth or blurry. The selection
range for this lter is from 0 to 7.
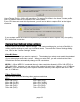
Temporal Filter
This lter processes pixel data that are located in the same pixel coordinates but across two
frames of video, usually the current video frame and the previous frame. Because of motion in
video sequences, and object located in one position may have moved in the next video frame.
Thus, if there is a log of motion, temporal ltering may cause blurring or introduce other artifacts.
The selection range for this lter is from 0 to 255.What is the best lter to use for your video?
There is no magic formula, you will need to experiment with different lter settings and pick the
lter level that removes noise but does not create blur.
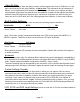
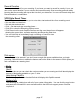
Use Deinterlacing (Preview/Playback)
The MPEG-2 software playback codec that we use does not de-interlace video by default.
Interlaced video will show horizontal lines when you preview or playback the video. This interlacing
does not affect video quality. All NTSC and PAL video is interlaced. You will not see the interlacing
when playing back a DVD disk on TV. De-interlacing the video during preview and playback makes
the video quality look better on the computer screen. The default capture settings have de-
interlacing turned on by default. De-interlacing the video takes a bit more CPU processing power.
Some slower PC’s may experience jerky video. In the custom settings, you have the ability to
enable or disable de-interlacing. Experiment with your system and your personal preferences to