Instant Video PCI : English/French Instant Video PCI Archive & Share Your Home Movies On CD User’s Guide: First Edition
Table of Contents Introduction Installation . . . Guide . . . . . . . . . . . . . . . . . . . . . . . . . . . . . 4 . . 8 Step 1. Driver Installation . . . . . . . . . . . . . . . 10 Step 2. Plugging In the Hardware . . . . . . . . 12 Software Installation . . . . . . . . . . . . . . . . . 14 Ulead VideoStudio 8 . . . . . . . . . . . . . . . . . 15 French Help Manual . Resources . . . . . . . . . . . . . . . . . . . . . . . . . . . .
Introduction Package Contents: 1. 2. 3. 4. Instant Video PCI device Audio/Video connection cable Instant Video PCI Installation CD User’s Guide System Requirements: • A computer system equipped with a Pentium 4 2.4GHz or greater.
Instant Video PCI allows you to easily capture video in multiple video compression formats. This product is targeted at compressing video into low bit rate formats that generate compact video files which are easily transferred to portable devices or allow for lots of video to fit on a normal CD-R disc. The Instant Video PCI acts as a video digitizer and video pipeline enabling raw uncompressed video to flow into the PC via the PCI port on Windows XP machines.
technology that can reduce the file size of video more than 5 times smaller than DVD while offering similar quality. This takes intense processing power. This is why the minimum CPU requirement Instant Video PCI is set at 2.4 GHz. The software included with your Instant Video PCI installs the Divx Video codec, Microsoft Windows Media Video 9 codec and MPEG-1 codec allowing you to easily capture into any of these video formats.
Video CD (VCD) VCD is probably the most common application for MPEG-1 video and has been a popular format in Europe and Asia for many years for movies. Before DVD players existed, VCD players were very popular virtually everywhere except North America. VCD is the same video bit rate and resolution as MPEG-1 but copied to a CD-R in a format that will play in VCD players. The advantage of VCD is that you can record approximately 70 minutes of audio and video on a CD-R.
INSTALLATION GUIDE NOTE: INSERT the CD and install the Drivers before plugging the Instant Video PCI Device in your computer! 8
Quick Installation Guide This Quick Installation Guide should be used as a reference guide only! It is highly recommended that you read the complete Instant Video CD Manual before using this product to help ensure you get the most out of your Instant Video CD.
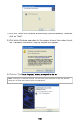
1) With the “Install the software automatically (Recommended)” selected, click on “Next”. 2) Wait while Windows searches for the proper drivers, then when found, the “Hardware Installation” pop-up window will appear. 3) Click on “Continue Anyway” when prompted to do so. Note: Cicking on “Continue Anyway” will not harm your computer in any way and will allow you to finish the install of your new hardware.
4) Your device, Instant Video PCI, is now installed, Click on “Finish” when the installation is complete. Note: Welcome to found new hardware wizard will come up for the second time. 5) Click on “next” to start the driver install. 6) Click on “Continue Anyways” to continue with the driver install.
7) Click on “finish” button to finish the driver install. • Click on the “+” sign next to “Imaging Devices” and you should see: “Instant Video PCI”. • Click on the “+” sign next to “Sound, video and game controllers” and you should see: “ADS PTV-390 Capture Devices” and “ADS PTV-390 Crossbar ”. Once you have confirmed the 2 locations, close the “Device Manager” window. Congratulations, you have installed the Instant Video PCI properly. Step 2.
1) Click on the “Install Drivers” button to start the driver installation. 2) Click on the “Start” button to continue installation. 3) Click on the “OK” button to finish the install. Note: This alert will appear 2 times during the installation process. Click on “Continue Anyway” to proceed.
Software Application Installation To start the installation of VideoStudio 8, click on the “VideoStudio 8” button. To install VideoStudio 8, click on the “Install Ulead VideoStudio 8” button. Getting Started with Video Studio 8 SE VCD: 1) Click on “VideoStudio Editor” to capture, edit, and burn your home movies.
2) Click on the “Capture” tab and ensure that your Source is set to ADS PTV-390 Capture Device. How VideoStudio works VideoStudio follows a step-by-step paradigm so that editing tasks remain uncomplicated from start to finish. VideoStudio also offers more than a hundred transition effects, professional titling capabilities and simple soundtrack creation tools. Learn in seconds, create in minutes. To make a movie production, first capture footage from a camcorder or another video source.
The User Interface 1 Step Panel Contains buttons that correspond to the different steps in video editing. 2 Menu Bar Contains menus that provide different set of commands. 3 Options Panel Contains controls, buttons, and other information that you can use to customize the settings of the selected clip. The contents of this panel change depending on the step you are in. 4 Preview Window Shows the current clip, video filter, effect, or title.
The Step Panel VideoStudio simplifies the process of creating movies into seven simple steps. Click the buttons in the Step Panel to switch between steps. Once a project is opened in VideoStudio, video can be recorded directtly to your computer’s hard disk in the Capture Setup. Footage from a video tape can be captured as a single file or automatically divided into multiple files. This step allows you to capture video and still images. The Edit Step and the Timeline are the heart of VideoStudio.
Capturing in DivX Format: 1) On the “Format” pull down menu make sure that you select “DivX”. Planning your DivX Video Project: You can change the video resolution and video bit rate settings to adjust for quality and also the file size of your video capture project. You may have the goal of fitting up to 2 hours of DivX video on CD-R disc. Here are some guidelines showing resolutions, video settings and approximate file sizes: Resolution Video Bit Rate File Size 640 x 480 500 kb/sec. @ 300 MB/Hr.
Step 1. Setting Video and Audio Capture Properties: 1) Click on the “Options” button and then “Video and Audio Capture Property Settings…” 2) Verify that the “Input Source:” is correct if you are connecting your analog source with RCA cables then please select Video Composite and if connected with S-Video then Video S-video.
Step 2. Adjusting the DivX bitrate: 1) Click on the “Capture” tab and then click on “Configure”. 2) Then choose the desired Variable Bitrate Mode by clicking the pull-down arrow.
1-Pass Encoding: (RECOMMENDED) 1-pass encoding is the quickest way to encode your video in the DivX format, at the expense of some quality - it allows you to set a fixed average bit-rate to use for the entire encoding. Step 3. Selecting the Audio Bitrate: 1) Make sure that you select “Ulead Mpeg-1 Layer2” for your Audio Encode Codec and then click “OK” to finish and save your settings.
Step 4. Start Capturing your VIdeo in DivX Format: 1) Click on the “Capture Video” button to start capturing. 2) When finished, click on the “Stop Capture” button the ESC key. or simply hit 3) Now your ready to burn your CD. How do I burn the DivX file to a CD? DivX files are saved as .avi format and can be burned directly onto a CD without any special formatting or disc authoring. You can use any commercially available CD burning software to copy the DivX .avi file to a CD.
Capturing in Windows Media Video (WMV) Format: Windows Media video is a format that is generally created to send video broadcasts over the Internet. The compression quality is very good so you can capture video at a low bit rate (small file size) yet still have good quality. You may want to capture video in the Windows Media Video format for sending video over the internet or simply to archive to CD-R for your personal video archive for playback on a PC.
Step 1. Customize or Select Different Quality Profiles: 1) Click on the “Options” button and select “Video and Audio Capture Property Settings…” 2) Click on the “Capture” tab and then click on the “Select…” where you will see a list of different Profiles you can select from.
Step 2. Start Capturing your Video in WMV Format: 1) Click on the “Capture Video” button to start capturing. 2) When finished, click on the “Stop Capture” button the ESC key. or simply hit 3) Now your ready to burn your CD*. *Use the CD burning software that came with your PC or CD burner to write Windows Media Video files to a CD. Capturing in VCD (MPEG-1) Format: 1) Click on the “Format” pull down menu and select “VCD”.
Planning your VCD Project: VCD is a format that was specifically created to put video on a CD-R disc. The video is always in the MPEG-1 format with a set video bit rate of 1.15 Mb/sec. You can capture approximately 70 minutes of audio and video to fill a 700 MB CD-R. Capturing video in the VCD format with Video Studio 8 will allow you to easily “Share” the captured and or edited movie to a CD.
2) Verify that the “Input Source:” is correct if you are connecting your analog source with RCA cables then please select Video Composite and if connected with S-Video then Video S-video. 3) Under the “Capture” tab, the VCD setting is selected by default (recommended), but you can also customize the frame size by clicking on the “Customize” setting.
Step 2. Start Capturing your Video in VCD (MPEG-1) Format: 1) Click on the “Capture Video” button to start capturing. 2) When finished, click on the “Stop Capture” button the ESC key. or simply hit 3) Now your ready to burn your CD. Step 3. Burning your VCD on Disc: 1) Click on the “Share” tab and then click on “Create Disc” to start creating your VCD disc.
2) Select desired menu and name your own titles and then click “Next”. 3) This screen allows you to preview your project before burning your disc or you can just skip it by clicking “Next”.
4) Here you can rename your disc, then select the Drive your recordable disc is in and then click “Output” to start the burn. Note: VCD discs will playback in most late model DVD players. Check your DVD specifications. For more detailed information on using VideoStudio 8, please refer to the manual on the CD.
Introduction: French Manual Contenu: 1. 2. 3. 4. Dispositif Instant Video PCI Câble de raccordement audio / vidéo CD pour l’installation de l’Instant Video PCI Guide de l’utilisateur Configuration requise: • • • • Ordinateur avec Pentium 4 2,4GHz ou supérieur.
Instant Video PCI vous permet de capturer facilement des vidéos dans de multiples formats de compression vidéo. Ce produit est conçu pour la compression de vidéo en formats à faible débit binaire produisant des fichiers vidéo compacts facilement transférables à des dispositifs portatifs ou permettant de placer une grande quantité de vidéos sur un disque CD-R normal.
similaire. Cette compression s’effectue au prix d’une puissance de traitement intense : c’est la raison pour laquelle Instant Video PCI est spécifié avec une capacité minimale de 2,4 GHz de l’unité centrale. Le logiciel fourni avec votre Instant Video PCI installe le « codec » DivX Video, le « codec » Media Video 9 de Microsoft Windows, et le « codec » MPEG-1, ce qui vous permet de capturer facilement dans un quelconque de ces formats vidéo.
VidéoCD (VCD) VCD est probablement l’application la plus répandue pour les vidéos MPEG-1. VCD est, depuis de nombreuses années, un format populaire en Europe et en Asie pour les films. Avant l’avènement des lecteurs de DVD, les lecteurs VCD étaient très répandus pratiquement partout sauf en Amérique du Nord. VCD présente le même débit vidéo et la même résolution que MPEG-1, mais il est reproduit sur CD-R dans un format que peuvent lire les lecteurs de VCD.
GUIDE D’INSTALLATION Nota : INSÉREZ le CD et installez les pilotes avant de brancher le périphérique Instant Video PCI dans votre ordinateur ! 35
Notice d’installation rapide La présente notice d’installation rapide doit être utilisée comme guide de référence exclusivement ! Nous vous conseillons vivement de lire entièrement le manuel de l’Instant Video PCI avant d’utiliser ce produit, afin de maximiser l’utilité de votre Instant Video PCI.
Étape 1. Branchement : Branchez le périphérique Instant Video PCI à l’ordinateur : A. Branchez la carte PCI directement dans un port PCI ouvert de la carte mère de l’ordinateur. B. Après le branchement, allumez l’ordinateur. Un Assistant d’installation de pilotes apparaît à l’écran. 1) Sélectionnez « Installer le logiciel automatiquement (recommandé) », puis cliquez sur « Suivant ». 2) Laissez Windows rechercher les pilotes appropriés.
4) Votre périphérique, Instant Video PCI, est maintenant installé : cliquez sur « Terminer » lorsque l’installation est terminée. Nota: L’assistant d’installation matérielle apparaîtra une seconde fois. 5) Cliquez sur « Suivant » pour lancer l’installation des pilotes.
7) Cliquez sur le bouton « Terminer » pour mettre fin à l’installation des pilotes. • Cliquez sur le signe « + » situé près de « Périphériques Image » et vous verrez « Instant Video PCI ». • Cliquez sur le signe « + » situé près de « Contrôleurs son, vidéo et jeu » et vous verrez « ADS PTV-390 Capture Devices » et « ADS PTV-390 Crossbar ». Après confirmation des deux adresses, fermez la fenêtre « Gestionnaire de périphériques ». Félicitations, vous avez installé Instant Video PCI correctement. Étape 2.
2) Cliquez sur le bouton « Démarrer » pour continuer l’installation. 3) Cliquez sur le bouton « OK » pour terminer l’installation. Nota : Cette alerte apparaîtra 2 fois pendant le processus d’installation. Cliquez sur « Continuer » pour poursuivre l’opération.
Installation de l’application logicielle Pour commencer l’installation de VideoStudio 8, cliquez sur le bouton « VideoStudio 8 ». Pour installer VideoStudio 8, cliquez sur le bouton « Install Ulead VideoStudio 8 ». Préparation pour le VCD Video Studio 8 SE : 1) Cliquez sur « VideoStudio Editor » pour capturer, éditer et graver vos films amateur.
2) Cliquez sur l’onglet « Capture » et vérifiez que votre Source est réglée sur ADS PTV-390 Capture Device. Comment fonctionne VideoStudio VideoStudio suit un paradigme progressif, conçu de sorte que les tâches d’édition restent simples du début jusqu’à la fin. En outre, VideoStudio offre également plus de cent effets de transition, capacités professionnelles de création de titres et simples outils de création de bandes son. Apprenez en quelques secondes, pour créer en quelques minutes.
L’interface utilisateur 1 Le panneau « Step » Il contient des boutons correspondants aux différents stades de l’édition de la vidéo. 2 La barre de menus Elle contient des menus offrant différentes séries de commandes. 3 Le panneau « Options » Il contient des commandes, boutons et informations diverses que vous pouvez utiliser pour personnaliser les réglages de la scène sélectionnée. Le contenu de ce panneau varie en fonction de la scène dans laquelle vous vous trouvez.
« Step Panel » VideoStudio simplifie la procédure de création de films, en la divisant en sept opérations simples. Pour passer de l’une à l’autre, cliquez sur les boutons contenus dans Step Panel. Lors de la création d’un projet dans VideoStudio, vous pouvez enregistrer directement la vidéo sur le disque dur de votre ordinateur dans Capture Setup. Il est possible de capturer les séquences d’une bande vidéo comme un fichier unique ou divisées automatiquement en fichiers multiples.
Capture en format DivX : 1) Dans le menu déroulant « Format », assurez-vous que vous sélectionnez DivX. Planification de votre projet vidéo DivX : Vous pouvez modifier la résolution de la vidéo ainsi que le réglage du débit de la vidéo pour ajuster la qualité ainsi que la taille du fichier de votre projet de capture vidéo. Vous désirez peut-être placer 2 heures de vidéo DivX sur un disque CD-R.
Opération nº 1 : réglage des propriétés de capture vidéo et audio 1) Cliquez sur le bouton « Options » puis sur « Video and Audio Capture Property Settings . . . » 2) Vérifiez que la « Input Source: » est correcte, si vous raccordez votre source analogique avec des câbles RCA, puis sélectionnez Video Composite et, si vous êtes raccordé à S-Video, sélectionnez Video S-video.
Opération nº 2 : réglage du débit binaire de DivX 1) Cliquez sur l’onglet « Capture » puis sur « Configure ». 2) Sélectionnez ensuite le mode de débit variable en cliquant sur la flèche de déroulement.
1-Pass Encoding : (PRÉCONISÉ) 1-Pass Encoding est la façon la plus rapide de coder votre vidéo en format DivX, au prix d’une certaine perte de qualité - cette fonction vous permet de régler un débit binaire moyen fixe que vous utiliserez pour le codage entier. Opération nº 3: réglage du débit binaire audio : 1) Sélectionnez « Ulead Mpeg-1 Layer2 » pour votre « codec » Audio Encode, puis cliquez sur « OK » pour terminer et sauvegarder vos réglages.
Opération nº 4: Début de la capture de votre Vidéo en format DivX : 1) Cliquez sur le bouton « Capture Video » la capture. pour commencer 2) Lorsque vous avez terminé, cliquez sur le bouton « Stop Capture » ou tapez simplement sur la touche ESC. 3) Vous pouvez maintenant graver votre propre CD. Comment faire pour graver le fichier DivX sur un CD ? Les fichiers DivX se sauvegardent en format .
Capture en format Windows Media Video (WMV) : Windows Media Video est un format généralement créé pour effectuer des transmissions vidéo sur l’Internet. La qualité de la compression étant très bonne, vous pouvez capturer des vidéos avec un débit faible (fichiers de petite taille) tout en maintenant une bonne qualité.
Opération nº 1. Personnalisez ou sélectionnez différents profils de qualité : 1) Cliquez sur le bouton « Options » puis sur « Video and Audio Capture Property Settings . . . » 2) Cliquez sur l’onglet « Capture » puis sur « Select . . . . » où vous verrez une liste de profils parmi lesquels vous pouvez effectuer votre sélection.
Opération nº 2. Commencer la capture de votre vidéo en format WMV : 1) Cliquez sur le bouton « Capture Video » la capture. pour commencer 2) Lorsque vous avez terminé, cliquez sur le bouton « Stop Capture » ou tapez simplement sur la touche ESC. 3) Vous pouvez maintenant graver votre propre CD*. * Pour écrire des fichiers Windows Media Video sur un CD, utilisez le logiciel de gravage de CD fourni avec votre PC ou votre graveur de CD.
Comment planifier votre projet VCD : VCD est un format créé spécifiquement pour placer des vidéos sur disque CD-R. La vidéo se trouve toujours en format MPEG-1, avec un débit binaire vidéo fixe de 1,15 Mb/sec. Vous pouvez capturer environ 70 minutes d’audio et vidéo pour remplir un CD-R de 700 Mo. En capturant la vidéo en format VCD avec Video Studio 8, vous pourrez facilement « partager » le film capturé et/ou édité sur CD.
2) Vérifiez que la « Input Source: » est correcte, si vous raccordez votre source analogique avec des câbles RCA, puis sélectionnez Video Composite et, si vous raccordé avec S-Video, sélectionnez Video S-video. 3) Avec l’onglet « Capture », le réglage VCD est sélectionné par défaut (préconisé), mais vous pouvez également personnaliser la taille de l’image en cliquant sur le réglage « Customize ».
Opération nº 2. Commencer la capture de votre vidéo en format VCD(MPEG-1) : 1) Cliquez sur le bouton « Capture Video » la capture. pour commencer 2) Lorsque vous avez terminé, cliquez sur le bouton « Stop Capture » ou tapez simplement sur la touche ESC. 3) Vous pouvez maintenant graver votre propre CD. Opération nº 3. Gravage de votre VCD sur disque : 1) Pour commencer à créer votre propre disque, cliquez sur l’onglet « Share », puis sur « Create Disc ».
2) Sélectionnez le menu désiré et créez vos propres titres, puis cliquez sur « Next ». 3) Cet écran vous permet de visualiser votre projet avant le gravage de votre disque : vous pouvez également le « sauter » en cliquant sur « Next ».
4) Vous pouvez maintenant renommer votre disque, puis sélectionner le lecteur où se trouve votre disque enregistrable et cliquer sur « Output » pour commencer le gravage. Nota : les disques VCD peuvent être lus dans la plupart des derniers modèles de lecteurs de DVD, vérifiez les spécifications de votre DVD. Pour des renseignements plus détaillés sur l’utilisation de VideoStudio 8, veuillez vous reporter à la notice sur le CD.
HELP RESOURCES: Video Studio Help – Press “F1” on your keyboard at any time. Video Studio User Manual – on CD ADS Web Site: www.adstech.com Support Online: We are constantly adding more information to the On-Line Help section of our web site. Click the “Support” button on the home page and select your product. Here you find support F.A.Q.’s with questions and answers to common issues, downloads, patches, manuals, and other resource material to help you get the most out of your product.
Service and Warranty: Service: If you require assistance with the installation, operation, or application of your ADS Technologies, Inc. product there are several options available to you as described in the technical support section of this manual. Your primary source for information and assistance is always your computer store or computer parts dealer. If your ADS product needs repair or replacement, contact your dealer for on-site repair service.
Warranty: This ADS Technologies, Inc. product comes with a One (1) year hardware warranty. ADS Technologies, Inc. (ADS) warrants this product against defects in material and workmanship for a period of One (1) year from the date of original purchase from ADS or an authorized ADS dealer. This warranty applies only to the original purchase of the product and is not transferable.
Phone: 562-926-4338 M-F: 8:00 am - 5:00 pm, PST www.adstech.com Support: www.adstech.com/support/support.asp SOUTHERN EUROPE AND MEA OFFICE 51-55 rue Hoche 94200 Ivry sur Seine, France Phone. 33+(0) 1.43.90.19.20 Fax. 33+(0) 1.46.58.67.06 Part No. 390-595 Tech www.adstech.