
USB Instant DVD User's Guide

25
CAPTURE WIZARD STEP-BY -STEP
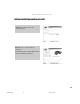
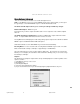
Audio/Video Delay Parameters
We have worked hard to ensure that audio and
video are in synch, but it is hard to predict
everyone’s system configuration and timing.
If the audio and video are not in synch you can
adjust the timing here.
Note:
1. Make adjustments with No Video Playing
2. Make small adjustments.
3 Change only one setting at a time; only audio
or only video.
4. Make small adjustments.
5. Watch the video carefully during capture and
playback so you can properly determine if audio
is ahead of the video or if the video is ahead of
the audio.
6. Watch both the preview and the captured
video. Often times the preview may be slightly
off, but the recorded file is fine.
7. Most corrections can be made by changing
ONLY the Audio timing.
8. During long captures you may see the lip
synch drift off a bit and then return to normal a
few minutes later. This will most likely not affect
your recording.
9. If you mess up, click the Reset button to
return to factory default settings.
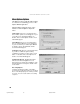
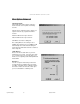
Video Capture Timing:
Making an adjustment here will control audio
and video timing during preview and capture.
1. Slide Audio or Video delay slider.
2. Click the Audio or Video button to set.
3. Click OK.
4 Click Preview to see the change.
5. Repeat steps 1-4 until you have perfect lip
synch.
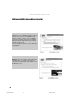
Video Playback Timing:
Making an adjustment here will control audio
and video timing during preview and capture.
1.) Slide Audio or Video delay slider.
2.) Click the Audio or Video button to set.
3.) Click OK.
4.) Click Preview to see the change.
5.) Repeat steps 1-4 until you have perfect lip
synch.
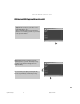
Control
The Control menu gives you another way to
control video recording and playback:
The selections are: Preview, Record, Stop,
Pause Play
Applications
The Applications menu gives you another way to
jump to bundled applications and you can also
change the path of these applications if you
happened to install them on a different drive.
1. Click the Applications menu button
2. Click on MyDVD or Video Studio to Jump to
the selected application. Capture Wizard will
automatically close when you do this.
3. Click the Edit button. This will show the
default or standard directory path the applica-
tions are normally installed.
4. To change the directory path click the box with
the “…” and you can browse to the directory path
you installed the application.
Menu Options
CapWiz manual.p65 6/4/2002, 12:22 PM25