
USB Instant DVD User's Guide


STORYBOARD 63
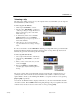
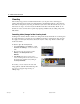
Capturing still images in the Storyboard Step
A still image can be captured in the Storyboard Step by selecting a specific frame in the
Timeline and saving it as an image file. In this manner, possible distortions are avoided since
the image is not acquired from a running video, unlike in the Capture Step.
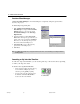
To capture still images:
1. Select a clip in your project.
2. Drag the Preview Bar to the frame you want
to capture.
3. Switch to an image folder in the Library. The
folder can be the default Image folder, or the
one created by yourself.
4. Click Save Still Image in the Options Panel.
The new image file is saved to the hard disk
and is represented as a thumbnail in the
image folder you assigned.
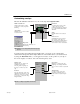
Using color clips
Color clips are simply solid colored backgrounds that are useful for titles and transitions. For
example, black clips can be used for an effective fade to black transition. Place your opening
credits over the top of the color clip and then use a cross fade effect to create smooth
transition into your movie.
You can insert a new color to the Color Library and control its duration just like an image clip.
Once a color clip has been inserted into the Library, you can drag it to the Timeline to put it
into your movie project.
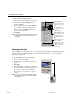
To insert a color clip in the Color Library:
1. Select Color from the folder list or click the
Storyboard menu arrow and select Color.
2. Click Load color to display the New Color
Clip dialog box.
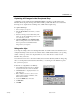
3. Here, click the color box to select a color
either from the Ulead Color Picker or the
Windows Color Picker.
4. Adjust the RGB values if needed.
5. Set Duration.
6. Click OK.
VS6-B.p65 6/4/2002, 12:23 PM63