
Service manual


APPENDIX
C
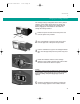
Changing the Voltage Selector
45
The voltage setting is designated at the factory before
shipping. If the voltage shown does not match your
power outlet, you must change the voltage selector
before plugging the instrument into the outlet. To
change the voltage selector:
1
Switch the power off and remove the power cord
from the power entry module.
2
Use a screwdriver to open the fuse access door
from the right end of the power entry module.
3
Use the screwdriver to pry the red voltage indicator
(also from the right side) from the power entry mod-
ule.
4
Rotate the indicator until the correct voltage
appears in the indicator window, then press it back
into the module until it clicks into place.
NOTE:
If necessary, change the fuses to match the new voltage setting. 100
or 120 V Setting: 1/4 Amp time-lag type (Type T) fuses (2 required).
220 or 240 V Setting: 1/8 Amp time-lag type (Type T) fuses (2
required).
5
Close the module door and check to ensure the
correct voltage appears in the indicator window.
M2672-2A 2005-02-11 17:29 Page 45