WARNING This manual contains information on limitations regarding product use and function and information on the limitations as to liability of the manufacturer. The entire manual should be carefully read.
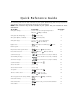
Quick Reference Guide The following chart lists the basic functions of your system alphabetically, and the keys to press for each function. Refer to the listed page number for more information. NOTE: Some functions may not be available on your system. Ask your installer for more information. To do this: Press this: See page: Arm system (Away): ................................ [access code], leave through entry/exit door OR press Away (if enabled) 7 Arm system (No Entry Delay): ..................
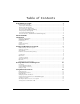
Tab l e o f C o n t e n t s Keypad Buttons & Lights 1 Displays (LCD Keypads): ........................................................................................................2 Status Lights (All Keypads): ...................................................................................................2 Number Pad (All Keypads): ..................................................................................................2 Function Buttons (All Keypads): ......................................
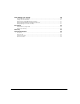
Customizing Your System 20 Programming Access Codes .................................................................................................20 Setting the Time and Date ...................................................................................................21 Changing the LCD5500Z Display Language .........................................................................21 Changing LCD5500Z Display Brightness/Contrast ................................................................
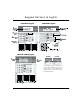
Keypad Buttons & Lights LCD5501Z Keypad LCD5500Z Keypad PC5532Z (LED) Keypad PC5508Z PC5516Z Your installer may have installed one of these LED keypads if you have 16 or fewer zones on your system. These keypads operate in the same way as the PC5532 keypad.
➊ Displays (LCD Keypads): Fixed Message Display (LCD5501Z Keypad) Shows the status of your security system using an LCD showing fixed words/icons and numbers. The display is described below. ➎ Arrow Keys (LCD5500Z Keypad Only): If “< >” appears, more information can be accessed by using the keys. Press to see the previous function or item of information. Press to advance the display to the next function or item of information.
About This Guide This Power864 User’s Guide is for anybody using a Power864 Security System. Read this guide thoroughly to learn how to use your security system. Ensure that all users of this system are equally instructed in its use. Important information about fire and burglary alarms is in section 3 on page 12. Read this section carefully! This guide provides step-by-step instructions for each function. Each key you need to press will be indicated by its symbol (e.g. ).
Section 1: Introduction Your security system can provide up to three kinds of monitoring: intrusion, fire, and emergency. We have designed your DSC Power864 security system to provide you with both flexibility and convenience. Your installer has set up your system with your home or business in mind. You may not need all of the features described in this manual. Your installer will only turn on the features that you need, and should explain all the active features to you.
In t r o d uc t io n : F ir e De t e cti on Fire Detection This equipment is capable of monitoring fire detection devices such as smoke detectors and providing a warning if a fire condition is detected. Good fire detection depends on having an adequate number of detectors placed in appropriate locations. This equipment must be installed in accordance with NFPA 72 (N.F.P.A., Batterymarch Park, Quincey MA 02269). Carefully review Section 6:“Fire Safety” on page 22.
Section 2: Arming and Disarming Your System This section describes how to perform the basic functions of your system: arming and disarming. Read this section carefully. Getting Ready to Arm Your System Before you arm your system, make sure that the system is Ready. You can tell that the system is ready when the Ready light is ON. If this is the case, you can arm your system - use one of the arming methods described on pages 7-9.
A r m in g an d D is ar m in g Y ou r Sy ste m : A r m in g Y o u r S ys t em Arming Your System There are two basic methods for arming your security system. • Away Arming: Use this method when everyone will be away from the premises. See below. • Stay Arming: Use this method when one or more people will stay on the premises. See page 8. You can also use any of these methods to arm your system (see pages 10 to 11): • Quick Arming: Arm your system without having to enter an access code.
Bell/Siren Sounds After Away Arming Audible Exit Fault In an attempt to reduce false alarms, the Audible Exit Fault is designed to notify you of an improper exit when arming the system in the Away mode. In the event that you fail to exit the premises during the allotted exit delay period, or if you do not securely close the Exit/ Entry door, the system will notify you that it was improperly armed in two ways: the keypad will emit one continuous beep and the bell or siren will sound.
A r m in g an d D is ar m in g Y o u r Sys t e m: Q u ic k Arm Re-activate bypassed zones To fully arm the system when it has been armed in Stay mode: 1. Press at any keypad. The interior zones are now armed. NOTE: When you have re-activated the interior zones, you will not be able to enter areas protected by motion detectors, or open doors and windows. To access these areas, you must enter your [access code] and disarm the system.
Automatic Arming Your installer may have set up your system to arm at a pre-programmed time. If automatic arming has been programmed, when the system reaches the programmed auto-arm time, the keypad buzzers will sound for one minute, and LCD5500Z keypads will display “System Arming in Progress”. During this one-minute warning time, you may be able to cancel or postpone auto-arming by entering your [access code]. Ask your installer for more information.
A r m in g an d D is ar m in g Y ou r Sy ste m : Q u ic k Ex it Quick Exit Your installer will tell you if the Quick Exit feature has been enabled on your system. The Quick Exit feature will allow you to exit the premises while the system is armed, without having to disarm and then re-arm the system. To use the Quick Exit feature: 1. While the system is armed, press . 2. The system will start a two-minute countdown, during which you may leave the premises through the entry/exit door.
Section 3: Dealing With Alarms and Emergencies If you return to the premises and the bell or siren is on - DO NOT ENTER. Contact local authorities from a nearby safe location. Read this section carefully so that you will know what to do if your system goes into alarm. Your installer will tell you if fire detection equipment has been installed and enabled on your system. NOTE: A fire alarm always has priority over an intrusion (burglary) alarm. Fire Alarms A pulsing bell or siren indicates a fire alarm.
Intrusion (Burglary) Alarms A steady bell or siren indicates an intrusion alarm. To silence the alarm: 1. Enter your [access code]. 2. If the alarm was unintentional, call your central station or local authorities immediately to avoid an unnecessary response. 3. Check the alarm memory display to see which zone caused the alarm. Once the source of the alarm has been corrected, the system will return to the Ready state.
Calling for Help All keypads have three pairs of emergency keys. Using these keys you can send an immediate Fire, Auxiliary or Panic message to your central station. Press both keys for two seconds to send a Fire message, and to trigger a fire alarm on the system. Press both keys for two seconds to send an Auxiliary message. Press both keys for two seconds to send a Panic message. IMPORTANT:The Fire, Auxiliary and Panic keys will NOT function unless turned ON by the installer.
Section 4: Using Advanced Functions This section describes how to perform more specialized functions: bypassing zones, turning the door chime on or off, viewing the trouble display and event buffer, and testing your system. NOTE: Your system may have cross zoning enabled. For more information, ask your installer.
Recalling Bypassed Zones Bypass Groups To recall the last set of bypassed zones: 1. Press , then your [access code] (if necessary). 2. Press . 3. To exit bypassing mode and return to the Ready state, press . A Bypass Group is a selection of zones programmed into the system. If you bypass a group of zones on a regular basis, you can program them into the Bypass Group, so that you do not have to bypass each zone individually every time. One Bypass Group can be programmed on each partition.
Us in g A dv an ce d F u nc t io n s : I de n t if y in g Tr ou b le C o nd i t io n s Identifying Trouble Conditions Your system continuously checks for a number of possible trouble conditions. If one of these trouble conditions occurs: • the Trouble indicator will be ON until the trouble is fixed; • the keypad will beep twice every 10 seconds until you press any key; • if AC power is lost, the Trouble LED will flash and the keypad buzzer will not sound.
Zone Light 7 8 Type Of Trouble Low zone battery. This trouble is generated when a wireless device has a low battery. This trouble only applies if you have wireless devices installed on your system. Press [7] one, two, or three times to view which devices are experiencing battery failure. The following will occur: Keypad beeps: Keypad displays: Press [7]1 Zones with low batteries Press [7] again2 Handheld keypads with low batteries Press [7] again3 Wireless keys with low batteries.
Us in g Ad v an ce d F u nc t io n s : A ll ow in g C o m pu t e r A cc es s t o Y o u r S ys t em LCD5500Z keypads will display the following message when each zone (detector) is activated: “Secure System Before Arming < >”, or “Secure System or Enter Code”. Use the keys to view which zones are open. The message will disappear when the zones are closed. On an LCD5501Z keypad, the display says “Open” when any zone (detector) is activated. To see which zones are open, press .
Section 5: Customizing Your System This section describes how to customize your system to your needs. Refer to this section for detailed instructions on: programming access codes, setting the time and date, and adjusting the keypad sounders and lights. Programming Access Codes The master code (code 40) can be used to program system options, arm and disarm the system and program other access codes. You can program up to 32 additional access codes (01 through 32).
Setting the Time and Date You should make sure that your system has the correct time and date. This is important for the auto-arm feature to function correctly, and for accurate reporting of events. 1. Press [Master Code] . 2. The keypad will now accept 10 consecutive digits: • Enter the time in hours and minutes using the 24-hour format (00:00 to 23:59). • Enter the date in months, days and years (MM DD YY). 4. To exit programming, press .
Section 6: Fire Safety Read this section carefully for important information about fire safety. Household Fire Safety Audit Most fires occur in the home. To minimize this danger, we recommend that a household fire safety audit be conducted and a fire escape plan be developed. 1. Are all electrical appliances and outlets in a safe condition? Check for frayed cords, overloaded lighting circuits, etc.
Section 7: Glossary Access code A 4- or 6-digit code that allows access to arming, disarming and other system functions. Alarm When a zone is violated (e.g., a smoke detector detects smoke, a motion detector senses movement, a door with a contact is opened), it will trigger an alarm. Intrusion (burglary) alarm: An alarm triggered by an intrusion detector (e.g., motion detectors, glassbreak detectors, door/window contacts). Usually occurs when the system is armed.
Exit delay A timer programmed by your installer. It starts when you arm your system, to allow you a period of time in which to leave the premises. At the end of the exit delay, the system will be armed. Master code The master code is a 4- or 6- digit access code that is used to program system options, to arm and disarm the system, and to program other access codes. Partition A group of zones that can be turned on or off together. Certain access codes may have access to only some partitions. See Zone.
Section 8: System Information Fill out the following information for future reference and store this guide in a safe place.
Zone Information There are ________ active zones on the system.
Index A Access codes adding 20 changing 20 defined 23 erasing 20 Master code 24 programming 20 Alarm defined 23 false 12 fire 12 intrusion 13 memory 13 viewing 13 Arming automatic 10 away 7 getting ready 6 no entry delay 9 quick 9 stay 8 Automatic arming 10 Auxiliary keys 14 Away arming 7 B Bells testing 18 Buttons on keypad 1 Bypass group 16 Bypassing zones 15 C Central station 5 defined 23 Cleaning the system 5 Codes See Access codes Computer access to system 19 D Date clearing display 21 setting 21 De
Limited Warranty Digital Security Controls Ltd. warrants the original purchaser that for a period of twelve months from the date of purchase, the product shall be free of defects in materials and workmanship under normal use. During the warranty period, Digital Security Controls Ltd. shall, at its option, repair or replace any defective product upon return of the product to its factory, at no charge for labour and materials.
WARNING Please Read Carefully N o te t o In stal le rs This warning contains vital information. As the only individual in contact with system users, it is your responsibility to bring each item in this warning to the attention of the users of this system. S yst em Fai lu res This system has been carefully designed to be as effective as possible. There are circumstances, however, involving fire, burglary, or other types of emergencies where it may not provide protection.
NOTES
Industry Canada Statement NOTICE: The Industry Canada label identifies certified equipment. This certification means that the equipment meets certain telecommunications network protective, operational and safety requirements. Industry Canada does not guarantee the equipment will operate to the user’s satisfaction. Before installing this equipment, users should ensure that it is permissible to be connected to the facilities of the local telecommunications company.