
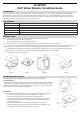
Installation Guide


2
Double tape installation procedure
To obtain optimum adhesion, the bonding surfaces must be well unified, clean and dry.
After application, the bond strength will increase as the adhesive flows onto the
surface. At room temperature, the ultimate strength will be achieved 100% after 24 hours.
5. Once Water probes are in position, use the included adhesive pad to secure the main
unit to a clean, dry surface. (Figure 9)
6. Complete. (Figure 10)
1. The White LED will stay off during the normal operation.
2. When the probes come into contact with water, Water Detector will transmit an alarm signal to the Control Panel, and raise alarm with its
built in buzzer.
3. Whenever the water level subsides, the Water Sensor will transmit an alarm restore signal and stop the alarm.
4. After the water has subsided and the probes are no longer in contact with water, the Water Detector will send a restore signal to the
Control Panel to indicate the water condition has been restored. The Water Detector then returns to Normal Operation Mode.
If Water Detector needs to reset to factory defaulted (for example, to prepare it for joining with a home controller or security system).
Reset to Factory Defaults
1. Open Water Detector top cover.
2. Press the pairing button for 10 seconds then release the button.
4. The White LED will be blinking for 3 seconds when the device is reset successfully.
5. The sensor will now be reset to factory defaults and will initiate pairing mode.
Note: Replace Battery with CR123A only. Use of another battery may negatively impact the performance of the product.
RISK OF EXPLOSION IF BATTERY IS REPLACED
BY AN INCORRECT TYPE. DISPOSE OF USED BATTERIES ACCORDING
TO THE INSTRUCTIONS
Reboot the Water Detector
Operation
Caution
Figure 7
Figure 8
Figure 9
Figure 10