
Specifications


SIP2 Authentication
BlueSecure™ Controller Setup and Administration Guide 6-11
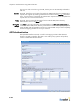
Displaying the
New SIP2
server page
1. Click the User authentication tab in the BSC administrator console.
2. Select External SIP2 Authentication from the Create drop-down list on the User
authentication page. The New SIP2 server page appears as shown in Figure 6-2.
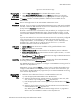
Enable server The Enable checkbox is marked by default to make the server available for user
authentication.
Name Enter a meaningful name for the external SIP2 authentication server.
Precedence Optional. If you are setting up multiple SIP2 authentication servers and need to establish
the order in which the BSC checks the servers for user authentication, select the server's
priority from the Precedence drop-down list.
Note that 1 means the server is checked first. The precedence you configure here does
not apply to Transparent NTLM Windows logins, Transparent 802.1x logins, or local
users in the BSC database, because these authentication schemes are always checked
first.
If you set a Precedence for a server that is the same as that set for a previously configured
server, the previous server's Precedence, and that of all servers having a lower
configured precedence, is incremented by 1. For example, if server A already has a
Precedence of 1 and server B's is 2 and you then set server C's to 1, server A's
Precedence becomes 2 and server B's becomes 3.
SIP2 server
settings
1. Server address: Enter the server's IP address or fully qualified domain name.
2. Port: Enter the server’s port number.
3. Validate PIN/password: Mark this checkbox to validate the patron’s credentials.
4. Enable CP Location Code: Mark this checkbox to enforce patron location, i.e. restrict
the patron to a specific library.
5. Server Username and Server Password: Enter the server login credentials.Re-enter the
password in the Confirm password field.
Accounting To enable RADIUS accounting for this server, select the name of the external RADIUS
accounting server from the Accounting server drop-down list.
See “RADIUS Accounting” on page 7-1 to configure a new RADIUS accounting server for
selection in the drop-down list.
Alternatively, you can select the Create… option to open a window that enables you to
configure a new RADIUS accounting server. After you save the server information, you
are returned to the New SIP2 server page where you can select the RADIUS accounting
server from the drop-down list.
Mapping SIP2
attributes to
roles
1. Define the rules to determine if the user is authenticated.For each rule:
a) Enter the appropriate SIP2 attribute in the Attribute field.
b) Select the appropriate logic operator (equal to, not equal to, starts with, ends
with, contains, or [is a role]) from the Logic drop-down list.
c) Enter the appropriate value to check against the specified attribute in the Value
field.
d) Select the role to assign to the user if the rule evaluates as true and the user is
authenticated from the Role drop-down list.
See “Defining User Roles to Enforce Network Usage Policies” on page 8-2 to
define a new role available for selection in the drop-down list.
Figure 6-3: New SIP2 Server Page