
Specifications


Chapter 6: Authentication Using External Servers
6-18
New
Transparent
802.1x server
page
1. Click the User authentication tab in the BSC administrator console.
2. Select Transparent 802.1x Authentication from the Create drop-down list on the User
authentication page.
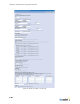
The New Transparent 802.1x server page appears as shown in Figure 6-7.
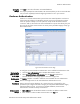
Enable server The Enable checkbox is checked to make the server available for user authentication.
Name Enter a meaningful name for the Transparent 802.1x authentication server.
Transparent
802.1X server
settings
Server address: Enter the server's IP address or fully qualified domain name.
Port: Enter the server’s port number.
Accounting To enable RADIUS accounting for this server, select the name of the external RADIUS
accounting server from the Accounting server drop-down list.
See “RADIUS Accounting” on page 7-1 to configure a new RADIUS accounting server for
selection in the drop-down list.
Alternatively, you can select the Create… option to open a window that enables you to
configure a new RADIUS accounting server. After you save the server information, you
are returned to the New Transparent 802.1X server page where you can select the
RADIUS accounting server from the drop-down list.
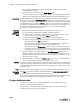
Mapping
Transparent
802.1X
attributes to
roles
1. Define the rules to determine if the user is authenticated.For each rule:
a) Enter the appropriate Transparent 802.1x attribute in the Attribute field. The
following attributes are available for matching:
• Login Name - Use for LEAP or MD5 EAP methods only.
• Common Name - Use for TLS EAP methods only. This is the common name
contained in the user's TLS certificate.
• Email Address - Use for TLS EAP methods only. This is the email name which
may be contained in the user's TLS certificate.
Figure 6-7: New Transparent 802.1x Server Page