
Specifications


Configuring VoWLAN QoS
BlueSecure™ Controller Setup and Administration Guide 9-3
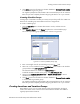
Polycom/Avaya
IP phone settings
Mark the Enable support for Polycom/Avaya IP phones checkbox if your wireless clients
are passing Polycom/Avaya IP phone traffic through the BSC and configure the following
settings:
Polycom/Avaya gateway IP address or hostname - Enter one or more IP addresses/
hostnames of the Polycom gateway(s) on your network as a comma delimited list
Polycom/Avaya SVP server IP address or hostname - Enter one or more IP addresses/
hostnames of the Polycom Voice Priority (SVP) server(s) on your network as a comma
delimited list.
Note: If you are using the BSC Replication feature, make sure that for each replicated
node, you override the replicated gateway and server IP addresses for Polycom/Avaya.
See “Configuring a Replication Override” on page 14-15.
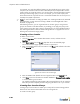
Cisco IP Phone
Settings
Mark the Enable support for Cisco IP phones checkbox if your wireless clients are passing
Cisco IP phone traffic through the BSC.
Vocera Badges
Settings
Mark the Enable support for Vocera Badges checkbox if your wireless clients are passing
Vocera IP phone traffic through the BSC, and then enter the IP address/hostname of the
Vocera server on your network in the Vocera server IP address or hostname field.
Policy settings Select the Role into which IP phone users are authenticated from the drop-down.
By default, IP phone users are authenticated into the IP Phones role. See “Defining User
Roles to Enforce Network Usage Policies” on page 8-2 for information about configuring
a role to enforce network usage policies for the IP Phones role.
Saving the
settings
Click Save to save the IP phone settings to the BSC database.
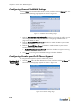
Configuring VoWLAN QoS
To configure QoS to reduce network delay, jitter, errors, lost, and retransmitted packets:
1. Make sure that the Prioritize Voice and Video Traffic checkbox is marked on the
VoWLAN General Settings Page (displayed by clicking the Voice tab and then the
General tab).
2. Specify an SSID for Voice traffic. Click the Wireless tab, click the SSID tab, and then
either (a) select SSID from the Create drop-down menu to display the Create new
SSID Page or (b) select the pencil icon next to an existing SSID to display the Edit
SSID page. On either the Edit SSID page or the Create SSID page, select Voice from
the Default QoS for SSID drop-down menu.
3. Enable call admission control for a single BSAP or for all BSAPs. For all BSAPs, click
the Wireless tab, click the Global tab, and then click the System link at the top of the
page to display the Edit AP System Settings - Global Page (see “Configuring Global
Miscellaneous Non-Radio Settings” on page 12-8). For a single AP, click the Wireless
tab, click the AP tab, and then click the pencil icon next to an AP to display the Edit
AP System Settings page (See “Editing Settings for an Individual BSAP” on page 12-
19))or select AP from the Create drop-down to display the Create New AP Page (see
“Creating BSAPs” on page 12-24).
a) Mark the Enable WMM and Voice Call Admission Control? checkbox.
b) Enter the maximum number of Voice Sessions per BSAP.
c) Enter the maximum number of Video Sessions per BSAP.