
Specifications


Creating a BlueProtect Policy
BlueSecure™ Controller Setup and Administration Guide C-5
)
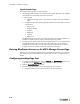
Note: Any URL that appears in this window will be automatically allowed for
clients in the Unregistered role. This allows a client to download Java. By default,
a link is provided for Windows clients. If you are supporting MAC OS X or Linux
clients, add the appropriate Java download URLs.
• Add any specific text for your network such as the email address of the network
administrator
• Specify in text form all remediation sites. You can also add links to download
local copies of anti-virus software.
• Specify exactly the client software that is required. For example if you require
Symantec anti-virus, indicate this in landing text so that clients that fails the virus
scan will know what software they need.
4. Mark the Deny Non-Supported Clients checkbox to deny access to non-supported
users and redirect them to the landing page. For example, if you mark this checkbox,
IPhones will not be allowed to connect to your network.
5. Mark the Enable auto-update capability checkbox to check for updates nightly.
6. Click Save.
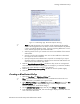
Creating a BlueProtect Policy
1. Select the User Roles tab, BlueProtect Policies tab.
)
Note: If you do not have a BlueProtect license, the BlueProtect Policies tab is not
visible and a link is provided for you to get a license.
2. Select BlueProtect Policy from the Create drop-down. The General section of the Edit
BlueProtect policy page is displayed. (The page is used to configure General,
Antivirus, Antispyware, and Firewall settings.)
3. On the Edit BlueProtect policy page, enter the policy Name and Description.
4. In the Remediation message field, enter the message to display to the user when the
scan of the client device fails.
Figure C-1: HTTP Settings Page - BlueProtect Endpoint Scanning