
Specifications


Appendix C: Endpoint Scanning
C-6
5. Select the Save button.
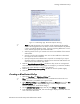
6. To configure Antivirus, Antispyware, or Firewall settings, click the link for your
platform at the left of the page. For example, the Edit BlueProtect policy page
redisplays as shown in Figure C-2 when you click the Antivirus Windows link:
7. Mark the Enable Antivirus Category checkbox
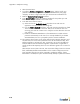
8. In the Select Products scrolling list, mark the checkbox for the product you want
BlueProtect to verify is installed on the wireless client.
9. In the Real Time Protection section:
a) Select Yes from the Enable RTP checks drop-down list to make sure the
application is not just installed, but running also.
b) From the If RTP is Disabled drop-down, select the action that should occur if Real
Time Protection is disabled on the client: Restrict user to block the user from
accessing your web site or Warn user to notify the user but allow them to access
your web site.
c) Enable or Disable Auto-Remediation to force BlueProtect to enable real time
protection automatically on the client if it is currently disabled. If you disable
Auto-Remediation, the user is prompted to perform manual remediation.
10. The remaining three sections on the page, Data File Time, Data File Signature, and
Last Scan time, are used to warn/restrict the user if the Virus Definition Time, Virus
Definition Signature, and Last Scan Time, respectively, are too old. The difference
between Data File Time and Data File Signature is that the latter is applicable to
specific products like Kaspersky which use virus definition signature as a counter for
viruses.
Select Yes/No to warn/restrict the user, enter the number of days/revisions in the text
field, and Disable/Enable Auto Remediation. If the number of days/revisions has
been exceeded, then the user will be prompted to update the software. If Auto
Remediation is enabled, the system will automatically attempt to update the software.