
Troubleshooting guide
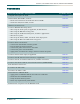


Section 6, User Interface Guide - NTP-001, Shelf and SCU Installation
61186003L1-1D 6-5
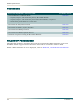
PROCEDURE
Perform the Steps Below in the Order Listed: For details, refer to:
1. Unpack and inspect the shelf. DLP-500
2. Mount Shelf, Heat Baffle, and Fan:
• Mount the brackets for the shelf and the heat baffle.
• Install the shelf, heat baffle, and fan.
DLP-501
3. Remove the metal cover. DLP-502
4. Connect MX2820 Wire-Wrap Posts:
• Wire wrap the Chain posts, if applicable, for RS-485 bus.
• Wire wrap the MIN alarm relay posts.
• Wire wrap the CLKB and CLKA posts, for STS-1 applications.
• Wire the ACO posts.
• Wire wrap the AUX3, AUX2, and AUX1 alarm input posts.
• Wire wrap the MAJ and CRIT alarm relay posts.
DLP-506
5. Connect Power and Ground:
• Connect the Fan Module to frame ground.
• Test the frame ground connection.
• Connect the power and return to the shelf.
• Connect the power to Fan Modules.
• Apply power and check the voltage, and then remove the power.
DLP-503
6. Connect the fan alarm input, if applicable. DLP-711
7. Connect the RS-485 Bus between shelves, if applicable. DLP-712
8. Connect the RJ-45 cable for Ethernet 10/100Base-T interface. DLP-708
9. Connect the DB-25 cable for X.25 network interface (NTWK MGMT). DLP-714
10.Re-install the metal cover. DLP-502
11.Connect the DS3 cable. DLP-709
12.Connect the DSX-1 cable. DLP-706
13.Install SCU in MX2820 Shelf
• Apply power to MX2820 shelf for SCU self-test verification.
• Install the SCU in MX2820 shelf.
• Verify the SCU self-test passes.
• Insert any required front panel blanks.
DLP-504
14.Perform the acceptance test for MX2820 shelf. DLP-601