
Troubleshooting guide


Section 7, User Interface Guide - DLP-504, Install SCU in MX2820 Shelf
61186003L1-1D 7-29
CAUTION
Attempting to insert the SCU in any other slot can damage the SCU
and the backplane pin connectors.
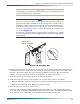
NOTE
The SCU can have a “key” screwed into the top of the module to
prevent inadvertent installation in the wrong slot. It works with an
MX2820 chassis which has an extra slot to accommodate the key.
If an SCU is to be inserted into a chassis that does not accommodate
the key, it will be necessary to remove the key by first removing its
screw. See
Figure 7-5.
If removed, use precaution to prevent SCU insertion into a MUX
slot; this will result in bent backplane pins and possible equipment
replacement.
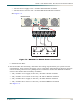
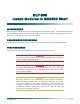
Figure 7-5. SCU Slot Key
6. Gently but firmly push the SCU into the second slot on the front-left of the shelf. This slot
is labelled for the SCU. Simultaneous thumb pressure at the top and bottom of the SCU
ensures a good seat of the SCU pins into the backplane connector. Be sure the latch
engages securely. The latch must be pressed firmly to snap it into place.
7. Push the ejector up and closed against the SCU front panel.
8. Verify SCU self-test passes. The sequence on the SCU front panel is as follows:
• ACT and ALM LEDs sequence from green to red to amber for approximately 15 seconds.
• Both LEDs extinguish, then ACT LED changes to green.
9. Insert blank front panels for vacant slots.
Insert the Clock Module blank front panel(s), P/N 1186011L1, into the first slot on the
front-left of the shelf if the Clock Module will not be used. Insert the MX2820 MUX blank
front panel(s), P/N 1186010L1, into the MUX slots that will not be used.
1186002
MUX
ALM
ACT
1186003
SCU
ALM
ACT
1186004
CLK
ACT
SCU SLOT KEY
Remove Key if
Chassis not slotted