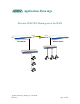
Application Drawings Netvanta 3200/3205: Routing across the WAN 10.0.0.1 10.0.0.2 T-1 192.168.1.254 192.168.2.
Overview This application drawing shows how to use NetVanta 3200s or NetVanta 3205s in a scenario where there is a point-to-point T-1 that is used for data. The IP addresses used in the configuration script and configuration steps are just examples and maybe modified to fit your network. Table of Contents Configuration steps using the web interface for NetVanta 3200/3205 “Host Router”:...... 3 Configuration Script for the NetVanta 3200/3205 “Host Router”: ..................................
Configuration steps using the web interface for NetVanta 3200/3205 “Host Router”: 1. Choose "Physical Interfaces" from the left hand side menu options. 2. Choose "eth 0/1" from the list of physical interfaces displayed. 3. Under the "IP Settings" section type in the new "IP Address" and "Subnet Mask" you would like to use. In the application drawings example the IP address 192.168.1.254 is used.
. Press the “Apply” button. Note: If you choose to change the IP address of Ethernet 0/1, you will need to change the IP address of your workstation to an IP on the same network as Ethernet 0/1 to continue configuring the router. 5. Choose "Physical Interfaces" from the left hand side menu options. 6. Choose "t1 1/1" from the list of physical interfaces displayed.
7. Checked the box next to "Enable".
8. Next to “Clocking” choose “Internal”.
9. Choose "1" in the first drop down next to "Data DS0s" and "24" in the second drop down.
10. Choose "PPP" next to "Encapsulation".
11. Press "Apply" and new screen will appear that is titled "PPP Configuration for ppp 1".
12. Under the "IP Settings" section change "Address Type" to "Static". 13. Fill in the "IP Address" and "Subnet Mask" you would like to use. In the example it would be 10.0.0.1 and 255.255.255.
14. Press "Apply". 15. Choose "Route Table" from the left hand side menu options.
16. Fill in 192.168.2.0 for the "Destination Address" and 255.255.255.0 for the "Destination Mask". 17. Choose "Address" under "Gateway" and type 10.0.0.
18. Press "Add". 19. Configuration is now done and all that left to do is choose "Save" in the upper right hand corner.
Configuration Script for the NetVanta 3200/3205 “Host Router”: ! ! hostname "HostRouter" enable password adtran ! ip subnet-zero ip classless ip routing ! event-history on no logging forwarding no logging email logging email priority-level info ! username "admin" password "adtran" ! ip policy-timeout tcp telnet 14400 ! ! ! ! ! ! ! ! ! ! ! interface eth 0/1 ip address 192.168.1.254 255.255.255.
! ! ! ! ip route 192.168.2.0 255.255.255.0 10.0.0.
Configuration steps using the web interface for NetVanta 3200/3205 “Remote Router”: 1. Choose "Physical Interfaces" from the left hand side menu options. 2. Choose "eth 0/1" from the list of physical interfaces displayed. 3. Under the "IP Settings" section type in the new "IP Address" and "Subnet Mask" you would like to use. In the application drawings example, the IP address 192.168.2.254 is used.
4. Press the “Apply” button. Note: If you choose to change the IP address of Ethernet 0/1, you will need to change the IP address of your workstation to an IP on the same network as Ethernet 0/1 to continue configuring the router. 5. Choose "Physical Interfaces" from the left hand side menu options. 6. Choose "t1 1/1" from the list of physical interfaces displayed.
7. Check the box next to "Enable", to enable the interface.
8. Select "1" in the “Data DS0s” drop down list and "24" in the second drop down.
9. Choose "PPP" from the "Encapsulation" options.
10. Press "Apply" and a new screen will appear to configure the PPP interface.
11. Under the "IP Settings" section change the "Address Type" to "Static". 12. Fill in the "IP Address" and "Subnet Mask" you would like to use. In the application drawings example the IP address and subnet mask would be 10.0.0.2 and 255.255.255.252 respectively.
13. Press "Apply", when done. 14. Choose "Route Table" from the left hand side menu options.
15. Using the information for the application drawings example, fill in 0.0.0.0 for the "Destination Address" and 0.0.0.0 for the "Destination Mask". 16. Choose "Address" under the "Gateway" and type 10.0.0.
17. Press "Add". 18. Configuration is now done and all that left to do is choose "Save" in the upper right hand corner.
Configuration Script for the NetVanta 3200/3205 “Remote Router”: ! ! hostname "RemoteRouter" enable password adtran ! ip subnet-zero ip classless ip routing ! event-history on no logging forwarding no logging email logging email priority-level info ! username "admin" password "adtran" ! ip policy-timeout tcp telnet 14400 ! ! ! ! ! ! ! ! ! ! ! interface eth 0/1 ip address 192.168.2.254 255.255.255.
! ! ! ! ip route 0.0.0.0 0.0.0.0 10.0.0.