
Technical data


90362-01 NetBlazer LS Configuration Worksheets B-15
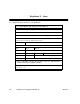
Worksheet 12. Dedicated IP Protocol
To configure your NetBlazer so it can use a dedicated line to route IP packets:
1. Set NetBlazer name and password (Worksheet 1) and configure NetBlazer LAN
protocols (Worksheet 2, Worksheet 3, or Worksheet 4).
2. Set up the interface as shown in the Dedicated LAN-to-LAN Interface Worksheet
(Worksheet 11).
3. On the Dedicated Interface screen, select “Protocol details”; if you go to the
Protocol Details screen, select “IP routes”.
4. On the IP Routes screen, type the address of a new IP route, then set that route’s
Public and Metric settings on the IP Route Details screen.
Route Address/Bits Public Metric (hops)
❏
default
❏
Yes
❏
No
______ . ______ . ______ . ______ / ______
❏
Yes
❏
No
______ . ______ . ______ . ______ / ______
❏
Yes
❏
No
______ . ______ . ______ . ______ / ______
❏
Yes
❏
No
______ . ______ . ______ . ______ / ______
❏
Yes
❏
No
______ . ______ . ______ . ______ / ______
❏
Yes
❏
No
Type “default” in place of a route number if you only need to add a single default route
for all the traffic from your network to the remote network.
If you have additional routes, copy this page and fill out the fields shown above with the
additional information.
Your
Local
Network
The
Remote
Network
Dedicated or
leased line
NetBla