
Technical data


B-18 NetBlazer LS Configuration Worksheets 90362-01
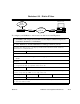
Worksheet 15. Frame Relay Connections
To configure your NetBlazer to use a Frame Relay connection:
1. Set NetBlazer name and password (Worksheet 1) and configure NetBlazer LAN protocols
(Worksheet 2, Worksheet 3, or Worksheet 4).
2. If necessary, set the line you want to use for Frame Relay to be a sync line (Worksheet 5).
3. Select “Dedicated LAN-to-LAN” from the Main Menu screen.
4. Move to a sync line (or a line you’ve set to be sync) and type “frame” in the INTERFACE
column to see the Frame Relay screens.
5. In the Frame Relay Connection screen enter a name for the frame relay interface, then set the
DLCI.
If you have additional connections you need to configure, copy this page and fill out the fields shown
below with the additional information.
Interface name
DLCI
6. Type the name of an existing dial-up LAN-to-LAN connection in the “Dial backup” field.
Dial backup
If you need to create a new dial-up LAN-to-LAN interface to use as a dial backup for this interface, use
Worksheet 7, Worksheet 8, Worksheet 9, and Worksheet 10 to organize the information you need to
configure the new dial-up LAN-to-LAN connection.
7. Move to “Line management” and press the Spacebar to select a line management type.
Line management
❏
LMI
❏
ANSI
❏
none
8. Select “Protocol details” and continue configuring the current connection for your protocols
using Worksheet 12, Worksheet 13, and Worksheet 14.
Your
Local
Network
The
Remote
Network
Frame
Cloud
Relay