
User's Manual


TRACER 2 x E1 User’s Manual
61280004L2-1C
Section 2 Installation
18
SETTING THE RFC FREQUENCY PLAN ON NON 1 WATT 2.4 GHZ MODELS
The frequency plan designates on which frequencies the TRACER transmits and receives. Plan A
corresponds to a transmitting (Tx) center frequency of 2422 MHz and a receive (Rx) center frequency of
2462 MHz. Plan B corresponds to a Tx center frequency of 2462 MHz and a Rx center frequency of
2422 MHz. Shipment of a link consists of one RFC set to Plan A and the other set to Plan B unless
specified otherwise. The RFC plan can, however, be changed in the field if required. This procedure
involves reconfiguring the RFC interconnect cables.
For rackmounted systems, do the following to reconfigure the RFC interconnect:
1. Remove the six screws which retain the RFC cover and remove the cover.
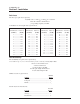
2. The RF unit may be identified by following the connection from the port labelled “IF” on the
rear of the RFC. This connection terminates at the RF unit. The diplexer may be identified
by following the connection from the “Antenna” port on the rear of the RFC. This
connection terminates at the diplexer, illustrated in Figure 2-2.
3. Unscrew the cable assemblies from the ports labelled “Tx” and “Rx” on the RFC, and the
ports labelled “J1” and “J2” on the diplexer, depending on the frequency Plan (Plan A or
Plan B).
4. Unscrew the cable assembly from the port labelled “ANT” on the diplexer.
5. Remove the four screws from the bottom of the RFC that hold the diplexer in place.
6. Turn the diplexer over revealing the opposite frequency plan (from Plan A to Plan B, or vice
versa).
7. Realign the diplexer with the screw holes and replace the four screws that attach it to the
bottom of the RFC.
8. Reattach the loose cable assembly (from step 4) to the port labelled “Antenna” on the
diplexer. Minimum bend radius on cables is 3/4 inches (2 cm). Exercise care in handling
and forming bends in these cables.
Figure 2-2. 2.4 GHz Diplexer
A
N
T
J2
J
1