
Quick Start Guide


e
reliant la sortie PRE-OUT à l’entrée AMP-IN.
PRE OUT / PREAMPLIFIER OUTPUTS
If you want to use a more powerful power amplifier and use the A-60 as a preamplifier, connect it
to the PRE OUT jacks, and connect all speakers to the power amplifier. You need to remove the U
bridge first between PRE-OUT and AMP IN.
AMP. IN / POWER AMPLIFIER IN
Si vous souhaitez utiliser uniquement la section amplificateur de puissance de votre
A-60, connecter sur les prises L/R AMP IN votre autre préamplificateur ou table de mixage audio.
AMP. IN / POWER AMPLIFIER IN
If you only want to use the power amplifier section of your A-60, you can connect another preampli-
fier or audio mixer on L/R AMP. IN jacks.
SORTIE REC
Il s’agit d’une sortie ligne fixe analogique (le signal ne varie pas avec le potentiomètre de volume).
Permet de raccorder un enregistreur de type cassette, MD, etc...
REC OUTPUT
This analog audio ouput are for connecting a recorder with an analog audio input such as a cassette
deck, MD recorder, etc. The output signal is not variable.
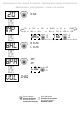
BORNIER HAUT-PARLEURS
Brancher des enceintes ayant une impédance minimale de 4 ohms. Brancher l’enceinte droite aux
bornes repérées ‘R +’ et ‘R-’ en s’assurant que ‘R+’ est reliée à la borne ‘+’ de l’enceinte et ‘R-’ est
reliée à la borne ‘-’ de cette même enceinte. Brancher le haut-parleur gauche aux bornes repérées
‘L+’ et ‘L-’ en procédant de la même manière.
On peut utiliser les bornes serre-fils pour courants élevés comme bornes à vis pour les câbles com-
portant des cosses plates, des broches, des prises “banane“, ou pour des câbles comportant des
fils nus.
Les fils nus et les broches s’insèrent dans le trou diamétral percé dans la tige de la borne.
Desserrer la bague en plastique jusqu’à ce que le trou dans la tige soit visible. Insérer la
broche ou le fil nu dans le trou, puis fixer le câble en vissant la bague de la borne.
Eviter tout risque que le métal nu des câbles de haut-parleurs ne touche la face arrière ou
un autre connecteur. S’assurer que la longueur dénudée ou la longueur de la broche ne
dépasse pas 1/2” (1 cm) et qu’il n’y a aucun brin libre.
SPEAKER TERMINALS
Connect speakers with impedance of 4 Ohms or greater. Connect the right
speaker to the terminals market ‘R +’ and ‘R-’ ensuring that the ‘R+’ is connected to the
‘+’ terminal on your loudspeaker and the ‘R-’ is connected to the loudspeaker’s ‘-’ terminal. Connect
the terminals marked ‘L+’ and ‘L-’ to the left speaker in the same way.
The high current binding post terminals can be used as a screw terminal for cables
terminating in spade or pin connectors or for cables with bare wire ends.
SPADE CONNECTORS
These should be slotted under the terminal’s screw bushing, which is then fully tightened.
Ensure the connector is tightly secured and there is no danger of bare metal from spade
connectors touching the back panel or another connector as this may cause damage.
BARE WIRES AND PIN CONNECTORS
Bare wires and pin connectors should be inserted into the hole in the shaft of the terminal.
Unscrew the speaker terminal’s plastic bushing until the hole in the screw shaft is revealed. Insert
the pin or bare cable end into the hole and secure the cable by tightening down the terminal’s
y
u