
User's Manual


SECTION 4. INSTALLATION INSTRUCTIONS
Floor mounted units with baseframes, lift & turn, lift & tilt and tilt units:
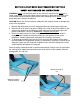
1. Move the lift to the usage area; insuring the floor is clean and level. If slings are
used, encircle the entire lift, not just the platform.
Caution! Before securing the unit to the floor, shim or grout the entire baseframe
assembly. Continuous baseframe support is essential for proper installation.
2. Connect the air supply line to the control valve. Recommended air pressure is 70
PSI @ 20 SCFM. Maximum air pressure is 100 PSI for lifting rated load.
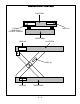
3. Using the control valve, fully raise the lift and insert the maintenance bars.
CAUTION!
See page (P 6-3) for complete instructions on using the maintenance bars.
4. Lag the unit in place using ½” x 5”, “Rawl-Studs” or wedge anchors in the holes
provided.
5. Clean any debris remaining from installation. Remove maintenance bars and lower
the unit.
6. Instruct user(s) in the proper operation of the lift, safety precautions, and equipment
capacity. Supply maintenance personnel with this service manual.
Pit mounted units:
1. Check all pit dimensions for accuracy.
2. Attach a temporary air line through the pit conduit to the lift.
3. Using slings, encircle the entire lift, not just the platform and lower the lift into the pit,
centering it for 1” minimum clearance on all sides to the pit wall.
4. Raise the lift with the control valve and remove the slings. Run the unit up and down
several times to insure proper clearances on pit walls.
5. Fully raise the unit and insert maintenance bars, lower unit onto the bars and
discharge air until air pressure is relieved from the system. CAUTION! See page (P
6-3) for complete instructions for proper maintenance bar instruction.
6. Level and center the lift by shimming and grouting the entire baseframe, not just the
corners. Lag the unit in place using ½” x 5”, “Rawl-Studs” or wedge anchors in the
holes provided.
Caution! Continuous baseframe support is essential for proper installation
7. Follow the instructions outlined in paragraphs 5 and 6 under “Floor mounted
installation”. To complete the installation.
P 4-1