
User's Manual


19
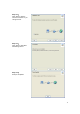
For 3G WAN Networking. The WAN fields may not be necessary for your connection. The
information on this page will only be used when your service provider requires you to enter a
User Name and Password to connect with the 3G network.
Please refer to your documentation or service provider for additional information.
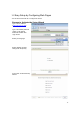
1. Dial-Up Profile: Select “Auto-Detection” or “Manual” to continue. If “Auto-Detection” is
selected, the device will try to configure some ISP specific dial-up parameters
automatically according to the Country, Telecom, and 3G Network information you
entered..
2. Country: Select your country.
3. Telecom: Select your telecom.
4. 3G Network: Select the 3G Network
5. APN: Enter the APN for your PC card here.(Optional)
6. Pin Code: Enter the Pin Code for your SIM card. (Optional)
7. Dial-Number: This field should not be altered except when required by your service
provider.
8. Account: Enter the new User Name for your PC card here, you can contact to your ISP to
get it. (Optional)
9. Password: Enter the new Password for your PC card here, you can contact to your ISP to
get it. (Optional)
10. Authentication: Choose your authentication.
11. Primary DNS: This feature allows you to assign a Primary DNS Server, contact to your
ISP to get it. (Optional)
12. Secondary DNS: This feature allows you to assign a Secondary DNS Server, you can
contact to your ISP to get it. (Optional)
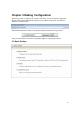
13. Connection Control: Select your connection control. There are 3 modes to select:
Connect-on-demand: The device will link up with ISP when the clients send outgoing
packets.
Auto Reconnect (Always-on): The device will link with ISP until the connection is
established.
Manually: The device will not make the link until someone clicks the connect-button in
the Status-page.
14. Keep Alive: This feature must collocate with the function "Auto" of "Auto Connect".
Enable it to keep the connection always be established.
15. LCP Echo Request
: Enter the time interval and the maximum failure count. The device
will constantly send out the LCP packets for keeping the connection alive.
16. Ping Remote Host: Enter the Remote host IP and the time interval to send the ping
packets for keeping the connection alive.