MODEL XRO-9100 REMOTE ENGINE STARTER WITH ALARM SYSTEM OWNER’S MANUAL 1
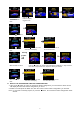
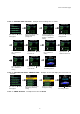
REMOTE TRANSCEIVER (TX) A. OLED DISPLAY Name of Transmitter Timer Door Lock In – Range Indicator Door Unlock Alarm Status Temperature Bypass Shock Sensor Battery Level Engine Running Melody Mode Count Down Timer Parking Timer Vibration Mode Alert Alarm Timer Start B. CHARGE THE BATTERY Power by built-in 3.7V lithium polymer battery, if the OLED screen is flash, charge your remote display low battery or transceiver.
Push the button to display triggered area. While the TRIGGERED icon flash. While the icon flash While the flash icon Push the button Press the button 2 to set off the count down time Push the button, the count down timer will display. missing graphic While the icon flash or Push the Or button, the OLED screen will display individually i.e. daily start timer, timer start or temperature start, depend on which you selected.
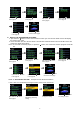
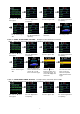
Spin up the switch Spin up the to the page 1 switch Spin up the to the page 2 Spin up the switch to the page 5 switch switch to the page 4 to the page 3 Spin up the Spin up the switch resume to main page. E. SELECT THE TRANSCEIVER FEATURES: 1. Spin down the Switch to select the transceiver feature you need and the OLED screen will display the features you select. 2.
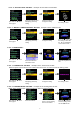
E- P1- 2. “BUTTON LOCK” SETTING: Spin down the switch to the page 1 Example: Set the “Button Lock Enable”. Press the button 1 to change the setting Press the button 2 and it will display previously setting D- P1- 3. “MELODY / VIBRATION MODE” SETTING: Spin down the switch to the page 1 Example: set the Vibration mode. Press the button 2 to change the setting Press the button 3 and it will display previously setting Press the button and the setting is done.
flash on the main page. D- P2- 3. “PARKING AREA” SETTING: Spin down the switch to the page 2 Example set the “Parking Area.” to “B120 Press the button 3, it will display previously parking area Press the button 1 and the “-” flashes for setting. Spin down the Press the button 1 and the “-” flashes for setting. Spin down the Press the button 2 to clear the parking area, and the “-” flashes for setting. switch to set the “1” switch to set the “0”.
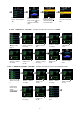
Spin down the switch to the page 3 Press the button 2 to set the “minute” digit to “20” Press the button 1 and the ”hour” digit flashes for adjusting. Press the button 1 and the ”A” digit flashes for adjusting. Press the button 2 to set the ”hours” digit to “08” Press the button 1 and the ”minute” digit flashes for adjusting. Press the button 2 to set the “P” Press the button 3 and the setting is done. D- P3- 2.
Press the button 2 to set the ”minute” digit to “30”. Press the button 3 to start the count down timer and the icon will flash on the main page. D- P4- 1. “NAME OF TX ” SETTING: Spin down the switch to the page 4 Press the button 1 and the “-” flashes for setting. Press the button 2 to set off the count down time. Example Set Name of Transceiver 1 to MIKE Press the button1 and the “-” flashes for setting. Spin down the switch to set the “M”. Press the button 1 and the “-” flashes for setting.
D- P6- 1. LANGUAGE SETTING: Spin down the switch to the page 6 Example set the Language to English Press the button and the setting is done. Press the button 1 to set the Language to ”ENGLISH”. D- P6- 4. SET TO DEFAULTS: Spin down the switch Press the button 1 & 2 at same time to set the defaults. Press the button 4.
CAR LOCATOR TRIGGER SYSTEM SINGLE TRIGGER PANIC FUNCTION THE MULTI TRIGGER ANTI CARJACKING FORM POSSE PORT DRIVER PAGING TRUNK RELEASE OUT OF RANGE TEMPERATURE CHECK 10
MULTIVEHICLE SECURITY OPREATION TURBO TIMER MODE REMOTE START TIMER START TEMPERATURE START DAILY TIMER START TURN OFF THE REMOTE START 11
Model XRO-9100 SELECTABLE FEATURES The selectable features can be set manually as explained below, Factory default settings are indicated by bold text. Note : The method of manual override can either be selected to operate from the valet switch or operate as custom code. Be certain to place a check mark indicating the method used in the box located on the last page of the owner’s manual. NOTE: Keyless Entry Models with no horn output will Flash the Parking Lights instead of chirp where chirp is indicated.
8th Ign. 3 Select 9th Diagnostics 10th Crank Time 11th Gas / Diesel 12th Transponder O/P 13th Temp Start Off During Crank On During Crank Same Aas Accy. Off 0.8 Sec Gas On 1.0 Sec Diesel 10 1.5 Sec Diesel 15 While R/S On During Start 2.0 Sec Diesel 20 DBI Until Ign.
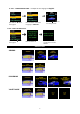
+ + + Channel 2 Channel 3 Channel 4 2-WAY OLED REMOTE CONTR TRANSCEIVER OPERATION ONLY Button Function Selection Confirm Button / Back to Main Page For Two way Remote transceiver For Two way Remote transceiver Feature Selection For Two way Remote transceiver 14
Federal Communication Commission Interference Statement This equipment has been tested and found to comply with the limits for a Class B digital device, pursuant to Part 15 of the FCC Rules. These limits are designed to provide reasonable protection against harmful interference in a residential installation. This equipment generates, uses and can radiate radio frequency energy and, if not installed and used in accordance with the instructions, may cause harmful interference to radio communications.