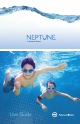
User Guide
USER GUIDE for the NEPTUNE™ Sound Processor
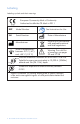
Labeling Labeling symbols and their meanings European Community Mark of Conformity Authorized to affix the CE Mark in 2011 REF Model Number SN Serial Number See Instructions for Use Date of Manufacture 2000-00 Manufacturer Dispose of in accordance with applicable national and local regulations Store at temperatures between -20° C (-4˚F) and +55° C (131˚F) Warning. For a full list of warnings, see pages 29 and 37-38 Pressure tolerance is between 69.6 kPa and 130.8 kPa.
Table of Contents Introduction . . . . . . . . . . . . . . . . . . . . . . . . . . . . . . . . . . . . . . . .5 Purpose of this Guide . . . . . . . . . . . . . . . . . . . . . . . . . . . . . . . . . . 5 About the Neptune Sound Processor . . . . . . . . . . . . . . . . . . . . . . . . . 5 The Neptune System . . . . . . . . . . . . . . . . . . . . . . . . . . . . . . . . . . .
Changing Volume . . . . . . . . . . . . . . . . . . . . . . . . . . . . . . . . . . . . Changing Sensitivity . . . . . . . . . . . . . . . . . . . . . . . . . . . . . . . . . . . Using FM . . . . . . . . . . . . . . . . . . . . . . . . . . . . . . . . . . . . . . . . . . Listening to the Microphone and FM Receiver . . . . . . . . . . . . . . . . . . . . Using the Telephone . . . . . . . . . . . . . .
Introduction Purpose of this Guide This User Guide is designed to help recipients, parents, and caregivers understand the use and care of the Neptune™ sound processor — the world’s first swimmable sound processor! In addition to being waterproof, the Neptune sound processor does not require you to wear anything on the ear, making it the most comfortable and discreet sound processor in the market today.
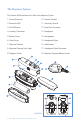
The Neptune System This Section Will Familiarize You With Your Neptune System 1. Sound Processor 10. Volume Control 2. Processor LED 11. Sensitivity Control 3. On/Off Button 12. Euro Port Connector 4. Auxiliary Connector 13. Headpiece 5. Battery Cover 14. Microphone 6. Color Cover 15. Headpiece Cable 7. Neptune Connect 16. AAA Battery 8. Neptune Connect Sync Light 17. Headpiece Cable Connector 9. Program Switch 18.
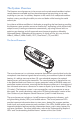
The System Overview The Neptune sound processor is the newest and most advanced cochlear implant sound processor available and has the advantage of not requiring you to wear anything on your ear. In addition, Neptune is the world’s first waterproof cochlear implant system, providing the ability to swim and bathe while hearing the world around you.
Your Neptune sound processor can be programmed using IntelliLink™ to prevent use by a cochlear implant other than the one for which it has been programmed. IntelliLink is another important safety feature for very young children and bilateral implant recipients. The Neptune Connect When attached to the sound processor, the Neptune Connect provides access to easy-to-use controls for adjusting volume, microphone sensitivity, and program position.
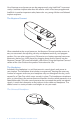
The Neptune sound processor works with two different headpieces: the Universal Headpiece and the AquaMic. The Universal Headpiece (UHP), which works with all Advanced Bionics’ sound processors, is intended for use with the Neptune processor outside of water environments. For more information, refer to the ‘Replacing Headpiece Cables’ section of the User Guide or the UHP and/or Cable ‘Instructions for Use.
Neptune Covers Color Cover Battery Cover The Neptune sound processor uses a disposable or rechargeable AAA battery as its power source. The Battery Cover attaches snugly to the bottom of your Neptune sound processor to create a water-tight seal enabling use of the Neptune system while swimming and bathing. To prevent very young children from gaining access to the battery, the Battery Cover is tamper-resistant by design.
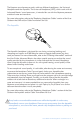
Wearing your Sound Processor Your sound processor has been designed so you do not have to wear anything on your ear. This design ensures the most comfortable, secure, and discreet wearing options possible. Neptune cables come in a variety of lengths and colors to allow you to customize your wearing preference. This section describes a variety of wearing options for your Neptune sound processor.
Using the Pouch The pouch is intended to allow for multiple wearing options. The pouch attaches to a lanyard, an armband, a belt, or a harness. Neptune pouches are available in a variety of colors and sizes and will accommodate the sound processor with or without the Neptune Connect. However, the Neptune Connect should always be removed prior to exposure to water. To use the pouch: 1. Lift pouch flap. 2. Slide the sound processor into the pouch in the desired orientation. 3.
Using the Armband The armband is intended to attach to your upper arm, typically on the same side as your implant. The Neptune processor can be placed on the armband with or without the Neptune Connect. However, the Neptune Connect should always be removed prior to exposure to water. To use the armband: 1. Ensure the headpiece cable is attached to the sound processor on one end and the appropriate headpiece on the other end. 2.
To use the lanyard: 1. Ensure the headpiece cable is attached to the sound processor on one end and the appropriate headpiece on the other end. Thread your headpiece cable through the adjustable loops on the lanyard to help manage the placement of your cable. 2. Attach the sound processor to the lanyard using your preferred retention device (i.e., clip or pouch). 3. Place the lanyard around your neck with the processor hanging in the front of your body.
Using the Harness The harness is a pediatric accessory which accommodates placement of one or two Neptune processors at a preferred wearing location. The Neptune processor may be attached to the harness on the child’s side, front, back, or shoulder and may be worn with or without the Neptune Connect. However, the Neptune Connect should always be removed prior to exposure to water. The harness is adjustable to optimally fit young children and is available in different colors.
Using the Neptune Sound Processor The Neptune System contains small parts that may cause choking if swallowed. If the sound processor becomes unusually hot or warm, discontinue use immediately and contact Advanced Bionics or your clinician. Powering the Neptune sound processor The ‘on/off’ button is located on the side of the Neptune sound processor. To power on the device, press and hold the ‘on/off’ button for 1-2 seconds.
Table 1: Neptune sound processor LED indications Color Orange Red Green Behavior Programmable Indication Blinks at start-up No • 4 quick blinks indicate that battery is fully charged • 2–3 quick blinks indicate that the battery is sufficiently charged to power the system • 1 quick blink indicates that the battery is nearly depleted • No blinking indicates depleted battery.
Understanding Audible Alarms Audible alarms are a programmable feature that can be used independently or in conjunction with the Neptune LEDs to provide important information about system status and battery life.
Removing the Battery Cover 1. H old the sound processor in one hand. 2. Firmly grip the ends of the Battery Cover and, starting at one end, pull it away from the sound processor. Never insert your fingernail or any type of tool into the Battery Cover to try to pry it off the processor as this may damage the battery seal allowing water and debris to enter into the Neptune battery compartment. Removing the Battery 1. Hold the sound processor in one hand. 2.
Attaching the Battery Cover 1. H old the sound processor in one hand, with AAA battery installed. 2. A lign the edges of the battery cover with one end of the sound processor housing. Note that the battery cover is not ‘sided.’ 3. P ush the battery cover onto one end of the sound processor then push firmly onto the other end to attach. Using Neptune Headpieces Two headpieces are available for use with your Neptune sound processor. 1. The Universal Headpiece (UHP) 2.
To attach the cable to the headpiece 1. Hold the headpiece in one hand and the cable connector in the other hand. 2. Push the cable connector firmly into the headpiece connector. To attach the cable to the sound processor 1. Hold the sound processor in one hand and the cable connector in the other hand. 2. P ush the cable connector firmly into the sound processor connector. For assistance in troubleshooting headpiece cables, please refer to the ‘Troubleshooting’ section of the User Guide.
Removing Headpiece Color Caps The UHP and AquaMic Color Caps are available in a variety of colors to match or coordinate with your Neptune sound processor. A Color Cap must be in place at all times when using your headpiece. You may need to remove your headpiece Color Cap to change the look and style of your headpiece, as part of routine troubleshooting, or, in the case of the AquaMic, to fully dry following submersion. To remove your headpiece Color Cap, only use the tool provided by Advanced Bionics.
If you wish to change programs or adjust your volume and/or sensitivity setting, you will need to attach the Neptune Connect. The sound processor does not need to be turned off prior to attaching the Neptune Connect. Once the desired changes have been made, you may remove the Neptune Connect by pressing the release latch, and the sound processor will maintain the new settings. Attach your Neptune Color Cover when the Neptune Connect is not in use.
To attach the Neptune Connect: Align here 1. Remove your Neptune Color Cover. 2. Align the circle on the top of the Neptune sound processor with the corresponding marking on the underside of the Neptune Connect for correct orientation. 3. Push the Neptune Connect snugly onto the sound processor. To remove the Neptune Connect: Release Latch 1. Hold the sound processor in one hand. 2.
Changing Programs monitor P1 P2 P3 The program switch is located on your Neptune Connect to allow you to easily change your program position prior to, or during, use. The sound processor can store up to three programs for optimal listening in a variety of situations. These programs can be updated and changed by your clinician during fitting. To change programs: 1. Slide the program switch located on the front face of the Neptune Connect to the desired program position. 2.
To change volume: 1. P lace your finger on the volume control dial or adjust from the edge of the Neptune Connect 2. Turn the dial to the desired setting. Turn the dial in a clockwise direction to increase or a counter-clockwise direction to decrease the volume Note: You may need to sync the Neptune Connect with the sound processor prior to changing the volume. The volume range available within a program can be changed or disabled by your implant professional in the SoundWave™ fitting software.
The sensitivity control can be enabled or disabled within a program by your implant professional in the SoundWave™ fitting software. If you have any questions about your specific sensitivity control setting, please contact your implant center. Using FM FM use is a critical feature for many cochlear implant users, particularly in schoolaged children, to help overcome difficulties hearing in the presence of noise, reverberation, and distance from the speaker.
4. A djust the program position, volume, and sensitivity to their desired settings. 5. Remove the Neptune Connect and re-attach the sound processor Color Cover. For further information regarding FM use, refer to the ‘Instructions for Use’ included with your FM system.
3. Use a patch cable A patch cable may be used to connect directly to your cellular or cordless telephone. The patch cable connects to the headset connector of your telephone on one end and the auxiliary connector of your Neptune Connect on the other. An Audio Interface Cable is available from AB, or you may require a custom-made patch cable from an independent vendor. Consult with your clinician or an AB representative for further information regarding this option. 4.
Using Neptune Accessories Advanced Bionics supplies a range of accessories for use with the Neptune system, although not all accessories may be included in your sound processor kit. Discuss with your clinician which accessories are included with your Neptune sound processor. For further information regarding the accessories listed below, refer to the ’Instructions for Use’ included with the product or contact Advanced Bionics.
you can fully enjoy the sound from your audio device. Also, your clinician can create a program allowing you to hear both environmental and auxiliary device sounds. Talk to your implant professional about which programming options are right for you in this situation. Do not connect to mains powered sound sources (e.g., TV, computer) unless using a mains isolation cable. For further information, contact your clinician or an Advanced Bionics representative.
Battery Cover Battery Covers provide an airtight seal and allow use of your Neptune sound processor while swimming or bathing. A Battery Cover should be in place on your sound processor at all times during Neptune use. To attach the Battery Cover: 1. Hold the sound processor in one hand, with AAA battery installed. 2. Align the edges of the battery cover with one end of the sound processor housing. Note that the battery cover is not ‘sided.’ 3.
Neptune Carrying Case A carrying case is provided with your Neptune system for use when traveling or for storage when your sound processor and accessories are not in use. If your Neptune system is exposed to moisture or high levels of humidity, you may choose to store components overnight in the Zephyr by Dry & Store® provided instead. Neptune Connect Wallet When the Neptune Connect is not in use, it is recommended that you store it in the Neptune Connect Wallet.
Zephyr by Dry & Store® A Zephyr by Dry & Store is included with your Neptune system. The Zephyr is designed to remove moisture from your equipment and is intended for daily use with your Neptune system components. For detailed instructions on how to use and care for the Zephyr, refer to the ‘Operating Instructions’ included in the package. It is important that you read and adhere to the‘Warnings and Cautions’ prior to and during use.
Care of your Neptune System It is important to properly care for your Neptune system to ensure optimal hearing at all times. If you wish to clean any part of your Neptune system, use only a damp cloth to wipe the part(s). Do not expose any part of the system to additional solvents (e.g., soap, bleach). No preventive maintenance or routine inspection is required. The components of the Neptune system are not serviceable.
Recommended Neptune System Operating and Storage Temperatures Table 4: Operating and storage temperature ranges Condition Minimum Maximum Operating temperature 0°C (32°F) 45°C (115°F) Storage temperature -20°C (-4°F) 55°C (131°F) The Neptune system meets the temperature safety requirements of IEC 606011:2005 in ambient temperatures up to 36.8°C (98°F).
Warnings General Warnings • Do not expose any part of the Neptune system to extreme heat, such as an oven, microwave, or hair dryer. • Using your sound processor accessories and parts contradictory to their intended use (e.g., mouthing, chewing) may cause bodily harm • Store additional headpieces away from items with magnetic strips (e.g., credit cards, hotel room key cards).
• If damage to the Battery Cover is noted or suspected, replace prior to resuming water-related use of the Neptune System. • Do not connect to mains powered sound sources (eg. TV, computer) unless using a mains isolation cable. • Do not swim or bathe with the Neptune Connect and audio accessories attached to the sound processor. • Your processor or headpiece should be serviced only by AB. Do not attempt to open or repair the parts.
Airport Security Metal Detectors Metal detectors and security scanners, including full body scanners, will not damage your implant system; however, metal detectors may be activated as you pass through. To avoid hearing any unwanted sound when walking through metal detectors or security scanners, you should reduce the volume on the sound processor or remove your headpiece.
Troubleshooting your Neptune System If no sound is heard or the red LED is flashing once per second on the Neptune processor LED when the headpiece is in place over the implant, try the following troubleshooting steps: 1. Check that the sound processor is “on” and that program, volume, and sensitivity controls are set in the desired positions. 2. Visually inspect the cable for any damage or breakage and verify it is firmly attached to the headpiece and sound processor. 3.
6. Visually inspect the headpiece microphone for signs of debris or wear. If available, replace the headpiece and/or headpiece Color Cap. 7. C lean the battery contacts on your processor or AAA battery. 8. Unaided listeners may perform a listening check of the headpiece microphone as described in the ‘Listening to the Microphone and FM Receiver’ section of the User Guide. If these measures do not resolve the problem, contact your clinician or Advanced Bionics immediately for further assistance.
If these measures do not resolve the problem, contact your clinician or Advanced Bionics immediately for further assistance. If the Neptune and/or AquaMic are accidentally exposed to sea or lake water: 1. Rinse parts with clean water. 2. Follow typical AquaMic post-submersion care instructions. 3. Place Neptune processor and AquaMic in your Zephyr by Dry & Store® or similar desiccant device and allow to dry completely. 4.
If the Neptune sound processor does not power up: 1. Depress and hold the ‘on/off’ button for at least 1 second. 2. Verify that a charged AAA battery is in place. 3. Verify that the AAA battery is inserted correctly. 4. Remove the AAA battery; wait five (5) seconds; then replace the battery. 5. If the problem continues, contact your clinician or Advanced Bionics for further assistance. If the Neptune Connect Sync Light indicates a solid red light: 1. Remove and re-attach the Neptune Connect. 2.
2. Verify you are using a program which allows for auxiliary, or Aux, input to your Neptune system. 3. V erify the FM transmitter and/or external audio device are powered. 4. Verify your FM receiver has been programmed for use with your processor. You may need to consult with your FM professional. If these measures do not resolve the problem, contact your clinician or Advanced Bionics for further assistance.
During battery status check, no blink or only one orange blink is observed: 1. Verify that the battery is inserted properly within the processor. 2. Replace the AAA battery. 3. If there are no blinks after battery replacement, clean the contacts with a hearing aid brush or damp cloth or cotton swab. 4. If the problem continues, contact your clinician or Advanced Bionics for further assistance. If the LED behaves differently following processor replacement or programming: 1.
Guidance and Manufacturer’s Declaration Per IEC 60601-1-2 Table 7: Guidance and Manufacturer’s Declaration-Electromagnetic emissions Guidance and manufacturer’s declaration –electromagnetic emissions The Neptune system is intended for use in the electromagnetic environment specified below. The customer or the user of the Neptune system should assure that it is used in such an environment.
Table 8: Guidance and Manufacturer’s Declaration-Electromagnetic immunity Guidance and manufacturer’s declaration – electromagnetic immunity The Neptune system is intended for use in the electromagnetic environment specified below. The customer or the user of the Neptune system should assure that it is used in such an environment.
Table 9: Guidance and Manufacturer’s Declaration- Separation distances between RF communications equipment and Neptune system Recommended separation distances between portable and mobile RF communications equipment and the Neptune system The Neptune system is intended for use in an electromagnetic environment in which radiated RF disturbances are controlled.
Table 10: Neptune External Equipment and Accessories The following table details the Neptune processor and its compatible hardware parts with the corresponding Advanced Bionics model number. Advanced Bionics supplies a range of accessories for use with the Neptune processor, although not all accessories may be included in your sound processor kit or listed here. For additional information regarding the Neptune processor or its accessory parts, contact your clinician or Advanced Bionics.
Compatibility The following tables display the compatibility between products in the HiResolution Bionic Ear System family and/or previous generation product. Table 1 Processor Type Implant Type Neptune C1 CII HiRes 90K – 31 31 3 Harmony 3 3 33 Auria – 3 3 3 3 2 Platinum Sound Processor (PSP) 4 3 Requires SoundWave 2.1 or later Requires SoundWave 2.0 or later 3 Requires SoundWave 1.
Contact Us Advanced Bionics is committed to providing the highest quality products and service to our customers. We welcome your comments regarding the Neptune sound processor system or your suggestions to improve our products. Please feel free to contact AB or discuss your suggestions with your implant professional. Advanced Bionics, LLC 12740 San Fernando Road Sylmar, CA 91342 USA +1.877.829.0026 +1.661.362.1400 +1.661.362.1500 Fax info@AdvancedBionics.
Advanced Bionics, Neptune, IntelliLink, AutoSound, SoundWave, HiRes, HiRes Fidelity 120, ClearVoice, and Built Kid Tough are trademarks of Advanced Bionics in the United States of America and other countries. Dry & Store® is a registered trademark of Ear Technology Corporation VELCRO® is a registered trademark of Velcro Industries B.V. Duracell® is a registered trademark of Procter & Gamble Energizer® is a registered trademark of Eveready Battery Company, Inc.
Advanced Bionics, LLC 12740 San Fernando Road Sylmar, CA 91342 USA +1.877.829.0026 +1.661.362.1400 +1.661.362.1500 Fax info.us@AdvancedBionics.com AdvancedBionics.com 9050050232 Rev D ©2013 Advanced Bionics, AG and its affiliates. All rights reserved.