
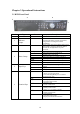
System information


18
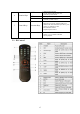
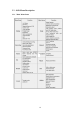
Loading the batteries into the IR controller:
1. Remove the battery cover.
2. Insert the battery. Ensure that the poles (+ and -) are correctly positioned.
3. Replace the battery cover.
Enable the IR Remote Controller:
1. Press the [DEV] key, input the DVR device ID (default is “88”. It can be changed
in the “Display” menu) and then press the [ENTER] key.
2. The “STATUS” lamp on the DVR front panel will turn green, indicating that you
can use IR controller to operate the DVR.
Disable the IR controller:
1. When IR controller status lamp is on, press the [DEV] key.
2. The “STATUS” lamp on the DVR will turn off. The IR controller won’t control the
DVR.
Turn off the DVR:
1. When IR controller status is on, press the [POWER] key for several seconds.
2. The DVR will be powered off.
Troubleshooting the IR Remote:
1. Always aim the IR Remote controller at the DVR you want to control.
2. Make sure that the correct DVR ID code is entered and the status lamp on the
DVR is green.
3. Check the batteries.
4. Make sure nothing is obstructing the IR sensor on the DVR.
5. Try another IR Remote control.
Note: If you have only one Remote unit to work with it is often difficult to verify whether the unit
is actually working. Humans can’t see the IR LED flashing on the remote when keys are pressed.
Cameras can see the LED flash. Aim the Remote at a conveniently placed camera and you can see
the LED flash on the monitor.