
User guide


16 Using Your Gateway Solo 2500 Multimedia Notebook
Getting Your System Running
To get the computer started you’ll need to install the battery pack, connect
to AC power, open the LCD panel, and start up the system.
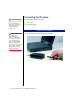
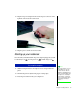
Installing the battery pack
Your notebook is powered by one of the longest-lasting batteries available,
shipped to you partially charged. When you first get started, you may want
to use the AC adapter to fully charge the battery and provide a constant
supply of power while you are checking out some of the notebook features.
If your battery is not installed, you need to install the battery pack and
charge it. You can charge the battery:
♦ When you are using your notebook with the AC adapter
♦ When the system is attached to AC power and in standby or suspend
mode
♦ When the system is attached to AC power and the system is turned off
The notebook can run on a fully charged battery for about 3 to 4 hours. Use
the battery gauge icon in the taskbar or battery gauge in the system
status indicator to track the available battery power. See “Monitoring the
battery status” on Page 59 to learn more about tracking battery status.
Battery life is affected by how much you use the system components such
as the hard drive, CD-ROM drive, LCD display, and other components.
Other factors such as the power management settings affect battery life.
See Chapter 4, “Managing Power Usage” for more information about
power management and monitoring the battery status.
Note:
Battery life varies
depending on configuration,
power management
settings, and features used.