
User guide


20 Using Your Gateway Solo 2500 Multimedia Notebook
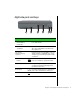
4.
Press
F
N
+↑
or
F
N
+↓
to change display brightness for suitable viewing.
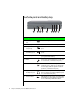
Notebooks with a HPA screen, press
F
N
+
→
or
F
N
+
←
to control
display contrast.
1.
Windows starts and the Regional Settings dialog box opens.
2.
Scroll down the list and select the regional setting.
3.
Click Next. The Keyboard Layout dialog box opens.
4.
Scroll down the list and select the keyboard layout.
5.
Click Next. The User Information dialog box opens.
6.
Enter your Name and Company (optional) in the User Information dialog
box.
7.
Click Next. The License Agreement opens.
8.
Scroll through the License Agreement to read it.
9.
Click I accept the agreement, then click Next. The Certificate of Authenticity
dialog box opens.
10.
Enter the Product ID number. This number is located on the
Certificate of Authenticity on the cover of the Windows manual.
11.
Click Next. The Start Wizard window opens.
12.
Click Finish. The Time Properties dialog box opens.
13.
Set the Time Zone and Time.
14.
Click OK. The Add Printer Wizard dialog box opens.
15.
Click Next.
16.
Select a printer from the list and click Next.
- OR -
click
Cancel to skip the printer setup.
To complete the first-time operating system setup
Note:
This system ships with the
“Auto dim with battery”
feature enabled. Auto dim
cuts LCD power 50% when
your notebook is operating
on battery power. See
“Using the BIOS Setup
Utility” on Page 70 for more
information about changing
the Power menu options.