
User's Manual


AXM700 Repeater
User Manual V0.2
Page | 13
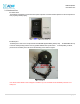
3.3.3 Ethernet Port and Host/Remote Switch
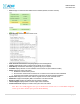
• The Ethernet port as shown in Figure 5 is used to interface with the repeater locally. A RJ-45 crossover cable is required in
order to establish a connection with the unit.
• Host/Remote switch is to be used when an external modem box is being used
o Host Mode: DHCP is enabled. Any computer set to “Obtain an IP address automatically” will be assigned an IP
address by the repeater. When the repeater is set to Host Mode the IP address of the unit is 192.168.63.1
o Remote Mode: DHCP is disabled. This mode should only be used when an external modem box is present. By
default, then IP address of the unit is set to 192.168.63.5 and can be changed by setting the repeater to Host Mode
and specifying and IP address in the Modem Box Setting under the Install Tab of our Web-GUI.
Figure 3: Ethernet Port and Host/Remote Switch
3.4 Installation
3.4.1 Tools
The following tools are required to mount the AXM700 to the wall:
• Phillips screwdriver
• Power drill
3.4.2 Procedure
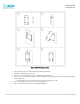
Four mounting holes are located on the wall-mounting bracket to attach it to the wall. The wall bracket must be securely
attached to sufficiently carry the weight of the AXM700, which is bolted to the wall bracket through the four aligned mounting
holes.
Installation Procedure
① Verify that the Repeater and Mounting Bracket are in good condition.
② Drill holes in the installation surface and insert the anchor bolts.
③ Set the mounting bracket against the wall.
④ Using the Hooks on top, set the Repeater against the mounting bracket.
⑤ Using the anchor bolts attach the Repeater to the Bracket.
⑥ Make sure the Repeater is securely attached.
⑦ Connect the GND cable.
⑧ Connect the Antenna cable.
⑨ Connect the Power.
⑩ Using a laptop, setup the Repeater.