THANK YOU! We are grateful for your purchase of Advanced Wireless Communications product. We believe this easy–to-use radio will provide you with dependable and reliable communications. This Advanced Wireless Communications portable two-way radio is a precision device. Treat it with care, and you will enjoy years of reliable operation.
Product Safety and RF Exposure for Portable Two-Way Radios Compliance with RF Energy Exposure Standards NOTICE: This radio is intended for use in occupational/controlled applications where users have been made aware of the potential for exposure and can exercise control over their exposure. This radio device is NOT authorized for general population, consumer or similar use.
at a proper distance is important since RF exposure decreases with increasing distance from the antenna. z Use only FCC-approved supplied or replacement antennas, batteries, and accessories intended for use with this radio. Use of non–FCC approved antennas, batteries and accessories may exceed FCC RF exposure guidelines. FCC license Information Your Advanced Wireless Communications radio operates on communications frequencies which are subject to FCC(Federal Communications Commission) Rules & Regulations.
INFORMATION TO THE DIGITAL DEVICE USER REQUIRED BY THE FCC This equipment has been tested and found to comply with the limits for a Class B digital device, pursuant to Part 15 of the FCC Rules. These limits are designed to provide reasonable protection against harmful interference in a residential installation. This equipment generates, uses and can generate radio frequency energy and, if not installed and used in accordance with the instructions, may cause harmful interference to radio communications.
CONTENTS Product Inspection Battery Charging Information Accessory Information Battery Antenna Belt Clip Getting Started LCD Display Basic Operations Features Monitor Channel Scan Priority Channel Scan Scan Revert Channel Selectable CTCSS/CDCSS Selectable Squelch Level High/Low power Key lock Time Out Timer (TOT) Battery Save Low Battery Alert Busy Channel Lockout Backlight Troubleshooting Guide Optional Accessories Care and Cleaning Notice to The User CTCSS/CDCSS table Frequency Chart 5
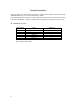
Product Inspection Thank you for your purchase of Advanced Wireless Communications portable two-way radio model: AWR2108. Before use, please inspect the product as follows. First check the shipping carton for any signs of damage If any damage has occurred, please contact your dealer immediately. Confirm the supplied product against the packing slip to assure accuracy. Available Accessories Part number Item Qty.
Battery Charging Information Standard Charger 1. Insert the radio and battery or battery alone into the charging cup. Charging begins and the red LED will light continuously. When the charging cycle is complete, the red LED will change to green. Charging time is less than 2.5 hours. 2. After the battery is fully charged, the charger will shut off automatically. 3. A flashing red LED indicates an abnormal charging condition, which can be caused by an old battery or a defective battery.
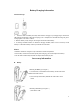
2, Push the battery latch on the back panel, towards the top of the radio. 3, Pull the top of the battery away from the radio chassis, and lift the battery from the radio. Antenna Attaching the Antenna (See figure 3 ) 1, Align the threaded end of the antenna with the radio’s antenna connector. 2, Turn the antenna clockwise to tighten. Removing the Antenna (See figure 4 ) 1.Turn the antenna counter-clockwise until you can remove it.
Getting Started 1. Antenna Used to receive or transmit signals. 2. LCD Displays operation status of the radio. 3. LED indicator In transmit mode, the red LED will turn on. In receive mode, the green LED will turn on. A flashing red LED indicates that the battery is low. 4. POWER/VOL Knob Rotate the volume control clockwise to turn the unit on, fully counter clockwise to turn the unit off. Increase or decrease volume by adjusting the volume control accordingly. 5. Down key Adjust the channel downwards. 6.
channel, it will stop scanning and listen to that channel. 7. Up key Adjust the channel upwards. 8. PTT button To transmit, press and hold PTT button. To receive, release PTT button. 9. MONI button In receive mode, press the MONI key to monitor other activity on your selected channel . 10. Microphone When transmitting, speak into the microphone holding the radio 2-4 inches from your mouth. 11. jack Used to connect external earphone/microphone accessories. 12. Speaker Listen to received audio. 13.
LCD Display 1. Appears when the transmit power of the current channel is set for low power. 2. Appears when the dealer disables the radio’s speaker. (Must use audio accessory to operate.) 3. Appears when the keys are locked. 4. Display the current channel number.
Basic Operations To Turn On the Radio Turn the POWER/VOL knob clockwise until a click is heard. To Receive 1. Press UP or DOWN key to select the desired channel. 2. Turn POWER/VOL knob to adjust the volume. Pressing the MONI key will provide noise so that the volume can be adjusted accordingly. Now if the radio receives a signal with CTCSS/CDCSS matching with that set in the radio, the speaker will output audio. To Transmit 1. 2. Press the UP or DOWN key to select the desired channel.
Features Monitor Press the MONI button to monitor any activity on the channel. Wait for this activity to clear before transmitting. Channel Scan Channel scan is set to monitor desired activities on all channels in scan list. When channel scan is enabled, the radio will automatically scan all channels in scan list until activity is detected on a channel. The scanning will then stop and the receive audio will be heard.
Press the [UP] key while holding down the [MONI] key to enter CTCSS/CDCSS set mode. In this mode, press [UP] or [DOWN] to select CTCSS/CDCSS. Press [SCAN], LCD display toggles between OFF/CTCSS/CDCSS/-CDCSS: CTCSS/CDCSS OFF: 00 CTCSS: 01 CDCSS: 01 -CDCSS: -01 38 83 -83 OFF CTCSS CDCSS -CDCSS Please refer to CTCSS/CDCSS table. Press [UP] while holding down [MONI] to exit CTCSS/CDCSS mode.
2, Press [SCAN] while holding down [MONI] to unlock keys. 3, lock symbol appears on LCD: Time Out Timer (TOT) Time Out Timer is to prevent user from transmitting on the same channel for extended periods of time. This also protects the radio from damage caused by accidental transmissions. If transmission exceeds the preset time, (the TOT time can be preset by the dealer), the radio will stop transmitting and return to the receive mode. Alert beeps will sound to indicate the halt in transmission.
Troubleshooting Guide Please check the following items before requesting service. 1. Review operation procedures. 2. Replace or recharge the battery. 3. If reception is poor, check the antenna to make sure it is undamaged and operating in a vertical position. 4. Try another location with fewer obstructions. 5. If you cannot communicate with your group members, make sure you are using the samefrequency and CTCSS/CDCSS. 6. If you hear other conversations on your channel, change your CTCSS/CDCSS.
CTCSS/CDCSS Table CTCSS NO Freq(Hz) NO Freq(Hz) NO Freq(Hz) 00 NO TONE 13 103.5 26 162.2 01 67.0 14 107.2 27 167.9 02 71.9 15 110.9 28 173.8 03 74.4 16 114.8 29 179.9 04 77.0 17 118.8 30 186.2 05 79.7 18 123.0 31 192.8 06 82.5 19 127.3 32 203.5 07 85.4 20 131.8 33 210.7 08 88.5 21 136.5 34 218.1 09 91.5 22 141.3 35 225.7 10 94.8 23 146.2 36 233.6 11 97.4 24 151.4 37 241.8 12 100.0 25 156.7 38 250.
08 051 36 251 64 532 09 054 37 261 65 546 10 065 38 263 66 565 11 071 39 265 67 606 12 072 40 271 68 612 13 073 41 306 69 624 14 074 42 311 70 627 15 114 43 315 71 631 16 115 44 331 72 632 17 116 45 343 73 654 18 125 46 346 74 662 19 131 47 351 75 664 20 132 48 364 76 703 21 134 49 365 77 712 22 143 50 371 78 723 23 152 51 411 79 731 24 155 52 412 80 732 25 156 53 413 81 734 26 162 54 423 82
Frequency Chart Model: ____________________ Channel Transmit Frequency Serial Number: Transmit CTCSS/CDCSS ________________ Receive Frequency Receive CTCSS/CDCSS 1 2 3 4 5 6 7 8 9 10 11 12 13 14 AWC endeavor to achieve the accuracy and completeness of this manual, but cannot guarantee its accuracy at all times. All the above specifications and design are subject to change by AWC without notice. All the reproduction and translation of this manual without authorization of AWC is not allowed.