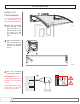
DOOR AWNING : PN SERIES Owner’s Manual For safety reasons, please carefully read and understand all written instructions and warnings in this manual prior to assembling or installing this product.
TABLE OF CONTENTS Safety instructions and warnings . . . . . . . . . . . . . . . . . . . . . . . . . . . . . . . . . . . . . . . . . . . 2 Package contents and parts . . . . . . . . . . . . . . . . . . . . . . . . . . . . . . . . . . . . . . . . . . . . . . . 3 Tool requirements . . . . . . . . . . . . . . . . . . . . . . . . . . . . . . . . . . . . . . . . . . . . . . . . . . . . . . . 4 Product features . . . . . . . . . . . . . . . . . . . . . . . . . . . . . . . . . . . . . . . . . . . . . . . . . . .
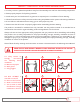
SAFETY INSTRUCTIONS AND WARNINGS • For safety concerns, please keep children away from the assembly area and from the assembly components. • Please properly dispose of all packing materials. • Consult with your local authorities if any permits are required prior to installation of Door Awning. • Follow all manufacturer’s safety instructions when using step ladders and/or power tools during installation. • Do not drill into walls where electric wiring, gas or water pipes may exist.
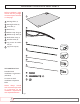
PACKAGE CONTENTS AND PARTS Before installation, make certain that the package contains all parts as listed on this page.
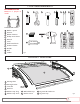
TOOL REQUIREMENTS RECOMMENDATION Minimum 2 people to install. 1 2 3 4 5 6 SUGGESTED TOOLS Marker / pencil 1 11 Scissors 2 7 Rubber hammer 3 9 Phillips screw driver 4 10 Wrench 5 Level 6 Small wood block 7 24 HOUR SILICONE 8 24 Hour silicone 8 Drill bit 9 10 11 Drill Ladder Fig.
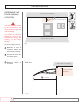
INSTALLATION DETERMINE THE DOOR AWNING LOCATION Roof, eave or overhang A Minimum 2 inch B Minimum 10 inch clear space The Door Awning needs to be mounted to the main structural supports of the building. The surface of the area should be clear of any obstructions along the entirety of the Door Awning. Locate a position that is: A Minimum 2 inch of clearance below the roof/eave/overhang. B At least 10 inch of vertical clear space. C Minimum depth of 31 inches.
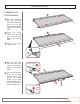
INSTALLATION ASSEMBLE THE DOOR AWNING 1 1 Peel the protective film from both the top and bottom back about 2” from the front and the wall side edges of the awning sheet. 2 Apply the (long) rubber strip for the front and wall side edge of the awning sheet. 3 Trim off all excess rubber strips. Fig 8 2 Fig 9 2 3 4 5 Press the front and wall side bars onto the front and wall side edges of the awning sheet.
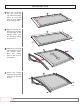
INSTALLATION 6 7 Peel the protective film from both the top and bottom back about 2” from the right and left edges of the awning sheet 6 Fig 11 Apply the (short) rubber strip for the right and left edge of the awning sheet. Trim off all excess rubber strip material. 7 Fig 12 8 Add the left and right awning brackets onto the awning sheet. Bend the awning sheet to the curve of the brackets. 8 Fig 13 9 Secure the awning sheet to the brackets with the (4) bracket screws. 9 Fig 14 7 www.
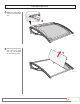
INSTALLATION 10 Apply the wall rubber strip to the wall side bar. 10 Fig 15 11 Peel away the protective film from both the top and bottom of the awning sheet. 11 Fig 16 Toll Free (US): (855) 574-0158 www.advaning.
INSTALLATION INSTALL THE DOOR AWNING 1 It is recommended that you have a minimum of 2 people during installation 1 Hold the assembled Door Awning in the area you want to install it and use a level to ensure that the Door Awning is leveled. 2 Mark the positions of the 4 mounting holes through the bracket holes using a marker/ pencil. Fig 17 Marke r / Pen cil 2 Ma rke r/P enc il Fig 18 3 Drill the mounting holes using a drill bit.
INSTALLATION 6 Fill the mounting holes with 24 hour silicone. 6 24 HOUR SILICONE Wall Fig 20 7 Place the Door Awning so that the bracket holes are aligned with the mounting holes on the wall. Insert the lag screws through the washers into the silicone filled holes. 7 Wall Fig 21 NOTE: Use a level to ensure that the awning is leveled. 8 Tighten the lag screws with a wrench.
10 Apply 24 hour silicone to the wall edge of the Door Awning. 10 NOTE: Please allow 24 hours for the silicone to fully set. 24 HOUR SILICONE INSTALLATION Fig 24 11 Press the screw caps onto the lag screw heads. 11 Wall Fig 25 11 www.advaning.
MAINTENANCE CLEANING Clean the door awning with mild detergent solution and rinse with cold clean water. Do not use acetone, abrasive cleaners or other special detergent to clean the awning sheet. CARE AND MAINTENANCE It is important to inspect the screws and the condition of the silicone seals. Perform periodic inspections to ensure that all the screws are properly tightened and that the silicone seals are in good conditions. Re-tighten all screws and reapply silicone as needed to prevent water leakage.
LIMITED WARRANTY AND CUSTOMER SERVICE LIMITED WARRANTY COVERS Advaning warrants all Advaning original products, sold and installed within the contiguous 48 states of the United States, to be free of defects of materials and workmanship. This warranty only applies to the original owner or purchaser of the product and is only effective on a basis for twelve (12) months or one (1) years from the date of purchase.
LIMITED WARRANTY AND CUSTOMER SERVICE Some states do not allow limitations on how long an implied warranty lasts, so the above limitation may not apply to you. UNDER NO CIRCUMSTANCES SHALL ADVANING, INCLUDING ITS SUBSIDIARIES AND AFFILIATES BE LIABLE FOR INCIDENTAL OR CONSEQUENTIAL DAMAGES WITH RESPECT TO ECONOMIC LOSS, INJURY, DEATH OR PROPERTY DAMAGE, WHETHER AS A RESULT OF BREACH OF THIS WARRANTY, NEGLIGENCE OR OTHERWISE.
CONTACT INFORMATION Service Questions: service@advaning.com Toll Free (US): 855–574-0158 12282 Knott Street, Garden Grove, CA 92841 www.advaning.com OM_PN Series_V02_R03_2020.08.