
Installation Guide


11
INSTALLATION
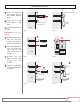
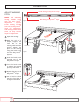
Fig 27
Fig 28
Fig 29 Fig 30
NOTE: The awning will
stand 10” off of this line.
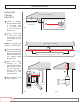
Locate a straight,
at and leveled edge
of your roof, eave
or overhang that
is clear and free of
obstructions.
Using a chalk line
or laser level, mark
a line that runs the
entire length of your
awning.
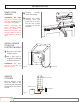
Use the recommended
bracket location chart
(page 5) to determine
bracket locations for
your awning model
along the line.
Place the ceiling
brackets in the
appropriate locations.
Use a level to make
sure the bracket is
straight and mark
the center of the
mounting holes.
Drill mounting holes
using a drill bit.
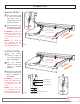
INSTALLING
CEILING
BRACKETS
www.advaning.com Toll Free (US): (855) 574-0158
4
5
Level
Ceiling
bracket
3.5”
Roof, eave or overhang
Chalkliner
Minimum 10 inch
clear space
Roof, eave or overhang
Bracket locations base on your awning model
Marker/pencil
1
1
2
2
3
3
4
5