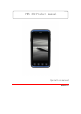
PWS 472 Product manual Operation manual Version 1.
Matters needing attention Battery precautions Battery life depends on the type of battery and how it is used. The battery life can be extended by avoiding the battery in a state that is completely electrically powered, which is prone to damage the battery. A few full discharges are more damaging than often charging the batteries. Charging a part of the battery does not damage the battery, because lithium batteries have no memory function. Keep the batteries in a cool state and avoid overheating.
Catalog Matters needing attention...........................................................................Ⅰ 1. Parts ................................................................................................... 1 2. Introduction......................................................................................... 1 2.1 Product overview..................................................................... 2 2.2 SIM card and SD card installation.................................... 3 2.
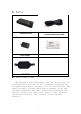
1. Parts USB Connecting line (Standard USB to Micro USB) PWS 472 terminal Battery Power adapter Wristband 2. Introduction PWS-472 based on Android development, with four core processors and 5-inch high-resolution screen, the use of industrial grade design and development with waterproof, dustproof, anti-fall, can replace the large capacity batteries, with more than 8 hours of endurance. At the same time support GPS/Beidou, RFID (NFC), 1D/2D barcode scanning and other functions.
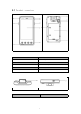
2.1 Product overview 1. Main screen 7. Microphone 2. Push-button 8. Scan engine 3. Power button 9. Camera 4. Scan button 10. Fill-in light 5. Receiver 11. Battery cover 13. Back cover screw 6. LED lamp 12. Speaker 08. Scan window 14.
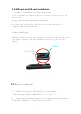
2.2 SIM card and SD card installation Assembly of batteries, SD cards and SIM cards 1. Use a screwdriver counterclockwise to loosen the two screws on the battery lid. 2. Open the rear cover and remove the battery。 3. You can now use the Micro SD card slot and the SIM card slot. (SIM card support Mobile/Unicom 4G) 4.Insert SIM/SD Card SIM/SD card metal contact face downward, referring to the fuselage card slot insert diagram, along the SIM/SD card groove to push into the smooth. SIM Card micro SD Card 2.
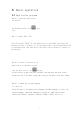
3. Plug the AC charger into the power outlet. 2.4 Data transfers between PC 1. Connect a standard USB connector to the PC's USB port. 2. Connect the micro USB connector in the connector to the micro USB port at the bottom of the device. 3. To make it easier to synchronize with your PC, you can download mobile management software from the Android Market. 2.5Check the battery and enter the power use menu 1 On the main screen, click the button.
2Enter settings 3 Select battery.
3. Basic operation 3.1 Application program How do I open the application interface? On the main screen, click button can. How to connect WiFi, BT? Click "Settings"-"WLAN" in your application to open WiFi and select the network you want to connect to. In the application, tap Settings-Bluetooth to open Bluetooth, and then select the device that you want to connect to the pairing. How do I create a shortcut to an application on the main screen? 1 On the main screen, click button.
Call function Call Processing/dial-up call 1 On the main screen,click button. 2 Select dial interface dial 3 Enter the phone number for the listener, and then click the call. To remove a number, click the Delete button. Hang up • Click Hook button.
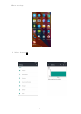
Application List The following illustration shows a common application sequence Telephone Call, you can directly use the T9 keyboard to dial the phone, or through the T9 keyboard to search for contacts, you can quickly dial back to call records. Send and receive SMS, SMS content support sending Information Mail list E-mail Browser Camera Resource Manager Clock text or inserting pictures, facial expressions, contact information, audio and video etc.
3.2 Barcode scanner 1. The native system automatically turns on scanning service. 2. The native scan service is divided into two modes: One is analog keyboard message, that is, open any edit area/input area to press the scan button to scan input. One is the messaging mechanism, which needs to modify the associated reception mechanism in the user app to get the current scan results. Generally speaking, it is necessary to receive the Chinese information in the barcode.
In the system settings, locate the WLAN roaming as follows: Click enter: WLAN roaming switch: Turn on/off roaming switches Toggle Signal Threshold: Set the trigger signal value for roaming Toggle Signal Difference: Sets the difference between the current signal and the roaming AP signal. Default roaming SSID: When fixed to a certain SSID, such as a connection to other SSID, the system deletes the configuration file for the attached SSID and reconnect the default SSID.
3.4 RFID Sensing 1. Tap the TagInfo.
四、 Product specification Processor CPU Cortex-A53, 64 bit, Quad core, 1.
FCC Caution. This device complies with part 15 of the FCC Rules. Operation is subject to the following two conditions: (1) This device may not cause harmful interference, and (2) this device must accept any interference received, including interference that may cause undesired operation. § 15.21 Information to user. Any Changes or modifications not expressly approved by the party responsible for compliance could void the user's authority to operate the equipment. § 15.105 Information to the user.