Wireless – G USB Adapter User's Manual Model # AWN-USB-54R
FCC Warning This equipment has been tested and found to comply with the limits for a Class B digital device, pursuant to part 15 of the FCC Rules. These limits are designed to provide reasonable protection against harmful interference in a residential installation. This equipment generates, uses, and can radiate radio frequency energy and, if not installed and used in accordance with the instructions, may cause harmful interference to radio communication.
Revision History Revision V1.0 History First release All brand and product names mentioned in this manual are trademarks and/or registered trademarks of their respective holders.
Contents 1. Introduction............................................................................4 1.1 1.2 1.3 Features ........................................................................4 Package Contents ........................................................4 LED Indicator ................................................................4 2. IP Address ............................................................................5 3. Install Driver/Utility......................................
1. Introduction This adapter is an IEEE 802.11g client device that delivers unrivaled wireless performance for your desktop PC or laptop PC. With this adapter, you can easily upgrade your computer wireless connectivity. Once connected, access your high-speed Internet connection while sharing photos, files, music, video, printers, and storage. Get a better Internet experience with a faster wireless connection so you can enjoy smoother digital phone calls, gaming, downloading, and video streaming.
2. IP Address To use this Wireless 54 Mbps USB Adapter with a computing device, the Wireless 54 Mbps USB Adapter must be equipped with an USB 1.1 or 2.0 Interface. All drivers and supporting software for the Wireless 54 Mbps USB Adapter need to be loaded and configured first.
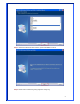
3. Install Driver/Utility 3.1 For Windows XP & Windows 2000 Step1: Inset Wireless LAN USB Adapter Installation CD into CD-ROM drive then windows below will appear. Click Install Driver Utility to begin Driver Installation. Step2: After click Install Driver Utility, the Choose Setup Language windows will show. Select the language or the installation from the choices below and then click Next to continue.
Step 3: Welcome windows will show as below, please click Next to continue. Step 4: Please wait for while during setup program is configuring.
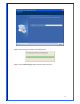
Step 5: Now searching for Hardware and installing Drivers. Step 6: Click Continue Anyway while below two windows are shown.
Step 7: Click Finish to complete installation.
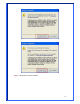
[Configure Wireless LAN Utility] Step 1: After Setup has finished installing the driver, please right-click the Wireless LAN icon on the system tray, and select “Open Config Utility”. Step 2: The USB Wireless LAN Utility will be displayed; select “Available Network” tab and the utility will auto-detect the available network channels and shows them in the list. Choose one you would like to connect.
Step 3: The Wireless Network Properties windows will show. You will see the network channel which you choose show in the Profile Name. Enter the Network Key (if it is necessary) and click OK to continue.
Step 4: The chosen Wireless network will be listed in the Profile tab. Step 5: Now you can browse the Internet Explorer and connect to the Internet. Step 6: You can also move your mouse to wireless LAN icon in the system tray and check current Wireless Network Connection status.
3.2 For Windows ME & Windows 98SE Step1: Inset Wireless LAN USB Adapter Installation CD into CD-ROM drive and then windows below will appear. Click Install Driver Utility to begin Driver Installation. Step2: After click Install Driver Utility, the Choose Setup Language windows will show. Select the language or the installation from the choices below and then click Next to continue.
Step 3: Welcome windows will show as below, please click Next to continue. Step 4: Please wait for while during setup program is configuring.
Step 5: Now searching for Hardware and installing Drivers. Step 6: After setup has finished, click “Finish” to exit the wizard. Step 7: You must restart your computer to complete the device configuration. Select Yes, I want to restart my computer now and click OK Button.
[Configure Wireless LAN Utility] Step 1: After reboot the computer, double-click USB Wireless LAN Utility to open the Utility. Step 2: The USB Wireless LAN Utility will be displayed; select “Available Network” tab and the utility will auto-detect the available network channels and shows them in the list. Choose one you would like to connect. Step 3: The Wireless Network Properties windows will show. You will see the network channel which you choose show in the Profile Name.
Step 4: The chosen Wireless network will be listed in the Profile tab. Step 5: Now you can browse the Internet Explorer and connect to the Internet.
3.3 For Windows Vista Step1: Inset Wireless LAN USB Adapter Installation CD into CD-ROM drive then windows below will appear. Click Install Driver Utility to begin Driver Installation. Step2: After click Install Driver Utility, the Choose Setup Language windows will show. Select the language or the installation from the choices below and then click Next to continue.
Step3: Welcome windows will show as below, please click Next to continue. Step4: Please wait for while during setup program is configuring.
Step5: Choose Install this drive software anyway and continue the next step. Step6: Please wait for while during the driver install process. Step7: Choose Install this drive software anyway and continue the next step.
Step8: Click Finish to complete installation. Step9: After setup your device, Windows System will pop-up the message and asks you to restart your computer for finishing set up your new hardware. Please click YES, I want to restart my computer now to restart again.
Step10: After you restart your computer, please go to Start Control Panel. Step11: Select “Network and Sharing Center”.
Step12: In the right panel, choose “Manage network connections”. Step13: Right-click the Wireless Network Connection 2 (which is indicated “Realtek RTL8187B Wireless 802.11g 54Mbps USB 2.0 Network Adapter #2”) and choose “Connect/Disconnect”.
Step14: Select an available network to connect. Step15: Type the network security key or password if it is necessary.
Step16: Please wait for connecting the selected network. Step17: After successfully connected to the network, click “Close” to exit this wizard.
Step18: Back to Network and Sharing Center, you will see the computer has been connected to the Internet.
4. Wireless Network Configuration The Configuration Utility is an application that helps you to configure the Wireless LAN PCI Card and monitor the link status and statistics during the communication process. 4.1 General In the “Configuration”, you can immediately monitor the link status. 4.2 Profile In the “Profile”, you can view the current using Available Point(s). You can add, remove or edit the current Available Point(s). Also you can duplicate the AP or Set current AP as Default.
4.3 Available Network The “Available Network” shows all Access Points, Routers or Adapters nearby when operating in Ad-Hoc mode. Click “Refresh” button to collect the SSID and Channel information of all the wireless devices nearby. If you want to connect to any device on the list, double-click the item on the list, and the card will automatically connect to the selected device. If you want to add one Access Point to the profile, click “Add to Profile” button.
[Network Authentication] -- Open System: No authentication is needed among the wireless devices. -- Shared Key: Only Wireless device using a shared key (WEP Key identified) is allowed to connecting each other. Setup the same key as the wireless device which the card intends to connect. -- WPA-PSK: It is a special modem of WPA for home users without an enterprise authentication server and provides the same strong encryption protection.
authentication types to their WLAN access points. Some of the most commonly deployed EAP authentication types include MD5,GTC,TLS,EAP,TTSL,and PEAP. -- Tunnel: Use the drag-down list to choose the tunnel. -- Username: Enter the username for personal certificate. -- Identity: Enter the Identity for personal certificate. -- Password: Enter the password in advance. -- Certificate: Click drag-down list to choose certificate that you want to use. 4.
4.5 Status In the “Status”, you can view the current link status of Wireless LAN adapter. 4.6 Statistics In the “Statistics”, you can get the real time information about the packet transmission and receiving status.
5. Troubleshooting Symptom: The LED is off. Remedy: Make sure the USB Adapter is inserted properly. Otherwise contact your vendor. Symptom: The LED is always on not blinking Remedy: Make sure that you have installed the driver from attached CD. Otherwise contact your vendor. Symptom: The LED is blinking but the USB Adapter icon does not appear in your icon tray.. Remedy: Make sure that you have installed the Utility from the attached CD.
6. Glossary IEEE 802.11 Standards The IEEE 802.11 Wireless LAN Standards Subcommittee, which is formulating a standard for the industry. Access Point An internetworking device that seamlessly connects wired and wireless networks together. Ad Hoc An Ad Hoc wireless LAN is a group of computers, each with a WLAN adapter, connected as an independent wireless LAN. Ad Hoc wireless LAN is applicable at a departmental scale for a branch or SOHO operation.
wired to the network at all times to gain access. Gateway A gateway is a hardware and software device that connects two dissimilar systems, such as a LAN and a mainframe. In Internet terminology, a gateway is another name for a router. Generally a gateway is used as a funnel for all traffic to the internet. IEEE Institute of Electrical and Electronics Engineers. Infrastructure An integrated wireless and wired LAN is called an Infrastructure configuration.
network environment where access point is deployed, PCs can always be connected regardless of where they are located or roam. SSID A Network ID require to a network. Only clients and Access Points that share the same SSID are able to communicate with each other. This string is case-sensitive. Simple Network Management Protocol (SNMP) Simple Network Management Protocol is the network management protocol of TCP/IP.
interoperability. The organization is formerly known as WECA. Wi-Fi Protected Access (WPA) The Wi-Fi Alliance put together WPA as a data encryption method for 802.11 wireless LANs. WPA is an industry-supported, pre-standard version of 802.11i utilizing the Temporal Key Integrity Protocol (TKIP), which fixes the problems of WEP, including using dynamic keys. Wide Area Network (WAN) A WAN consists of multiples LANs that are tied together via telephone services and/or fiber optic cabling.