ADVUV630 Owner’s Manual ® DEST NAV PWR-VOL A/V INPUT
Introduction Congratulations on your purchase of the ADVUV630 Mobile Multimedia Receiver. Please read the instruction manual for this product before using. The documentation provided will allow you to fully enjoy all the features this unit has to offer. Please save this manual for future reference. iPhone®, iPod®, iPod classic, iPod nano, iPod shuffle, and iPod touch are trademarks of Apple Inc., registered in the U.S. and other countries.
Contents Controls and Indicators ............................................................................................. 4 Main Menu ................................................................................................................... 6 Main Menu - Page 1 .............................................................................................. 6 Main Menu - Page 2 .............................................................................................. 7 Audio Control Menu ...
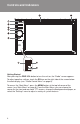
Controls and Indicators DEST NAV PWR-VOL A/V INPUT Getting Started After pressing the PWR-VOL button to turn the unit on, the “Radio” screen appears. To adjust equalizer settings, touch the EQ icon on the right side of the screen below the clock display (see ““Audio Control Menu” on page 8). To access the “Main Menu”, press the MENU button at the top left corner of the screen (see “Main Menu” on page 6).
Controls and Indicators 1. Eject Button Press this button to eject a DVD/CD/MP3 disc. Disc play is stopped, the disc is ejected, and the unit will change to radio operation. If the disc is not removed from the unit and the button is pressed again, the disc will be re-loaded. If the disc is not removed from the disc slot within 10 seconds of being ejected, it will be automatically re-loaded to prevent accidental damage. 2.
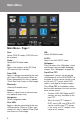
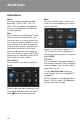
Main Menu Main Menu - Page 1 Disc: Select CD/DVD mode, (CD/DVD must be inserted). Radio: Select AM/FM radio mode. SD: Access the contents of the SD Card (SD card must be inserted). Front USB: Access a device connected to the front (A/V Input) USB connector. When an iPod is connected, this icon is labeled “Front iPod” and shows an iPod image. Bluetooth: View the Bluetooth menu. Camera: Access a signal from an external camera (optional accessory). Navigation: Select navigation mode.
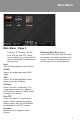
Main Menu Main Menu - Page 2 • If the rear TFT source is AV IN1 or AV IN2, the front TFT source must be different since these AV IN sources cannot be shared between front and rear. Rearrange Main Menu Icons: Press and hold an icon, and then drag to relocate it to another position on the screen. The icon in the target destination will move to the vacant position. Next: View a second page of menu choices. AV IN2: Access the audio/video input (AV2) mode.
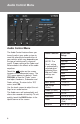
Audio Control Menu Audio Control Menu The Audio Control feature allows you to easily adjust your audio system to meet the acoustical characteristics of your vehicle, which vary depending on the type of vehicle and its measurements. Proper setting of the Fader and Balance boosts the effects of the cabin equalizer. Touch the EQ button on the screen to access the audio control menu. The “EQ” menu appears by default. Touch FAD-BAL to view the “Fader” menu and adjust Loudness, Subwoofer and Fader settings.
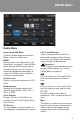
AM/FM Radio Radio Menu Accessing Radio Mode: To access Radio mode from the Main Menu, select the “Radio” icon. MENU: Press to access the “Main Menu” (see “Main Menu” on page 6). From the Main Menu, you can choose the source for the front and rear zone TFT screens, change the background wallpaper, or select the “Settings” menu to adjust a variety of system features. Volume Level: Displays the current volume level (VOL 0-50).
AM/FM Radio Radio Menu Band: Press to select or change the radio band (AM-1, AM-2, FM-1, FM-2, or FM3). When the band is changed the presets associated with the band will also be displayed. Scan: Press to access the Auto-Store Tuning feature which will automatically scan and enter up to six strong stations into the six preset memory locations. If you have already set the preset memories to your favorite stations, activating the Auto-Store feature will erase those stations and enter the new strong stations.
Loading Media Loading Media Load Disc: Playback begins automatically when a disc is inserted. You can play video, audio or images stored on the following discs: • • • DVD Video, DVD-R, DVD-RW VCD Audio CD, CD-R, CD-RW Eject Disc: Press the button on the front panel to eject the disc. When the disc is ejected, the unit switches to the previous source. Connect USB/iPod Device: 1. Open the AV/INPUT cover (or access the rear iPod connector). 2. Connect your USB/iPod cable to the front or rear USB input.
Audio Disc Audio Menu (iPod, USB, Disc, SD) MENU: Press to access the “Main Menu” (see “Main Menu” on page 6). From the Main Menu, you can choose the source for the front and rear zone TFT screens, change the background wallpaper, or select the “Settings” menu to adjust a variety of system features. Clock Display: Displays the time (12:19 AM) as entered by the user in the Settings Menu, clock function. Random: Press to access the random play function.
JPEG/MPEG 1/2 Rotate 2/2 Zoom JPEG Image Mode Navigating Files: When a disc containing JPEG files is loaded in the unit, the Root Menu appears automatically. The Root Menu will display the contents of the disc. image on the left side of Touch the the screen (under the music note and film strip) to view a display of the images or image folders contained on the disc or card/device. JPEG images can be stored on the disc/card device as individual images or in folders.
JPEG/MPEG Audio Sub Title MPEG Video Mode Navigating Files: When loading a disc or device containing multiple MPEG, or a combination of media files, the Root Menu appears automatically. The Root Menu will display the contents of the disc, card or device. If only one MPEG file exists, playback will begin automatically. Touch the film strip image on the left side of the screen (under the music note) to view a display of the MPEG files or folders contained on the disc or card/device.
DVD 1/2 2/2 Audio Sub Repeat Title A-B ANGLE DVD Mode Accessing DVD Mode: When a DVD disc is loaded in the unit, playback begins automatically. To access DVD mode from the Main Menu, select the “Disc” icon. DVD Touchscreen Areas: Touch the areas indicated below to access on-screen options: A B C • • • Touch A to access the main menu. Touch B to view disc information, including file type, elapsed and remaining playing time, title and chapter number.
JPEG/MPEG DVD Mode • • • • Repeat: Repeat the current chapter. Press the icon a second time to repeat the current title. Press the icon a third time to turn the repeat function off. A-B: Repeat a specific portion from point A to point B of the disc. During playback press A-B to set the starting point A. Press A-B a second time to set the ending point B. The player will repeatedly play the part between Point A and Point B. Press A-B a third time to cancel A-B repeat and resume playback.
Bluetooth Bluetooth Menu Entering Bluetooth Mode: To enable Bluetooth mode, press the unit’s front panel MENU button. Next, press the Settings icon on page 2 of the Setup menu. Select the Bluetooth submenu and set the “Bluetooth” option to “On”. Select the Bluetooth icon from the main menu to acces the Bluetooth screen. Previously paired phones (if applicable) are listed in the center of the screen. Use the up/down buttons to navigate the list.
Bluetooth Connecting to a Bluetooth device Bluetooth® technology has the capability to wirelessly synchronize and transfer data among devices. The Bluetooth audio capabilities can be used for wireless phones hands-free applications. Bluetooth has many profiles and the unit is compatible with most Bluetooth enabled wireless phones. Before attempting to use the Bluetooth functions on the unit, please make sure your wireless phone supports Bluetooth functions. Pairing a Wireless Phone and the Unit: 1.
Bluetooth Connecting to a Bluetooth device discover mode to ON. NOTE: Some discover modes have a time limit, usually a minute, before they are automatically turned off. asking connect to the unit, “Yes” or “No”. Press Yes. The wireless phone and the unit should pair and the wireless device name will appear at the top of the screen. 4. On the Bluetooth main menu press the Connect Phone button. 5. Follow the prompts on your wireless phone to initiate pairing.
Bluetooth Bluetooth Setup Menu To access the Bluetooth “Options” menu, press the Setup button. Bluetooth: Choose to turn the Bluetooth feature “On” or “Off.” Auto Connect: The “Auto Connect” option will allow the unit to automatically connect to a previously paired Bluetooth device when it is in range. When the Auto Connect option is set to “Off”, you must initiate the pairing process with your wireless phone. To enable the Auto Connect option, set this feature to “On.
Bluetooth Disconnecting Deleting a paired wireless device: 1. Press the front panel MENU button and then press the Bluetooth icon to access the Bluetooth main menu. 2. Touch to select the phone model number you want to delete and then press the Delete button. Disconnect a Bluetooth device: To disconnect a device, press the Disconnect Phone button. The device will also be disconnected when the device is moved beyond the operational range (approximately 30 feet).
Bluetooth Making Calls Make a call (keypad direct entry): 1. Press the front panel MENU button and then press the Bluetooth icon to access the Bluetooth main menu. 2. Pair the phone with the unit. 3. Press the Direct Entry button to view the keypad. Cancel call in progress: To cancel a call in progress, touch the Hangup button at the bottom of the screen.
Bluetooth Managing Incoming Calls Managing Incoming Calls: When connected to a Bluetooth phone, the unit will mute audio output, pause disc play, and change to the Bluetooth screen when a call is received. The incoming phone number and assigned name for that number will appear in the middle of the screen. An audible tone will sound from the unit and a graphic display will appear on the front panel. If the incoming call has no caller ID, the unit will display “Private Caller”.
Rear Camera Camera Function Rear Camera Function: The unit is “camera ready.” Before accessing any camera features, you must install a rear video camera. When the camera is not installed and the function is accessed by the gear selector being placed in reverse or the unit’s menu, touching the Camera icon produces no response. When the camera is installed, the rear view image of what is behind the vehicle will appear when the vehicle’s gear selector lever is placed in reverse.
Rear Camera Rear Display Function The unit allows two sources to be played simultaneously. For example, the unit’s screen can be set to the radio function while the rear passengers can watch a DVD video using an optional rear monitor. The unit provides for connection of up to two additional monitors (sold separately) for rear passengers. Perform the following to access the Rear TFT function: 1. Turn on the rear monitor. Refer to the monitor’s owner’s manual for instructions. 2.
iPod/iPhone (Front USB/Rear USB) iPod/iPhone Music Menu Accessing iPod Mode: Press to access the “Main Menu” (see “Main Menu” on page 6). Connect a supported iPod or iPhone to the Front or rear USB connector. The iPod icon appears instead of the USB icon whenever an iPod or iPhone is attached to the Front or Rear USB connector. Press the Front iPod or Rear iPod icon to access iPod mode. Music playback begins automatically.
iPod/iPhone (Front USB/Rear USB) iPod/iPhone Music Menu Direct Entry: Press to access the direct access song selection keyboard. Enter the desired track number and press the check mark ( ) to play the selected track. / : Press to begin playback. Press again to pause playback. List: Press once to view a list of the files contained on the iPod. Press the onscreen arrows to navigate the list of files or touch to select. Once highlighted, touch the file name again to play.
iPod/iPhone (Front USB/Rear USB) iPod/iPhone Video Menu Press the film strip icon on the left side of the screen (under the music note) to view the iPod movie menu. NOTE: You must use the optional jLink USB cable to view iPod video on this unit. • • • • • • 28 MOVIE: Provides a list of all the movies that are stored in the iPod. Pressing the movie’s name will begin playback of the movie. RENTAL: Provides a list of rental videos that are stored in the iPod.
AV IN1/AV IN2 Input Auxiliary Audio/Video Input AV IN1 Auxiliary Audio/Video Input: The unit contains an auxiliary audio/ video input which can accept signals from various audio/video devices. The A/V INPUT on the front panel (reference Item 9, Controls and Indicators) accepts a 3.5mm connector which has three female color coded RCA connectors on the opposite end. The yellow is used for video, the red accepts the right channel audio and the white accepts the left channel audio.
XM Satellite Radio (Optional) XM Radio Menu Listeners can subscribe to XM® Radio on the Web by visiting www.xmradio. com, or by calling (800) 967-2346. Customers should have their Radio ID ready (see “Displaying the Identification (ID) Code”). Customers can receive a limited number of free-to-air channels without activation. Accessing XM Radio Mode: To access Radio mode from the Main Menu, select the “XM” icon. Band Indicator: Indicates the frequency band currently playing (BAND 1, BAND 2 or BAND 3).
XM Satellite Radio (Optional) XM Radio Menu frequencies. Press to recall preset stations. Mute: This button is used to mute the volumefrom the radio. By pressing the button, a Mute indication will appear on the speaker icon and the volume will be muted. Band: Press to select or change the radio band (Band 1, Band 2 or Band 3). When the band is changed the presets associated with the band will also be displayed.
SWC (Steering Wheel Control) SWC Menu The ADVUV630 is compatible with the PAC (Pacific Accessory Corporation) steering wheel control adapter SWI-PS. A 3.5mm female connector (labeled “SWC”) on the back of the head unit allows connectivity to the PAC adapter. Please refer to the instructions included with the PAC adapter for detailed installation information. The steering wheel control option allows you to program your existing steering wheel controls to work with the ADVUV630.
System Settings Menu Settings Menu Accessing the “Setup” Menu: Press MENU to access the “Main Menu.” Press Next to view a second page of menu options and then select the Settings icon. Accessing Menu Items: Press the submenu feature you wish to adjust (Video, General, etc.). The submenu feature for adjustment will be highlighted. Pressing the feature will display the adjustable parameters.
System Settings Menu Settings Menu • • option to “Off.” Wallpaper: Choose a preferred wallpaper image (Black, Shore Waves, Lotus Flower, Smart Cars, Dense Flowers, User Defined) to be displayed behind the Main Menu options. Select the “User Defined” option to load up to 12 user-defined wallpaper images using the Micro-SD slot located at the top right corner of the front panel (labeled “MAP”).
System Settings Menu Settings Menu for pairing the unit with Bluetooth devices. DVD Rating Menu Options: • Set Password: Set the password to restrict playback of disc content determined by the “Rating Level” option. The default code is “4321.” • Rating Level: Choose an appropriate rating level to be playing without the use of a password. • Kid safe Acceptable for children. G Acceptable for general viewers. PG Parental guidance recommended. PG-13 Unsuitable for children under the age of 13.
Wallpaper User-Defined Wallpaper Accessing the “Wallpaper” Screen: Press MENU to access the “Main Menu.” Press Wallpaper to access the “Wallpaper” screen. You can also access the “Wallpaper” screen from the “Setup” menu by choosing the Settings button. Choose “Wallpaper” from the “General” menu and select the “User Defined” option. You can store up to 12 JPEG or Bitmap images in flash memory for use as wallpaper. Adding User-Defined Images: 1.
Troubleshooting Problem Cause Corrective Action Radio fuse blown Install new fuse with correct rating Car battery fuse blown Install new fuse with correct rating Illegal operation Press the RESET button located in the bottom left corner of the front panel Improper audio output connection Check wiring and correct GENERAL Unit will not power on No/low audio output Poor sound quality or distortion Unit resets itself when engine is off Volume set too low Increase volume level Improper “MUTE” c
Troubleshooting Problem Cause Corrective Action Vehicle antenna is not fully extended Connect the vehicle antenna control cable properly Vehicle antenna not properly connected Connect the vehicle antenna control cable properly LOCAL function is activated Use LO/DX button to turn LOCAL function off Cannot insert disc Disc already inside unit Eject current disc and insert new one Image blurred, distorted, or dark Disc is illegally copied Use original disc Disc does not play back Disc is warpe
Error Messages Message Displayed Cause Corrective Action Loading Disc is being read No Disc Disc is dirty Clean disc with soft cloth Disc is upside down Insert disc with label side up Disc not present in loading compartment Insert disc Bad Disc Disc is dirty Clean disc with soft cloth Disc is upside down Insert disc with label side up Unknown disc Disc format is not compatible with this unit Region Error DVD is not compatible with region code of unit Error Illegal mechanism operation
Care and Maintenance 1. Use only a clean silicone cloth and neutral detergent to clean the front panel or monitor. A rough cloth and non-neutral detergent (such as alcohol) may result in scratching or discoloration. 2. Do not get water or cleaning fluids on the unit. 3. If the temperature inside the player gets too hot, a protective circuit automatically stops play of the disc. If this occurs, allow the unit to cool before operating the player again. 4.
Specifications DVD/CD Player Compatible Disc Media: DVD + R / RW (Single and Dual Layer) and CD-R / RW Compatible Media Formats: CD-DA, MP3, WMA, VCD, SVCD, Xvid, AVI, MPEG1 / 2 Signal to Noise Ratio: > 95dBA Dynamic Range: > 95dB Frequency Response: 20Hz to 20 kHz, -3dB Channel Separation: > 60dB @ 1 kHz D/A Converter: High performance 24-bit / 192 kHz sample rate, Multi-Bit Sigma-Delta Modulator Video Format: NTSC, PAL (auto-detection) Output: 1Vp-p (75-ohm) Input: 1Vp-p (75-ohm) FM Tuner Tuning Range:
® Audiovox Electronics Corporation Hauppauge, NY 11788 Technical Assistance: 1-800-323-4815 www.audiovox.com © 2011 Audiovox Ver.