WIRELESS STEREO HEADPHONES INSTALLATION AND OPERATING INSTRUCTIONS AW720
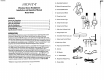
A. Adjustable Headband B. Battery Compartment Cover Wireless Stereo Headphones Installation and Operation Manual C. Power ON/OFF Switch Model AW720 D. Volume Control Wheel E. Charge Input Jack CONTENTS Connect the Transmitter Power the Headphones Adjust the Transmitter Tune the Headphones More Helpful Information Troubleshooting Specifications & Features 4 5 6 7 7 9 11 F. Power Indicator Light G. Tuning Indicator Light H. Tuning Control Wheel I. Audio Level Indicator Light J.
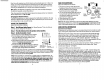
POWER THE HEADPHONES CONNECT THE TRANSMITTER Connect the transmitter as follows: The AW720 headphones are powered by 2AAA Nickel Cadmium (Ni-Cd) batteries. Step 1 Power the Transmitter 1. Insert the power cord from AC Adapter (P) into the Transmitter Power Input Jack (K). 2. Plug the AC Adapter (P) into any standard wall outlet. Note: There is no transmitter ON/OFFswitch. The transmitter is designed to be left plugged in and powered at all times.
Over time, with repeated use, Ni-Cd batteries will eventually wear out. If, after a full charge, you notice a) dramatically decreased playing time, b) the Power Indicator Light begins to dim quickly and/or c) static interference occurs within a short time of turning the headphones on, it may be time to replace the batteries. Note: Battery life depends on frequency of use, time, and care (fully discharging the batteries regularly, as described above.
Hint: If your VCR (or other RCA-type audio source you are connecting to) is mono (a single audio output), you need to acquire another RCA "Y" Cable. It differs from the "Y" Cable Adapter included in this kit It will have a single male RCA plug and 2 female RCA jacks. Connect the dual RCA plugs from the "Y" Cable Adapter (a) to the 2 female RCA jacks on the second "Y" cable, then connect the single male RCA plug of the second "Y" cable to the single audio output of the VCR.
Trouble Checks and Adjustments SPECIFICATIONS & FEATURES NoSoundl • Confirm the batteries are"good." When batteries begin to weaken, there can be static breakup. If necessary, replace/recharge the batteries. Transmitter Omnidirectional Effective Transmitting Range: Up to 300 feet* Adjustable Audio Level Input Variable Frequency Adjustment between 912.5 and 914.5 MHz Line Audio Input with 3.
WARRANTY ONE YEAR LIMITED WARRANTY Recoton Corporation (the Company) warrants to the original retail purchaser of this product that should the product or any part thereof be proven defective in material or workmanship within One Year from the date of original purchase, such defects will be replaced without charge for parts or labor. This warranty does not apply to any incidental or consequential damages.
IMPORTANT! READ INSTRUCTIONS BEFORE HOOK-UP
PLEASE SEND ALL CORRESPONDENCE TO: 2950 Lake Emma Road Lake Mary, Florida 32746 ©1998 Recoton Corp.
w R E s E L s PRODUCT REGISTRATION FORM Thank you for purchasing this Advent Wireless Product. At Advent, we're dedicated not only to producing a superior product, but to providing the very best customer service possible. As part of our ongoing effort to better understand you, the Advent customer, we ask that you fill out this Registration Card and return it within 15 days of purchase.
10. What is the primary reason for this purchase? (check one) Profession 4. 1. 2. 3. 4. 5. 6. 5. D D D D D D Administrator/Clerical 7. 8. Instructor/Teacher 9. Homemaker Management 10. Professional 11. Retired D D D D D Sales/Marketing Self Employed Skilled Laborer/ Tradesmen Student Technical Not including yourself, what are the genders and ages of children and other adults living in your household? 1. 2. 0 4. D 3. 2. 0 0 3. 4. D 1. 6. D Female Age (in years) o D o LL.J LL.J LL.
13. Did you buy this product by itself or with a stereo or video system? 1. 1. D By itself 2. D With audio products 3. D With video products 2. 3. 4. 5. 6. 14. What made you choose the Advent brand? (check all that apply) 1. D 2. D 3. D 4. D 5. D 6. D 7. D 8. D Do you plan to purchase in the next year? (cheek all that apply) 16. Sound Quality Appearance Reputation Ease of Operation Previous Advent Owner Salesperson Recommendation Features Wireless 17. 0 9.0 0 8. 0 9.
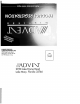
900 MHz WIRELESS STEREO HEADPHONES INSTALLATION AND OPERATING INSTRUCTIONS AW720
900 MHz Wireless St6reo Headphones Installation and Operation Manual Model AW720 CONTENTS Cennect the Transmitter Pctwer the Headphones Adiust the Transmitter Replace the Battery Troubleshooting Specifications & Features 4 6 8 9 10 11 INTRODUCTION Thank you for your purchase of 900 MHz Wireless Headphones by Advent. These headphones will expand and enhance your enjoyment of the various audio sources - such as TV and stereo - found in your home.
A. Self-Adjusting Headband B. Battery Compartment Cover C. Power Indicator Light D. Power ON/OFF Switch E. Charge Input Jack F. Tuning Indicator Light G. Volume Control Wheel H. Tuning Control Wheel I. Audio Level Indicator Light J. Transmitter Power Input Jack K. Charge Output Jack L. Output Level Control Wheel B t H M. Right Audio Input Jack N. left Audio Input Jack ~ O. Frequency Control Wheel - P. Charge Cable Q. Transmitter AC Adapter R. Dual RCA Cable S. "V" Cable Adapter T.
CONNECT THE TRANSMITTER Connect the transmitter as follows: Stu1 Transmitter Power Input Jack (J) Power the Transmitter 1. Insert the power cord from AC Adapter (Q) into the Transmitter Power Input Jack (J). 2. Plug the AC adapter into any sta(ldard wall outlet. ~~ Transmitter AC Adapter(Q) Stu 2 Connect to an Audio Source WARNING: DO NOT connect the Dual RCA cables to a speaker output on the audio source.
N.te: If you select Option 1 or Option 2 to connect the transmitter, the audio level will be fixed or variable, depending on your equipment. If you select Option 3, the audio level will be variable. AlOUT FIXED-LEVEL OUTPUTS A fixed-level, or line-level audio output is considered ideal since it provides an audio signal unchanged by adjustments to the audio source (stereo, etc.) volume control.
Hillt: On most bookshelf-type or compact stereo systems, inserting a headphone plug into the headphone jack results in automatir. cutoff of the stereo system speakers. Hint Most TVs, regardless of age or price, have variable outputs. If you are unsure which, if any of your outputs is fixed, refer to the TV instruction manual. Some TVs have outputs that can switch between variable and fixed. Refer to the TV instruction manual. When given a choice, fixed is always recommended.
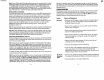
CHARGE SCHEDULE USE CHARGE TIME PLAY TIME Initial charge Average Extended 24 hours 10-12 hours 16-18 hours 5-6 hours 3-4 hours 5-6 hours Play time as shown above reflects use of batteries in good condition. Note: The charger will not overcharge the batteries if left on longer than shown above. If you will not use the headphones for an extended period of time, however, it is recommended you unplug the charger cable.
ADJUST THE TRANSMITTER Adjust the transmitter as follows: STEP 1 TURN ON YOUR AUDIO SOURCE (i.e. Stereo Receiver, TV, etc.) so that you can hear sound coming from the source. STEP 2 SET THE TRANSMITTER "LEVEL" Audio Level 1. Set the Frequency Control Wheel (0) to its midpoint. 2. Turn the Output Level Control Wheel (L) all the way to the right as shown. 3. Check status of Audio Level Indicator Light (I). If it flickers intermittently (about half the time), proceed to "Tune the Headphones". 4.
Hint If you wish to use the headphones in such a way that you are the only person who can hear the audio from the TV (e.g. use them in bed while another person in the room is sleeping), connect as described in the above Hint. However, if there is no VCR to connect to, use the following configuration: Connect to the variable audio outputs of the TV, then turn the TVs internal speakers OFF.
TROUBLESHOOTING The following troubleshooting guide takes you through some of the more common problems and corrections associated with the installation and/or operation of a wireless system. If the problem persists, please call 1-800-732-6866 and a knowledgeable customer service representative will assist you.
Change the position of the transmitter Frequency Control Wheel (0) to change the operating frequency. Then, readjust the headphone Tuning Control Wheel (H) until the Tuning Indicator Light (F) illuminates red. Try changing the physical location of the transmitter. Locate it as high and free of obstruction as possible. Avoid placing directly on top of a TV, if possible. Try moving the transmitter and headphones closer together.
WARRANTY ONE YEAR LIMITED WARRANTY Recoton Corporation (the Company) warrants to the original retail purchaser of this product that should the product or any part thereof be proven defective in material or workmanship within One Year from the date of original purchase, such defects will be replaced without charge for parts or labor. This warranty does not apply to any incidental or consequential damages.