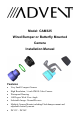
Model: CAM325 Wired Bumper or Butterfly Mounted Camera Installation Manual Features • • • • • • • Very Small Compact Camera High Resolution, ¼ inch CMOS Color Camera Waterproof Housing 160 Degree Wide View Angle Selectable Image: Normal/Reverse Multiple Camera Mounts including Flush bumper mount and adjustable butterfly mount.
Table of Contents Warnings ......................................................................................3 Product Description .....................................................................4 Packing List .................................................................................4 Camera Installation ......................................................................5 Camera Wiring Diagram..............................................................8 Specifications ..................
Warnings The product is intended to assist in safe driving and to allow the driver to have a broader rear view while the vehicle is in reverse. You, as the driver, are solely responsible for the safe operation of your vehicle and the safety of your passengers according to local traffic regulations. Do not use any features of this system to the extent it distracts you from safe driving. Your first priority while driving should always be the safe operation of your vehicle.
Product Description This new camera system gives you two mounting options for installing a backup camera onto the rear of your vehicle (surface butterfly mount and in bumper flush mount). This Wired Camera is compatible with most monitors/TFT screens and can be connected using a standard RCA connector.
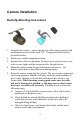
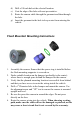
Camera Installation Butterfly Mounting Instructions 1. Assemble the camera – ensure that the top of the camera marked with an alignment arrow and the word “UP” is aligned with the notch in the metal bracket. 2. Decide on a suitable mounting position. 3. Examine the vehicle to determine the best way to run the power wires to the reverse lights and the extension cable through the car. 4. Mount the camera using the provided bracket and screws – the bracket can be bent to suit different mounting angles. 5.
d) e) f) g) Drill a 5/8 inch hole at the selected location. Coat the edge of the hole with rust preventative. Route the camera cable through the grommet and then through the hole. Insert the grommet in the hole to keep water from entering the vehicle. Flush Mounted Mounting Instructions 1. Assembly the camera. Ensure that the spacer ring is installed before the flush mounting supporter is screwed on. 2.
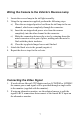
Wiring the Camera to the Vehicle’s Reverse Lamp 1. Locate the reverse lamp in the tail light assembly. 2. Using the tap connector supplied, perform the following steps: a) Place the un-stripped positive lead from the tail lamp in the run channel, which runs completely through the connector. b) Insert the un-stripped red power wire from the camera completely into the other channel in the connector.
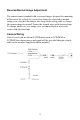
Reverse/Normal Image Adjustment The camera comes standard with a reversed image, designed for mounting at the rear of the vehicle. If you need to change to a forward or normal image view, clip the blue jumper wire loop on the wiring cable to change the camera image to normal. Secure the clipped wires with electrical tape. To change back to reverse image view, reconnect the blue wires and secure with electrical tape.
Specifications 1. 2. 3. 4. 5. 6. 7. 8. 9. 10. Voltage: DC9v – DC24v Current: 50 mA Signal System: NTSC Image Sensor: ¼” CMOS Sensor Horizontal Resolution: 480 lines Viewing Angle: 160 degrees Minimum Illumination: 0.7 Lux Image Display: Selectable Normal/Reverse Image Adjustable Viewing Angle Dimensions: • Camera: 26mm W x 30mm L • License Plate Bracket: 196mm W x 36mm H Troubleshooting Symptom No video signal appears while reversing the vehicle Solution 1.
7
© 2008 Audiovox Electronics Corp., 150 Marcus Blvd., Hauppauge, N.Y.