ADVENT xt WARDEN CALL SYSTEM V2.0 OPERATORS MANUAL KIRK 4020/4040 DECT TELEPHONES WITH A PANASONIC 308 PBX Tynetec operate a policy of continual product improvement.
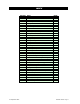
INDEX SECTION 1 2 3 4 5 6 7 8 9 10 11 12 13 14 15 16 17 18 19 20 21 22 23 24 25 26 27 28 29 30 31 32 33 34 35 36 37 38 15 September 2009 TOPIC The Intercom Unit DECT & Fixed CLI Telephones Answering a Call Calling a Resident Sequential Daily Calls Call Waiting Using The PA Function Using the Fire Alarm Function Selecting The Operating Mode Parking an Alarm Call Checking The Fault Memory Checking The Call Memory Setting The System Time & Date Setting The Daily Alarm Time Using The Local Offsite Mode Setti
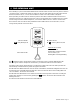
1. THE INTERCOM UNIT Each dwelling on your scheme will be fitted with an Advent xt intercom unit, there may also be others in communal areas, corridors and toilets. Any intercom unit or its associated orange pullcords located in bedrooms, bathrooms, etc, can be used to initiate an alarm call on the warden call system. When operating in onsite mode all calls are reported on the DECT cordless handset or the fixed CLI telephones.
2. DECT & FIXED CLI TELEPHONES All DECT cordless handsets and/or fixed CLI telephones will ring when a call exists in Onsite Mode. To answer a call using a DECT telephone press the Line key, if using a fixed CLI telephone simply lift the handset. When answered a speech message will identify the call type and flat number, the residents name may also be displayed if it has been programmed into the telephone name/number memory.
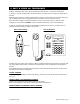
3. ANSWERING A CALL To answer an alarm call, press the Line key on the DECT cordless handset and listen to the alarm message in the earpiece (the alarm message will repeat until the key is pressed). Press the key after the message and speak with the caller. To cancel the alarm call press the # key followed by the Line key to clear the connection. TO ANSWER A CALL: 1. Press the Line key 2. Listen to the alarm message in the earpiece 3. Press the key to open speech 4.
4. CALLING A RESIDENT To call a resident, press the Line Key on the DECT cordless handset, enter 8 1 and listen for the “Ready” prompt in the earpiece. Enter the flat number required using the DECT keypad and press the key, a tone will sound in the flat and a speech link will open. To cancel the call press the # key followed by the Line key to clear the connection. TO CALL A RESIDENT: 1. Press the Line key and enter 8 1 2. Wait for the “Ready” prompt in the earpiece 3.
. USING THE PA FUNCTION The Advent xt system has an optional PA facility to allow public announcements to be made through all intercoms. To use the PA function you must enter a special code on the DECT telephone. TO USE THE PA FUNCTION: 1. Press the Line key and enter 8 1 2. Wait for the “Ready” prompt in the earpiece 3. Enter the code 1000 followed by the key 4. Make your public announcement 5. Press the # key to end your announcement 6.
9. SELECTING THE OPERATING MODE The Advent xt system can report calls to an onsite manager via a DECT cordless telephone, to a mobile warden via a standard mobile telephone or a remote control centre via a PSTN line. The operating mode is selected via a keyswitch on the Status Module or by entering special codes on the DECT telephone.
10. PARKING AN ALARM CALL If the Advent xt system is permanently re-reporting an alarm call due to a fault condition this call can be “PARKED” using the DECT telephone. To park a constant call, answer and speak to the caller in the normal way, then press the 5 key to park the call and clear the system down in the normal way. TO PARK A CONSTANT CALL : 1. Press the Line key 2. Listen to the alarm message in the earpiece 3. Press the key to answer the call 4. Press the 5 key to Park the call 5.
13. SETTING THE SYSTEM TIME & DATE The Advent xt system has a real time clock with auto-BST adjustment which is used for activity monitoring mode and recording the time and date of all events on the optional printer. TO CHECK/SET THE SYSTEM TIME: 1. Press the Line key and enter 8 1 2. Wait for the “Ready” prompt in the earpiece 3. Enter the code 2000 followed by the key 4. A message will announce the time (24 hour format) 5. Press the # key to accept 6.
15. USING THE LOCAL OFFSITE FACILITY The Advent xt system may have a Local Offsite facility to divert calls to mobile warden via a standard mobile telephone (or any other fixed telephone with a DTMF keypad). Answering a call in Local Offsite mode is identical to the procedure for onsite mode except a site identification message is added so that several different schemes can be identified.
17. CHECKING THE CONTROLLER FIRMWARE VERSIONS The Advent xt controller firmware versions can be checked using the DECT handset. TO CHECK THE FIRMWARE VERSIONS: 1. Press the Line key and enter 8 1 2. Wait for the “Ready” prompt in the earpiece 3. Enter the code 4009 followed by the key 4. Three firmware versions will be announced and logged on the system printer. 5. Wait for the “Ready” prompt in the earpiece 6.
21. USING THE EXTRACARE FUNCTION Extracare intercom units are available for certain categories of schemes where alarm calls must be cancelled at the source of the call. Systems can contain a mixture of standard and Extracare intercoms to maximise operational efficiency whilst ensuring care level compliance. When a call is made from an Extracare intercom it is reported and answered in the normal way but it cannot be permanently cleared until it has been visited and cancelled locally.
23. USING THE ACTIVITY MONITORING FUNCTION The Advent xt system may be fitted with PIR movement detectors in each flat to monitor the residents activity. Three time periods can be programmed to operate on a daily basis - if no activity is detected during each period then the flat numbers with no activity will be reported to the DECT telephone at the end of each period. TO SET THE ACTIVITY START TIME: 1. Press the Line key and enter 8 1 2. Wait for the “Ready” prompt in the earpiece 3.
24. TO ENABLE/DISABLE ACTIVITY MONITORING Vacant or temporarily unoccupied flats can have the activity monitoring disabled to prevent in-activity calls being reported every day. TO DISABLE VACANT FLATS: TO RE-ENABLE VACANT FLATS: 1. Press the Line key and enter 8 1 2. Wait for the “Ready” prompt in the earpiece 3. Enter the code 3000 followed by the key 4. Enter the flat number to be disabled followed by the 5. Press the Line key to clear the connection 1. Press the Line key and enter 8 1 2.
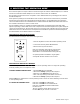
25. ACTIVITY MONITOR PANEL Timed activity monitoring periods can be overridden to provide permanent monitoring via a wall mounted Activity Monitor Panel. An LED representing each flat will be extinguished when activity is detected, LED’s will remain illuminated for flats with no activity. 1 16 17 32 33 48 49 64 RESET Each LED is labelled with the actual flat number it represents. Press the panel RESET button to illuminate all LED’s. LED’s will extinguish as activity is detected in each flat.
27. ADDING & REMOVING RADIO TRIGGERS Neck worn pendants or any other Altec radio devices can be allocated to any flat by entering a special code on the DECT telephone (not via Local Offsite mode); TO ADD A RADIO TRIGGER: 1. Press the Line key and enter 8 1 2. Wait for the “Ready” prompt in the earpiece 3. Enter the code 5000 followed by the key 4. Enter the flat number followed by the key 5. Activate the Pendant (or Altec Device) to be added 6.
28. CHECKING INTERCOMS FOR PRIVACY When an intercom is called with privacy mode selected (intercom LED illuminated green) the resident can hear your voice but you cannot hear them. You can check which intercoms have privacy mode selected by entering a special code on the DECT telephone; LIST INTERCOMS IN PRIVACY MODE: 1. Press the Line key and enter 8 1 2. Wait for the “Ready” prompt in the earpiece 3. Enter the code 5003 followed by the key 4. All flats with intercoms in privacy will be heard 5.
30. SETTING DOOR ENTRY CALL TRANSFERS The Advent xt system may be fitted digital door entry panels to allow visitors to call residents direct from outside the building. Once called the resident has the facility to allow access by pressing the button on their door entry telephone. With the telephone on-hook the button is used to select privacy mode and prevent calls from the door entry system. A simple User Guide is provided with each telephone.
31. SETTING 24 HOUR DOOR ENTRY CALLS The Advent xt door entry system can be set-up to operate in 1 of 3 modes; 1. allow calls from door entry panels to all flats 24 hours a day 2. disable all calls during the evening/night (time period programmable by Engineer only) 3. disable calls to most flats during evening/night with some exclusions (user programmable) If a call is made from a door entry panel to flat number which has calls disabled the visitor will automatically be transferred to the Manager.
32. CHECKING TELEPHONES FOR PRIVACY/FAULT When a door entry telephone has privacy mode selected (telephone LED illuminated red) the resident will not receive any door entry calls. You can check which telephones have privacy mode selected by entering a special code on the DECT telephone; LIST TELEPHONES IN PRIVACY MODE: 1. Press the Line key and enter 8 1 2. Wait for the “Ready” prompt in the earpiece 3. Enter the code 8008 followed by the key 4. All flats with telephones in privacy mode will be heard 5.
33. MANUAL DATA BACK-UP/RESTORE FUNCTION All system configuration and radio device data is automatically saved to a removeable memory card. In the event of complete system failure the card can be swapped to a new controller and the original settings can be quickly restored. Note: a manual back-up/restore can only be performed for 60 seconds following a system reset. SYSTEM DATA BACK-UP: 1. Press the Line key and enter 8 1 2. Wait for the “Ready” prompt in the earpiece 3.
34. INTERCOM UNIT TEST MODE The intercom unit “Test Mode” allows all ceiling pullcords, smoke detectors and radio pendants etc. to be tested on a per-flat basis without putting a call on the system. Once in Test Mode the intercom will beep as each device is activated, the system printer will log each test with the flat number, device type, time & date. The intercom must be in a quiescent state to enter the Test Mode, ie.
35.
36. DTMF KEY SUMMARY The telephone keys can be pressed during a call to perform the following functions; DTMF Key 1 2 3 4 5 6 7 8 9 0 # Function Volume Up Volume Down Lock Release Park A Call Index Re-send Call Tone Confirm Entry Clear 37.
38. SYSTEM CONFIGURATION DETAILS This section should be completed by the Commissioning Engineer prior to handover. Site Name: Installed By: Office Tel No. Service Tel No.