TOCLS-OE100 TOCLJ-OE100 Quick Start Guide
Introduction Congratulations on your purchase of the TOCLS-100/ TOCLJ-100 Mobile Multimedia Receiver. Please read the instruction manual for this product before using. The documentation provided will allow you to fully enjoy all the features this unit has to offer. Please save this manual for future reference. iPod® Control “iPod” is a trademark of Apple Computer, Inc., registered in the U.S. and other countries. Expanding Systems iPodVTR etc. Expanding audio features Expanding visual features.
Contents WARNINGS. . . . . . . . . . . . . . . . . . . . . . . . . . . . . . . . . . . . . . . . . . . . . . . . . . . . . . . . . . . . . . . . . . . . . . . . . . . 2 FEATURES . . . . . . . . . . . . . . . . . . . . . . . . . . . . . . . . . . . . . . . . . . . . . . . . . . . . . . . . . . . . . . . . . . . . . . . . . . . 4 CONTROLS AND INDICATORS. . . . . . . . . . . . . . . . . . . . . . . . . . . . . . . . . . . . . . . . . . . . . . . . . . . . . . . . 5 Turning the Unit ON or OFF. . . . . .
Features General •B luetooth - Bluetooth hands-free profile for safety / convenience and A2DP profile for streaming music from a PDA / PMP • Navigation Ready • Infrared Remote Control • Two Composite Video Outputs for Additional Screens • One Audio /Video Auxiliary Inputs • Rotary Encoder Audio Control • Seven-Band EQ with Eleven Preset EQ Curves • Rear Camera Input DVD • Aspect Ratio - 16 : 9 or 4 : 3 • Fast Forward, Fast Reverse - 2X, 4X, 8X and 16X • Play, Pause, Stop, Next Chapter and Previous Chapt
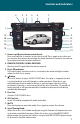
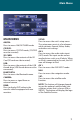
Controls and Indicators 2 3 4 5 6 7 1 8 19 18 17 16 9 10 11 12 13 14 15 1. Power on/off and volume control knob Press and hold for 3 seconds to turn the unit off. Press again to turn the unit on. Increase the volume by rotating the knob clockwise. Decrease the volume by rotating the knob counter-clockwise. 2. REMOTE CONTROL SIGNAL RECEIVER Receives the IR signal from the remote control. 3.
9. NAV Button Press this button to access the Navigation mode. 10. DEST Button Press this button as a shortcut to access the Navigation mode and enter a desired destination. 11. REPEAT Button Press to repeat the voice guidance or instructions while in the Navigation mode. 12. MENU Button Press this button to access the main menu. 13. AV IN Jack Jack (3.5mm) which provides an audio or video input jack. 14.
Controls and Indicators Turning the Unit ON or OFF: Press the front panel PWR button to turn the unit on. The unit can also be turned on buy pressing the front remote control power button. To turn the unit off, press and hold the front panel PWR button for 2 seconds or press the front remote control power button. Volume Adjustment: To increase or decrease the volume level, turn the front panel PWR button or press the VOL+/ VOL- buttons on the front remote control.
Audio Adjustments: 1. Press the unit’s front panel TUNE SEL button or press SEL on either the front or rear remote control to access the Equalizer Control Menu. 2. Press and hold either the left/right cursor buttons to move the highlight on the feature to be adjusted to a negative or positive value. To left of the cursor buttons is a numerical value for the feature being adjusted.
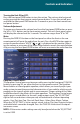
Main Menu MAIN MENU SETUP: Press to access the unit’s setup menu AM/FM: The setup menu consists of a submenu Press to access AM/FM TUNER mode. which contains General, Video, Audio, CD/DVD: and other unit settings. Press to access CD/DVD mode, (CD/DVD AV 2: must be inserted). Press to access the audio video input SD CARD: (AV2) mode. The input can be various Press to access the contents of the SD media devices such as an iPod etc. When Card (SD card must be inserted).
Bluetooth BLUETOOTH OPERATION Bluetooth® technology has the capability to wirelessly synchronize and transfer data among devices. The Bluetooth audio capabilities can be used for wireless phones hands free applications. Bluetooth has many profiles and the unit is compatible with most Bluetooth enabled wireless phones.
Bluetooth Pairing the Unit and a Wireless Phone: 1. Press the front panel MENU button and then press the BLUETOOTH icon to access the Bluetooth main menu. 2. Select the Bluetooth setup option on the wireless phone to be paired (please refer to the wireless phone’s instruction manual to enter Blue7. Using the keypad enter the PIN or tooth setup, turn Bluetooth on/off, Passkey to your wireless phone and and perform pairing). Access the press OK.
graphic display will appear on the front panel. If the incoming call has no caller ID, the unit will display “Private Caller”. 10. Once the Bluetooth main menu appears on the unit’s front panel the wireless phone and the unit have paired. 11. In the event the unit and the wireless phone fail to pair or bond the following screen will appear. 12. Press the RETRY icon. The wireless phone will receive a prompt similar to “Pairing request from _______ Accept? Yes or No “.
Bluetooth 2. Use the 0-9, */+, and # buttons to 2. Press the CONTACTS icon. The followinput the phone number. If necessary ing screen will appear:: press the C icon to clear the last digit or the entire number and start over. 3. After entering the phone number, press the icon to dial the call. The number dialed will be displayed on the screen. 3. Press icon for the number to be dialed. The following screen will appear: 4. To end the call, press the button. 4.
AV2 Media Device AV2 Media Device (iPod) iPod Icon: Indicates the media device that is connected to AV2. When pressed the user is returned to the Main Menu.The media devices can consist of an iPod, USB device, or 3.5mm jack input. The USB device and the 3.5 mm jack input can be connected to the unit at the same time. When the iPod is connected the other two inputs are excluded. Bluetooth Icon: The icon will be light blue when paired to a device and gray when not paired.
AV2 Media Device SCAN Icon: Pressing this icon will play the first ten seconds of each track. Play/Pause Icon: Press to begin playback. Press the icon again to pause playback. Icon: Plays tracks in the directory in random order. Previous Icon: Press to advance to the next item contained in the menu. Repeat Icon: Press the icon (S ) during playback to repeat playback of the current song. This operation plays back the track currently being played. Press the icon (A )a second time to repeat all.
2. Press the unit’s front panel or front Keyboard Icon: remote control MENU button and Press to directly access a video or an select AV1. audio track. When the icon is pressed a keyboard will appear. The user can then 3. Use the controls located on the device to start playback and other enter the desired feature number and control functions. press OK. The item will begin to play.
Navigation NAVIGATION 4. You can now select a destination. For this example, let’s find a nearby The mode can be accessed from the airport. Select by pressing screen: Main Menu. The mode can also be se • Icon to activate main menu. lected by pressing the front panel NAV/ • Start Route Guidance DEST button or can be selected using • Point of Interest the front remote control to access the • State/Province Main Menu.
XM Radio (Optional) XM SATELLITE RADIO MENU XM Icon: Identifies the name of the satellite radio that is currently playing. When pressed the user is returned to the Main Menu. Antenna Icon: As the strength of the satellite radio signal increases, the number of illuminated segments will increase. Bluetooth Icon: The icon will be light blue when paired to a device and gray when not paired. Time Display: Displays the time as entered by the user in the SETUP Menu, clock function.
XM Radio (Optional) Jump Icon: Press jump to access the previous channel (i.e., switch between the current and previous channel). Previous Icon: Press to advance to the next previously available category. Keyboard Icon: Press to directly tune to a channel. When the icon is pressed a keyboard will appear. The user can then enter the channel number and press OK. The unit will tune to the channel and the programming on the channel will play.
SIRIUS Radio (Optional) SIRIUS SATELLITE RADIO MENU currently playing channel is now set into that preset memory position. The channel can now be recalled at any time by pressing that preset. Categories Icon: When the icon is pressed a category list is displayed. Categories group music by type such as jazz, rock, classical etc. Use the next arrow ( ) or the previous arrow ( ) to view the available SIRIUS categories.
SIRIUS Radio (Optional) Icon: Press jump access to the previous channel (i.e., switch between the current and previous channel). Previous Icon: Press to advance to the next previously available category. Keyboard Icon: Press to directly tune to a channel. When the icon is pressed a keyboard will appear. The user can then enter the channel number and press OK. The unit will tune to the channel and the programming on the channel will play.
To unlock the channel, press the channel icon and the lock will open. The following screen will appear: Enter the four digits you want to replace the default password. The following screen will appear: The channel will appear in the screen followed by the opened lock. This indicates that the channel is now accessible. Edit Password: Press the EDIT PASSWORD icon and the following screen will appear: Enter the same four digits again and press OK. The password is now changed to the new password.
Notes NOTES 23
C 2009 Audiovox Electronics Corp.