
Installation guide

www.AdventistSat.com Toll Free 866-552-6882
17
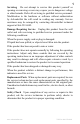
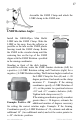
Assemble the LNBF Clamp and attach the
LNBF clamp to the LNBF arm.
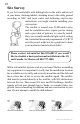
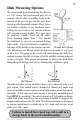
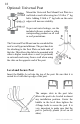
Example: Positive +20°
LNBF Rotation Angle: _______________
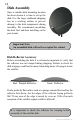
Install the GEOSATpro Mini Bullet
LNBF into the LNBF Clamp. Slide the
LNBF as far away from the reflector as
possible so the tabs on the LNBF plastic
housing touch the LNBF clamp. Rotate
the LNBF in the circular clamp until the
centering line on the top of the LNBF
aligns with the LNBF Rotation specified
in the aiming coordinates.
Standing in front of the dish looking
towards the reflector, rotate the LNBF counter clockwise (left) for
a positive (+) LNBF Rotation setting and Clockwise (right) for a
negative (-) LNBF Rotation setting. The Rotation Angle is marked on
the LNBF Clamp for Zero (0) and +/- 20
degree positions. Each mark on the clamp
measures 5°. Example: If the aiming
coordinates specify a LNBF Rotation of
+13, set the pointer to a position between
+10° and +15° counter clockwise (left).
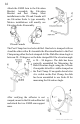
Tighten both clamp screws (2).
If the aiming coordinates specify a number
greater than +/- 20 degrees, estimate the
additional number of degrees necessary
for setting the correct rotation angle. Example: If the Aiming
Coordinates specify a LNBF Rotation of -30, estimate and add an
additional 10° (two additional marks) and set the center pointer to
a -30° clockwise position.