
Installation Guide

INSTRUCTIONS
INSTRUCTIONS
2
WITH TRANSFER FILM
OR A “CUT-OUT”
White vinyl on which we print a
design and then cut it out.
A
B
Single-colour vinyl that we have cut into a
specific shape or design. There is a transparent
film covering the design.
WITHOUT TRANSFER FILM
OR A “PRINT”
1. Use scissors to cut out the
dierent parts of the design.
1. Gently peel the backing o each
piece. Make sure your ngers don’t touch
the sticky surface, especially the edges.
TECHNIQUE A • with transfer lm
What about air bubbles?
You can press them out with the palm of your hand or a soft tool. You can also puncture them with the tip of a pin.
Can I reposition the decal?
Prints can be repositioned if you wish, but they must be handled very carefully.
How can I remove a decal?
Use a tool with a thin edge to unstick the top of the decal. Don’t use your ngernails – you could mark the paint.
Lift the decal and peel it evenly downward so as not to damage the paint.
2. Place the visible surface of the decal
face down on a table (so you can’t see the
design). Apply pressure by rubbing a
credit card or similar tool evenly over the
paper backing.
2. Apply the pieces to the wall. Start by
sticking one edge to the wall and then
gradually and gently press the rest of it
into place with your hand. If necessary,
gently peel the piece o the wall and
reposition it.
APPLYING YOUR DECAL
B
A
C
3. Peel o the paper backing parallel
to the table (angle of 180°). If the decal
comes unstuck from the transparent lm,
replace the paper backing and rub that
spot again so that the decal re-adheres to
the transparent lm.
4. Pick up the transparent lm by the two
top corners and place the decal against
the wall. Rub the card against the lm
from top to bottom, starting in the top left
corner and working toward the right.
C
C
BACK
5. Peel o the lm, starting in the upper
left-hand corner, gently pulling it down
and to the right until the whole top edge
is free. Then gently and evenly peel the
lm straight down, parallel to the wall.
C
6. If any part of the decal remains stuck
to the lm, stick the lm with that part
back against the wall and rub the lm
again until the decal adheres properly to
the wall (step 4).
C
C
(angle of 180°)
(angle of 180°)
3. Once the entire decal is in place,
gently press it with the palm of your
hand or a soft cloth, from the centre
outward.
TECHNIQUE B • without transfer lm
1
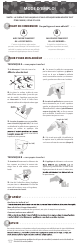
BEFORE GETTING STARTED
*NOTE: THE SURFACE YOU ARE APPLYING YOUR DECAL ONTO MUST BE
CLEAN, DRY AND SMOOTH.
3
What next?
4
USEFUL TIP
If you have any problems when applying your decal, contact our customer service department
at 514-664-5193 or info@adzif.ca
What kind of decal are you using?
It may happen that your sticker shows signs of curling around the edges on some surfaces. In that case, use a hair
dryer at maximum heat setting to apply heat around the edges of the product, at a distance of 5 in, while applying
pressure with your ngers. The softened vinyl will conform closely to the surface texture and present a perfect
adhesion.
2
WITH TRANSFER FILM
OR A “CUT-OUT”
White vinyl on which we print a
design and then cut it out.
A
B
Single-colour vinyl that we have cut into a
specific shape or design. There is a transparent
film covering the design.
WITHOUT TRANSFER FILM
OR A “PRINT”
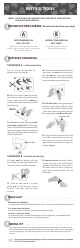
1. Use scissors to cut out the
dierent parts of the design.
1. Gently peel the backing o each
piece. Make sure your ngers don’t touch
the sticky surface, especially the edges.
TECHNIQUE A • with transfer lm
What about air bubbles?
You can press them out with the palm of your hand or a soft tool. You can also puncture them with the tip of a pin.
Can I reposition the decal?
Prints can be repositioned if you wish, but they must be handled very carefully.
How can I remove a decal?
Use a tool with a thin edge to unstick the top of the decal. Don’t use your ngernails – you could mark the paint.
Lift the decal and peel it evenly downward so as not to damage the paint.
2. Place the visible surface of the decal
face down on a table (so you can’t see the
design). Apply pressure by rubbing a
credit card or similar tool evenly over the
paper backing.
2. Apply the pieces to the wall. Start by
sticking one edge to the wall and then
gradually and gently press the rest of it
into place with your hand. If necessary,
gently peel the piece o the wall and
reposition it.
APPLYING YOUR DECAL
B
A
C
3. Peel o the paper backing parallel
to the table (angle of 180°). If the decal
comes unstuck from the transparent lm,
replace the paper backing and rub that
spot again so that the decal re-adheres to
the transparent lm.
4. Pick up the transparent lm by the two
top corners and place the decal against
the wall. Rub the card against the lm
from top to bottom, starting in the top left
corner and working toward the right.
C
C
BACK
5. Peel o the lm, starting in the upper
left-hand corner, gently pulling it down
and to the right until the whole top edge
is free. Then gently and evenly peel the
lm straight down, parallel to the wall.
C
6. If any part of the decal remains stuck
to the lm, stick the lm with that part
back against the wall and rub the lm
again until the decal adheres properly to
the wall (step 4).
C
C
(angle of 180°)
(angle of 180°)
3. Once the entire decal is in place,
gently press it with the palm of your
hand or a soft cloth, from the centre
outward.
TECHNIQUE B • without transfer lm
1
BEFORE GETTING STARTED
*NOTE: THE SURFACE YOU ARE APPLYING YOUR DECAL ONTO MUST BE
CLEAN, DRY AND SMOOTH.
3
What next?
4
USEFUL TIP
If you have any problems when applying your decal, contact our customer service department
at 514-664-5193 or info@adzif.ca
What kind of decal are you using?
It may happen that your sticker shows signs of curling around the edges on some surfaces. In that case, use a hair
dryer at maximum heat setting to apply heat around the edges of the product, at a distance of 5 in, while applying
pressure with your ngers. The softened vinyl will conform closely to the surface texture and present a perfect
adhesion.