
User's Manual


Getting Started…
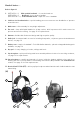
BATTERIES
Open the battery cover (#7, Fig. H) and place two 1.5 Volt AA size batteries inside the compartment.
Ensure that the + and – poles of the batteries are in the correct positions (refer to gure inside the battery
cover). The headset is polarity protected in the event batteries are incorrectly inserted.
When the batteries get low in power, a voice message saying “low battery” will be heard inside the
headset. This message will be repeated in 2 minute intervals until the batteries are completely depleted,
at which point the headset will have a voice conrmation saying “battery empty” and will shut off.
Note(s):
1) Battery life span/operating time varies greatly depending on the type of batteries and how the
headset is used. For example, with an alkaline battery with at least 2000 mAh, the operating time
in low-power mode is about 30 hours at 10 % transmission, 10 % reception and 80 % stand-by. In
high-power mode, the operating time under the same conditions decreases by about 10 %. At 20 %
transmission, 20 % reception and 60% stand-by, the operating time is about 20 hours.
2) The headset has an automatic shut-off feature to save on batteries. It will turn itself off automatically
after 2 hours if one of the following keys is not activated in that timeframe: (0) (+) (-) (PTT/VOX). A
triple tone signal will be emitted every 30 seconds for 5 minutes prior to nal shut down.
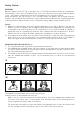
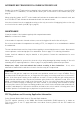
ADJUSTING THE CUPS FOR FIT (Fig. J)
1. The cup guide arms (#3, g H) slide up and down the metal wires.
2. For headband and neckband models, place the headset on your head, with one hand, hold the band
(#1, g H) in place and with the other slowly move the cup up/down the wire arms until they are in
the comfortable and snug t position.
3. For harthat mount position (g. K) snap the headset helmet attachment into the slot of the helmet.
Place the hardhat with headsets in place on your head and refer to 2. above for cup placement
instructions.
The hardhat mounted headset can be used in two positions:
working position (1) and ventilation position (2).
When in use, the cups must be placed in working position. Press the headband wires inwards until
you hear a click on both sides. To ensure proper noise attenuation while in the working position do
not press against the lining or edge of the helmet.
Tip: At the end of the day, do not leave the headset in the upright position on top of the helmet, leave
it in the ventilation position allowing the foam on the inside of the cups to dry out.
(J)
(K)