
User's Manual


28
ENGLISH
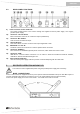
B) Available channels
Indicates the quantity of channels available within the selected bank (total number prior to scanning,
number of free channels after scanning).
C) Set bank
Indicates the currently set bank number.
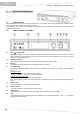
25) CHANNEL indicator
The number of the channel inside the bank used by the receiver is displayed.
26) FREQUENCY indicator
Indicates the frequency to which the receiver is tuned.
27) Output level indicator
Displays the output level used for the LIN (line) or MIC (microphone). The outputs are selected using the
button (12) located on the rear of the receiver (see paragraph 2.5).
28) MUTE indicator
Displays if the connected transmitter has been muted or not.
29) Antenna A signal level
Indicates the intensity of the signal received from antenna A.
30) Antenna B signal level
Indicates the intensity of the signal received from antenna B.
31) Noise signal level
When the transmitter is off, it indicates the intensity of the detected input noise.
3.5.2 SETTING THE COUNTRY
From the main screen, turn the Select (4) knob until the country is displayed (22).
Press the knob to select the change function, turn the knob again to scroll the countries, for more information
about the country abbreviations.
Press the knob to confirm the selected country.
Note. Changing the country involves losing the selection of the bank and channel being used.
3.5.3 SETTING THE BANK
From the main screen, turn the Select (4) knob until displaying the number that indicates the bank being used
(24-C).
Press the knob to select the change function, turn the knob again to scroll the bank numbers. When selecting
the bank number, you can see on the display the variation in the order of the bank (24 - A), the number of
channels (24 - B) and the frequency (26).
Press the knob to confirm the selected bank.
Note. Changing the bank involves losing the selection of the channel being used.
3.5.4 SETTING THE CHANNEL
From the main screen, turn the Select (4) knob until displaying the number that indicates the “channel” (25).
Press the knob to select the change function, turn the knob again to scroll the channels. When selecting the
channel, you can see the variation of the frequency on the display (26).
Press the knob to confirm the selected channel.
Note. When selecting the channel, you can see the intensity of the noise detected by the receiver (31) on the
currently selected channel. It is recommended to select the channel with the lowest possible amount of noise in
order to optimize device operation.
3.5.5 SCROLLING THE MENU PAGES
From the main screen, press the Up (5) or Down (6) button to change the menu. From any menu page, if the
selection phase is not active, press the Esc (7) key to automatically return to the main screen.
3.6 CONFIGURING THE RECEIVER AND TRANSMITTER
All the basic system settings can be displayed and modified from the various menus of the MOVING D-R
receiver.
The transmitter is configured by the receiver, by means of the IRDA device.