
User's Manual


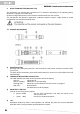


5) ANTENNA
Built-in antenna that allows the transmission of the signal.
6) BATTERIES
Battery area
3.2. Functions
Power on
Press and hold the ON/OFF button for a few seconds; the status LED (2) turns on and indicates
the status of the transmitter.
Power off
Press and hold the ON/OFF button for about 1 sec.; the status LED (2) turns off.
Selection of the channel
Only via the IR command from the receiver.
a) Remove the cover of the transmitter pressing the
appropriate unlock key (2) and slide the handle
(refer to battery change)
b) Align the transmitter and the receiver at a distance
of 20/30cm
c) Press and hold for two seconds the "SYNC" button
on the receiver:
- The "SYNC" LED on the receiver begins to
flash for 5 sec.
- The status LED on the transmitter flashes as
soon as the synchronization has been
achieved.
d) Once synchronization is achieved, the transmitter
will immediately begin to transmit on the preset
channel.
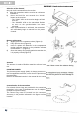
Battery replacement
The batteries are housed within the transmitter.
For the replacement follow the directions below:
a) Slightly press the unlock button (2) - (Figure A).
b) Completely slide off the handle (figure B)
c) Insert or replace the batteries in the compartment,
paying particular attention to the polarities
indicated on the bottom + /- (Figure C)
d) Press again the unlock button (2) to insert the
handle (Figure D)
e) Lock the handle fully inserting it under the
transmitter head. (Figure E)
Antenna
The antenna is integrated in the transmitter. For a correct
operation hold the transmitter in the central section and
never from the bottom.