
User Guide


33
F
Dichtung
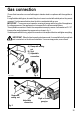
Fig.11
Fitting the hob to the worktop
To install the hob, proceed as follows:
1) Remove the pan supports, the burners caps
and crowns and turn the hob upside down,
taking care the ignition candles are not
damaged in this operation.
2) Place the sealing gasket (supplied with the hob)
on the edges of the cut out: place it exactly on
the front and rear edge, taking care that the
sealings meet without overlapping;
3) Fix the hob with the relevant screws (fig. 11).
The traction of the screws is able to trace the
sealing, any excess of which can be easily
removed.
The edge of the hob forms a double labyrinth seal which provides a total guarantee against infiltration
of liquids.
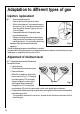
Kitchen unit with door
Proper arrangements must be taken in designing the forniture unit, in order to avoid any contact with
the bottom of the hob which can be heated when it is operated. The recommended solution is shown
in Fig. 12.
The panel fitted under the hob should be easily removable to allow an easy access if a technical
assistance intervention is needed.
Kitchen unit with oven
The hob recess dimensions must comply the indication given in Figs. 13 and 14 and must be
provided with brackets to allow a continuous supply of air.
To avoid overhating, the building in should be carried out as shown in Figs. 15 e 16.
The hob's electric connection and the oven's one must be carried out separately, both for safety
reasons and to allow the oven to be easily taken off the unit.
In case a hood with lenght of 600 mm. is fitted over the hob, the hanging furniture units beside the
hood must be placed at 550 mm. minimum from the hob, to allow the fitting and the correct use of the
lid, if required (fig. 17).
Possibilities for insertion