
User Guide

25
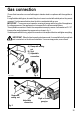
Fig. 3
F
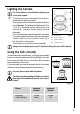
Lighting the burners
For easier lighting, proceed before putting a pan
on the pan support.
To light a burner, push in the relevant knob and turn it
anticlockwise to "maximum position".
After lighting the flame, keep the knob pushed down for
about 5 seconds. This will allow the "thermocouple" (Fig.
2, lett. D) to be heated and the safety device to be
switched off, otherwise the gas supply would be
interrupted.
Then, check the flame is regular and adjust it as required.
If you cannot light the flame even after several attempts,
check the "cap" (Fig. 2, lett. A) and the "crown" (Fig. 2,
lett. B) are in the correct position.
To put the flame out, turn the knob to the symbol l.
Always turn the flame down or put it out before taking the pans off the burner.
Using the hob correctly
To ensure maximum burner efficiency, it is strongly recommended
that you use only pots and pans with a bottom fitting the size of the
burner used (see table below), so that flame will not spread
beyond the bottom of the vessel.
It is also advisable, as soon as a liquid starts boiling, to turn down
the flame so that it will barely keep the liquid simmering.
Use only pans or pots with flat bottom.
Carefully supervise cookings with fats or oil, since
these types of foodstuff can result in a fire, if over-
heated.
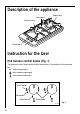
Fig. 2
FO 2295
A - Burner cap
B - Burner crown
C - Ignition candle
D - Thermocouple
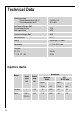
Burner minimum maximum
diameter diameter
Big (rapid) 160 mm. 260 mm.
Small (Auxiliary) 80 mm. 160