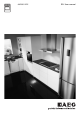
68456IU-MN EN User manual
www.aeg.com CONTENTS 1. 2. 3. 4. 5. 6. 7. 8. 9. 10. 11. 12. 13. SAFETY INFORMATION . . . . . . . . . . . . . . . . . . . . . . . . . . . . . . . . . . . . . . . . . . . . . . . . . . . . . . 3 SAFETY INSTRUCTIONS . . . . . . . . . . . . . . . . . . . . . . . . . . . . . . . . . . . . . . . . . . . . . . . . . . . . . . 4 PRODUCT DESCRIPTION . . . . . . . . . . . . . . . . . . . . . . . . . . . . . . . . . . . . . . . . . . . . . . . . . . . . . 8 BEFORE FIRST USE . . . . . . . . . . . . . . . . . . . .
ENGLISH 3 1. SAFETY INFORMATION Before the installation and use of the appliance, carefully read the supplied instructions. The manufacturer is not responsible if an incorrect installation and use causes injuries and damages. Always keep the instructions with the appliance for future reference. 1.1 Children and vulnerable people safety WARNING! Risk of suffocation, injury or permanent disability.
www.aeg.com • Never try to extinguish a fire with water, but switch off the appliance and then cover flame e.g. with a lid or a fire blanket. • Do not store items on the cooking surfaces. • Do not use a steam cleaner to clean the appliance. • Metallic objects such as knives, forks, spoons and lids should not be placed on the hob surface since they can get hot.
ENGLISH • The sides of the appliance must stay adjacent to appliances or to units with the same height. • Do not install the appliance on a platform. • Do not install the appliance adjacent to a door or under a window. This prevents hot cookware to fall from the appliance when the door or the window is opened. WARNING! Make sure to install a stabilizing means in order to prevent tipping of the appliance. Refer to Installation chapter. Electrical connection WARNING! Risk of fire and electrical shock.
www.aeg.com appliance from the power supply. This to prevent an electrical shock. • Users with a pacemaker must keep a distance of minimum 30 cm from the induction cooking zones when the appliance is in operation. WARNING! Risk of fire or explosion. • Fats and oil when heated can release flammable vapours. Keep flames or heated objects away from fats and oils when you cook with them. • The vapours that very hot oil releases can cause spontaneous combustion.
ENGLISH Pyrolytic cleaning WARNING! Risk of fire and burns. • Before carrying out a Pyrolitic selfcleaning function or the First Use function please remove from the oven cavity: – Any excess food residues, oil or grease spills / deposits. – Any removable objects (including shelves, side rails etc., provided with the product) particularly any nonstick pots, pans, trays, utensils etc. • Read carefully all the instructions for Pyrolytic cleaning.
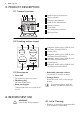
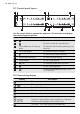
www.aeg.com 3. PRODUCT DESCRIPTION 3.1 General overview 1 2 3 1 Knob for the oven functions 4 2 Power indicator 3 Electronic programmer 5 6 5 4 3 2 1 8 4 Knob for the temperature 5 Heating element 6 Oven lamp 7 7 Fan and heating element 8 Shelf positions 3.
ENGLISH • Clean the appliance before first use. time will be saved automatically after 5 seconds). Refer to the chapter "Care and cleaning". 4.2 Sensor field Touch and hold for minimum 1 second the sensor field on the control panel to operate the appliance. 9 The display shows hour. "00" flashes. and the set 3. Press nutes. 4. Press to confirm (necessary only for the first setting. Later the new time will be saved automatically after 5 seconds) . The Temperature/Time display shows the new time.
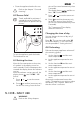
www.aeg.com 5.1 Control panel layout 1 2 10 3 4 9 8 5 7 6 Use the sensor fields to operate the appliance. The indicators and display show which function operates. Sensor field Function 1 To activate and deactivate the hob. 2 To lock / unlock the control panel. 3 Timer indicators of cooking zones To show for which cooking zone you set the time. 4 The timer display To show the time in minutes. To activate the Power function. 5 6 A heat setting display To show the heat setting.
ENGLISH Display 11 Description Not correct cookware or too small cookware or no cookware on the cooking zone. The Automatic Switch Off operates. 5.3 Activating and deactivating the hob Touch for 2 seconds to activate the hob. Touch for 1 second to deactivate the hob. 5.4 Heat setting Touch the necessary heat setting on the control bar. Change to the left or right, if necessary. Do not release before you have the correct heat setting. The display shows the heat setting.
www.aeg.com reduced zone changes between two levels. 5.8 Timer Count Down Timer Use the Count Down Timer to set how long the cooking zone operates for only this one time. Set the Count Down Timer after the selection of the cooking zone. You can set the heat setting before or after you set the timer. • To set the cooking zone: touch again and again until the indicator of a necessary cooking zone comes on. • To activate the Count Down Timer: touch of the timer to set the time ( 00 - 99 minutes).
ENGLISH 2. To activate this function, touch The display shows the symbol 4 seconds. 3. To deactivate this function, touch . The display shows the heat setting that you set before. . for When you deactivate the appliance, the function is deactivated. When you activate the appliance, the display shows SAFE . 5.11 Child safety device This function prevents an accidental operation of the hob. Activating the child safety device 1. Touch to activate the hob. Do not set the heat settings. 2.
www.aeg.com 6. HOB - HELPFUL HINTS AND TIPS WARNING! Refer to the Safety chapters. 6.1 Cookware for induction cooking zones In induction cooking, a powerful electromagnetic field almost instantly generates heat inside the cookware. Cookware material • Correct: cast iron, steel, enamelled steel, stainless steel, a multi-layer bottom (marked as correct by the manufacturer). • Incorrect: aluminium, copper, brass, glass, ceramic, porcelain.
ENGLISH 15 Heat setting Use to: Time Hints 1-3 Solidify: fluffy omelettes, baked eggs. 10-40 min Put a lid on the cookware. 3-5 Simmer rice and milkbased dishes, heating up readycooked meals. 25-50 min Add at least twice as much liquid as rice, mix milk dishes at some point during the procedure. 5-7 Steam vegetables, fish, meat. 20-45 min Add some tablespoons of liquid. 7-9 Steam potatoes. 20-60 min Use max. ¼ l water for 750 g of potatoes.
www.aeg.com 8. OVEN - DAILY USE WARNING! Refer to the Safety chapters. 8.1 Activating and deactivating the appliance 1. Turn the knob for the oven functions to an oven function. The power indicator comes on while the appliance operates. 2. Turn the knob for the temperature to set the temperature 3. To deactivate the appliance, turn the knob for the oven functions and the knob for the temperature to the Off position. 8.2 Oven Functions Oven function Application Off position The appliance is off.
ENGLISH 17 8.3 Display 7 1 2 3 1 Timer 2 Heat-up and residual heat indicator 3 Water tank (selected models only) 4 Core temperature sensor (selected models only) 7 6 5 4 5 Door lock (selected models only) 6 Hours/minutes 7 Clock functions 8.4 Buttons Button Function Clock , Minus, plus Description To set a clock function. To set the time. 8.5 Heat-up and residual heat indicator When you activate an oven function, the come on one by bars in the display one.
www.aeg.com 8.8 Cooling fan When the appliance operates, the cooling fan activates automatically to keep the surfaces of the appliance cool. If you deactivate the appliance, the cooling fan continues to operate until the temperature in the appliance cools down. 8.9 Installing the oven accessories The deep pan and the oven shelf have side edges. These edges and the shape of the guide-bars are a special device to prevent the cookware from slipping.
ENGLISH 19 The high rim around the oven shelf is a special device to prevent the cookware from slipping. 8.11 Inserting the oven shelf and the roasting pan together Put the oven shelf on the roasting pan. Put the oven shelf and the roasting pan on the telescopic runners. 9. OVEN - CLOCK FUNCTIONS Symbol Function Description Minute Mind- To set a countdown time. er Time of day To set, change or check the time of day. Refer to "Setting the time of day".
www.aeg.com 4. 5. Press + or - to set the hour. Press to confirm. 6. When the set time ends, the symbol or and the set time flash. The acoustic signal sounds for two minutes. The appliance deactivates. Press a button or open the appliance door to stop the signal. If you press while setting the time for Duration , the appliance switches to setting the End function. 9.2 Setting the Minute Minder Used to set a countdown time. The maximum time you can set is 23 hours 59 minutes.
ENGLISH 21 this occurs, do not change the temperature setting. The differences equalize during the baking procedure. 10.2 Tips on baking Baking results Possible cause Remedy The cake is not browned enough underneath. Wrong shelf position. Place the cake lower. The cake sinks (becomes soggy, lumpy, streaky). The oven temperature is too high. The next time you bake set a slightly lower oven temperature. The cake sinks (becomes soggy, lumpy, streaky). The baking time is too short.
www.aeg.com Shelf Temperature °C Time in minutes Sponge cake in tins Type of baking 2 160 50-70 Ring cake or brioche in tins 2 150-160 50-70 Madeira cake/Dry fruit cakes in tins 2 140-160 70-90 Biscuits made with egg white, meringues 3 80-100 120-150 10.4 True Fan Cooking Baking on one oven level Baking in tins Type of baking Shelf position Temperature °C Time in min.
ENGLISH Biscuits Type of baking Shelf position Temperature °C Time in min.
www.aeg.com Biscuits/small cakes/pastries/rolls Type of baking Shelf position 2 levels Temperature °C Time in min.
ENGLISH 1) Pre-heat the oven Cakes/pastries/breads on baking trays Type of baking Shelf position Temperature °C Time in min. Plaited bread/ bread crown 2 170 - 190 40 - 50 Christmas stollen 2 160 - 180 1) 50 - 70 Bread (rye bread): 1. First part of baking process. 2. Second part of baking process. 1-2 1. 230 1) 1. 2. 160 - 180 1) 2.
www.aeg.com Biscuits Type of baking Shelf positions Temperature °C Time in min.
ENGLISH Type of baking Shelf position Temperature °C Time Min.
www.aeg.com 1) Pre-heat the oven Pork Type of meat Quantity Shelf position Temperature °C Time in min. Shoulder, neck, ham joint 1-1.5 kg 1 210 - 220 90 - 120 Chop, spare rib 1-1.5 kg 1 180 - 190 60 - 90 Meat loaf 750 g -1 kg 1 170 - 190 50 - 60 Porkknuckle (precooked) 750 g -1 kg 1 200 - 220 90 - 120 Quantity Shelf position Temperature °C Time in min. 1 kg 1 210 - 220 90 - 120 1.
ENGLISH 29 Poultry Type of meat Quantity Shelf position Temperature °C Time in min. Poultry portions 200-250g each 1 220 - 250 20 - 40 Half chicken 400-500g each 1 220 - 250 35 - 50 Chicken, poulard 1-1.5 kg 1 220 - 250 50 - 70 Duck 1.5-2 kg 1 210 - 220 80 - 100 Goose 3.5-5 kg 1 200 - 210 150 - 180 Turkey 2.5-3.5 kg 1 200 - 210 120 - 180 Turkey 4-6 kg 1 180 - 200 180 - 240 Type of meat Quantity Shelf position Temperature °C Time in min. Whole fish 1-1.
www.aeg.com Quantity Shelf position Temperature °C Time min. 750 g -1 kg 1 150 - 170 90 - 120 Quantity Shelf position Temperature °C Time min. Roast veal 1 kg 1 160 - 180 90 - 120 Knuckle of veal 1.5-2 kg 1 160 - 180 120 - 150 Type of meat Quantity Shelf position Temperature °C Time min. Leg of lamb, roast lamb 1-1.5 kg 1 150 - 170 100 - 120 Saddle of lamb 1-1.5 kg 1 160 - 180 40 - 60 Type of meat Quantity Shelf position Temperature °C Time min.
ENGLISH 31 Grilling Food types for grilling Shelf position Temperature °C Roast beef, medium 2 Filet of beef, medium Grilling time in min. 1st side 2nd side 210 - 230 30 - 40 30 - 40 3 230 20 - 30 20 - 30 Back of pork 2 210 - 230 30 - 40 30 - 40 Back of veal 2 210 - 230 30 - 40 30 - 40 Back of lamb 3 210 - 230 25 - 35 20 - 35 3-4 210 - 230 15 - 30 15 - 30 Whole fish, 500 - 1000g the appliance door and let the appliance cool down. After that finish the drying process.
www.aeg.com Dish Defrosting time in min. Further defrosting time in min.
ENGLISH 33 CAUTION! Do not let the removable shelf supports stay in the appliance during Pyro Cleaning. There is a risk of damage. 2. Remove the worst dirt manually. 3. Fully close the oven door. When Pyro Cleaning is completed, the display shows the time of day. The oven door stays locked. When the appliance is cool again, an acoustic signal sounds and the door unlocks. The Pyro Cleaning procedure cannot start if you do not close the oven door. 4. Set the function Pyro Cleaning.
www.aeg.com 2. Pull the rear end of the shelf support away from the side wall and remove it. 2 1 WARNING! Make sure that the glass panels are cool before you clean the glass door. There is a risk that the glass could break. Installing the shelf supports Install the shelf supports in the opposite sequence.
ENGLISH 35 Removing and cleaning the door glasses 1. Hold the door trim (B) on the top edge of the door at the two sides and push inwards to release the clip seal. 2. Pull the door trim to the front to remove it. Hold the door glass panels on their top edge one by one and pull them upwards from the guide. Clean the door glass panels. B 3. 4. To install panels, do the above steps in the opposite sequence. CAUTION! The removable glass panels have a marking on one side.
www.aeg.com Inserting the drawer 1. Set the drawer on the support rails. Make sure that the catches engage correctly into the rails. 2. Lower the drawer until it is horizontal and push it in. WARNING! When the oven is in use, heat can build up in the drawer. Do not keep flammable things in there (e.g. cleaning materials, plastic bags, oven gloves, paper, cleaning sprays, etc.). 12. WHAT TO DO IF… WARNING! Refer to the Safety chapters.
ENGLISH Problem Possible cause 37 Solution The oven does not heat up. The appliance is deactivated. Activate the appliance. The oven does not heat up. The timer is not set. Set the timer. Refer to "Setting the time of day". The oven does not heat up. The necessary settings are not set. Make sure that the settings are correct. The oven does not heat up. The Automatic SwitchOff operates. Refer to "Automatic switch-off". The oven does not heat up. The Child Lock operates.
www.aeg.com Problem The oven does not heat up. The display shows Demo. Possible cause Solution The demo mode is activated. 1. 2. 3. 4. 5. 6. The display shows an error code that is not on this list. 1. There is an electronic fault. 2. There is steam and condensation on the food and in the oven. You left the dish in the oven for too long. If you cannot find a solution to the problem yourself, contact your dealer or the service centre. Deactivate the appliance. Press and hold the button +.
ENGLISH 39 13. INSTALLATION WARNING! Refer to the Safety chapters. 13.1 Technical Data Dimensions Height 847 - 867 mm Width 596 mm Depth 600 mm Oven capacity 74 l 13.4 Anti-tilt protection CAUTION! You must install the anti-tilt protection. If you do not install it, the appliance can tilt. Your appliance has the symbol shown on the picture (if applicable) to remind you about the installation of the anti-tilt protection. 13.
www.aeg.com it into the solid material or use applicable reinforcement (wall). 3. You can find the hole on the left side at the back of the appliance (see fig.). Lift the front of the appliance (1) and put it in the middle of the space between the cupboards (2). If the space between the bench cupboards is larger than the width of the appliance, you must adjust the side measurement to centre the appliance. Make sure that the surface behind the appliance is smooth. 13.
ENGLISH 41
www.aeg.
ENGLISH 43
892957388-A-152013 www.aeg.