FAVORIT 40010 VI Benutzerinformation Geschirrspüler
Verehrter Kunde! Vielen Dank, dass Sie sich für eines unserer Qualitätsprodukte entschieden haben. Dieses Gerät bietet Ihnen eine perfekte Synthese aus funktionellem Design und wegweisender Spitzentechnologie. Überzeugen Sie sich selbst von dem Entwicklungsvorsprung unserer Produkte, die bei Leistungsfähigkeit und Bedienung eine absolute Spitzenposition einnehmen.
Inhalt 3 117981410-24082007 Inhalt Gebrauchsanleitungen 5 Sicherheitshinweise Bestimmungsgemäßer Gebrauch Allgemeine Sicherheitshinweise Kindersicherung Aufstellung 5 5 6 6 6 Produktbeschreibung 7 Bedienblende Einstellmodus Töne 8 9 9 Erste Benutzung 10 Einstellen des Wasserenthärters Manuelle Einstellung Elektronische Einstellung 10 11 11 Verwendung von Geschirrspülsalz 12 Verwendung von Klarspülmittel Einstellung der Klarspüldosierung 13 14 Täglicher Gebrauch 15 Laden von Besteck und
Inhalt Filterreinigung Reinigung der Sprüharme Reinigung der Außenseiten Reinigung des Geräteinneren Längerer Gerätestillstand Frostschutzmaßnahmen Transport des Gerätes 24 26 26 26 26 26 27 Was tun, wenn ...
Sicherheitshinweise 5 Gebrauchsanleitungen Sicherheitshinweise Lesen Sie zu Ihrer Sicherheit und für die optimale Geräteanwendung vor der Installation und dem Gebrauch des Gerätes die vorliegende Gebrauchsanweisung aufmerksam durch, einschließlich der Ratschläge und Warnungen. Es ist wichtig, dass zur Vermeidung von Fehlern und Unfällen alle Personen, die das Gerät benutzen, mit der Bedienung und den Sicherheitsvorschriften vertraut sind.
Sicherheitshinweise Allgemeine Sicherheitshinweise • Spülmittel für Geschirrspüler können Verätzungen an Augen, Mund und Kehle verursachen. Lebensgefahr! Halten Sie sich immer an die Sicherheitsanweisungen der Spülmittelhersteller. • Das Wasser in Ihrem Geschirrspüler ist kein Trinkwasser. In der Maschine können immer Spülmittelrückstände vorhanden sein. • Sorgen Sie dafür, dass die Tür des Geschirrspülers außer beim Be- und Entladen immer geschlossen ist.
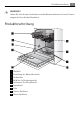
Produktbeschreibung 7 WARNUNG! Halten Sie sich für den elektrischen und den Wasseranschluss strikt an die Anweisungen der betreffenden Abschnitte.
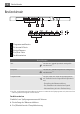
Bedienblende Bedienblende 1 2 3 4 5 Programmwahltasten Zeitvorwahl-Taste Kontrolllampen Ein-/Aus-Taste Funktionstasten Kontrolllampen Salz Leuchtet auf, sobald Spezialsalz nachgefüllt werden muss. 1) Klarspüler Leuchtet auf, sobald Klarspülmittel nachgefüllt werden muss. 1) Programmende Leuchtet nach dem Ende des Spülprogramms auf.
Bedienblende 9 • Ein-/Abschalten der Töne mit Hilfe dieser Tasten eingestellt werden. Einstellmodus Das Gerät befindet sich im Einstellmodus, wenn alle Kontrolllampen der Programmtasten leuchten. Denken Sie daran, dass sich der Geschirrspüler: • beim Auswählen eines Spülprogramms • bei der Einstellung des Wasserenthärters • beim Aktivieren/Deaktivieren der Klarspülmitteldosierung • Ein-/Abschalten der Töne im Einstellmodus befinden MUSS.
Erste Benutzung 3. Drücken Sie die Funktionstaste C; jetzt erlöschen die Kontrolllampen der Tasten A und B, während die Kontrolllampe der Funktionstaste C weiter blinkt. Gleichzeitig leuchtet die Kontrolllampe Programmende und zeigt damit an, dass die Töne eingeschaltet sind. 4. Drücken Sie zum Abschalten der Töne erneut Taste C: Die Kontrolllampe Programmende erlischt und zeigt damit an, dass die Töne ausgeschaltet sind. 5. Zur Speicherung des Vorgangs schalten Sie den Geschirrspüler bitte aus. 6.
Einstellen des Wasserenthärters Der Enthärter muss entsprechend der Wasserhärte Ihres Gebietes eingestellt werden. Ihr lokales Wasserwerk kann Sie über die Härte Ihres Leitungswassers informieren.
Verwendung von Geschirrspülsalz 1. Drücken Sie die On/Off Taste. Der Geschirrspüler muss sich im Einstellmodus befinden. 2. Drücken Sie gleichzeitig die Tasten B und Cso lange, bis die Kontrolllampen der Tasten A, B und C zu blinken beginnen. 3. Drücken Sie Taste A; die Kontrolllampen der Tasten B und C erlöschen, während die Kontrolllampe der Taste A weiter blinkt. Gleichzeitig beginnt die Kontrolllampe Programmende zu blinken, und eine Abfolge von Tönen ist hörbar.
Verwendung von Klarspülmittel 13 2. Gießen Sie 1 Liter Wasser in den Salzbehälter (dies ist nur vor der ersten Benutzung erforderlich) . 3. Füllen Sie den Behälter mithilfe des mitgelieferten Trichters mit Salz. 4. Die Verschlusskappe wieder anbringen und sicherstellen, dass kein Salz auf dem Gewinde oder der Dichtung vorhanden ist. 5. Schrauben Sie die Verschlusskappe nach rechts bis zum Anschlag zu. Ein Klicken zeigt an, dass die Kappe fest verschlossen ist.
Verwendung von Klarspülmittel 1. Drücken Sie auf die Entriegelungstaste (A), um den Behälter zu öffnen. 2. Füllen Sie das Klarspülmittel in den Behälter. Der maximale Füllstand wird durch die Markierung "max" angezeigt. Das Dosiergerät fasst ca. 110 ml Klarspülmittel; die Menge reicht je nach der Dosiereinstellung für 16 bis 40 Spülzyklen. 3. Vergewissern Sie sich nach jedem Füllen, dass der Deckel geschlossen ist.
Täglicher Gebrauch 15 Erhöhen Sie die Dosierung, wenn auf dem Geschirr nach dem Spülen Wassertropfen oder Kalkflecken zurückbleiben. Verringern Sie die Dosierung, wenn weißliche Streifen auf dem Geschirr oder ein bläulicher Überzug auf Gläsern und Messerklingen zu sehen sind. Täglicher Gebrauch • Kontrollieren Sie, ob der Geschirrspüler mit Salz oder Klarspülmittel aufgefüllt werden muss. • Laden Sie das Besteck und Geschirr in den Geschirrspüler. • Füllen Sie Reinigungsmittel ein.
Laden von Besteck und Geschirr • Beachten Sie beim Laden des Geschirrs und Bestecks folgendes: – Geschirr und Besteck dürfen nicht die Drehung der Sprüharme behindern. – Hohlgefäße mit der Öffnung nach unten einlegen, so dass sich in den Behältern kein Wasser ansammeln kann. – Geschirr und Besteckteile dürfen nicht ineinander liegen oder sich gegenseitig abdecken. – Gläser dürfen sich zur Vermeidung von Bruchschäden nicht berühren. – Kleine Gegenstände in den Besteckkorb legen.
Laden von Besteck und Geschirr 17 Unterkorb Größeres und stark verschmutztes Geschirr im Unterkorb einordnen. Zum leichteren Einstellen großer Teller können die beiden Tellereinsätze auf der rechten Seite des Unterkorbs nach unten geklappt werden. Besteckkorb WARNUNG! Messer mit langer Klinge in aufrechter Stellung stellen eine potentielle Gefahr dar. Langes und/oder scharfes Besteck wie Tranchiermesser müssen waagerecht in den Oberkorb gelegt werden.
Laden von Besteck und Geschirr 1. Stecken Sie das Besteckgitter auf den Besteckkorb. 2. Gabeln und Löffel mit dem Griff nach unten in den Besteckkorb stellen. Für größere Gegenstände wie Schneebesen eine Hälfte des Besteckgittters entfernen. Oberkorb Laden Sie kleineres, empfindliches Geschirr und lange, scharfe Besteckteile in den Oberkorb. • Stellen Sie das Geschirr so auf und unter die hochklappbaren Tassenablagen, dass sie sich nicht berühren und gut vom Wasser umspült werden können.
Gebrauch von Spülmittel 19 • Für größeres Geschirr können die Tassenablagen nach oben umgeklappt werden. • Stellen oder hängen Sie Kelchgläser in die Schlitze der Tassenablagen. Gebrauch von Spülmittel Verwenden Sie ausschließlich Reinigungsmittel für Geschirrspülmaschinen. Befolgen Sie die Herstellerangaben für Dosierung und Aufbewahrung auf den Packungen. Die Verwendung der richtigen Dosierung der Reinigungsmittel trägt zum Schutz der Umwelt bei. Füllen Sie Reinigungsmittel ein 1.
Gebrauch von Spülmittel 2. Füllen Sie den Behälter für Reinigungsmittel (1) mit Reinigungsmittel. Achten Sie auf die Dosiermarkierungen: 20 = ca. 20 g Reinigungsmittel 30 = ca. 30 g Reinigungsmittel. 3. Bei Programmen mit Vorspülen zusätzliches Spülmittel (5/10 g) in die Vorspülkammer (2) füllen. Das Reinigungsmittel wird in der Vorspülphase verwendet. 4. Legen Sie Reinigertabletten in das Fach (1) 5. Schließen Sie den Deckel und drücken Sie denselben an, bis er einrastet.
Spülprogramme 21 Das Auffüllen des Salzbehälters und des Klarspülerdosierers ist nicht mehr erforderlich. In diesem Fall leuchtet die Kontrolllampe für Klarspülermittel stets, wenn der Geschirrspüler eingeschaltet wird (nicht alle Geschirrspüler besitzen Kontrolllampen für Klarspülmittel). Sollte das Geschirr nicht trocken genug sein, empfehlen wir Folgendes: 1. Füllen Sie den Klarspüldosierer mit Klarspüler auf. 2. Bringen Sie den Klarspüldosierer in Stellung 2.
Wählen und starten Sie ein Spülprogramm Wassermenge (Liter) Energie (kWh) 0,8 4 Dauer (in Minuten) Dieses Programm kann dazu verwendet werden, Teller vor dem Servieren zu erwärmen oder lange nicht benutztes Geschirr von Staub zu reinigen.
Wählen und starten Sie ein Spülprogramm 23 1. Nachdem Sie das Spülprogramm ausgewählt haben, drücken Sie die Zeitvorwahltaste für die Zeitverzögerung, bis die Kontrolllampe für die gewünschte Anzahl an Stunden (3, 6, 9 Stunden) blinkt. 2. Schließen Sie die Tür des Geschirrspülers, der Ablauf der Zeitvorwahl beginnt automatisch. 3. Der Ablauf der Zeitvorwahl wird in 3 Stunden-Schritten heruntergezählt. 4. Das Öffnen der Tür unterbricht den Ablauf der Zeitvorwahl. 5.
Entladen des Geschirrspülers • • • 1. 2. Öffnen Sie die Tür des Geschirrspülers. Die Kontrolllampe für das Programmende leuchtet. Die Kontrolllampe für das gerade abgelaufene Programm leuchtet weiterhin. Schalten Sie mit der Ein-/Aus-Taste den Geschirrspüler aus. Öffnen Sie die Tür des Geschirrspüler einen Spaltbreit und warten Sie einige Minuten, bevor Sie das Geschirr entnehmen; auf diese Weise kühlt das Geschirr ab und wird die Trockenwirkung verbessert.
Reinigung und Pflege 25 2. Das Filtersystem des Geschirrspülers umfasst einen Grobfilter (A), einen Mikrofilter (B) und ein Filtersieb. Entriegeln Sie das Filtersystem mit dem Griff des Mikrofilters und ziehen Sie das Filtersystem heraus. 3. Drehen Sie den Griff um 1/4 Umdrehung nach links und ziehen Sie das Filtersystem heraus. 4. Fassen Sie den Grobfilter (A) am Handgriff und ziehen Sie ihn aus dem Mikrofilter (B). 5. Reinigen Sie alle Filter sorgfältig unter fließendem Wasser. 6.
Reinigung und Pflege Reinigung der Sprüharme Versuchen Sie NIE, die Sprüharme auszubauen. Eventuell durch Schmutz verstopfte Löcher der Sprüharme mit einem Partystick reinigen. Reinigung der Außenseiten Reinigen Sie die Außenseiten und die Bedienblende des Gerätes mit einem weichen feuchten Tuch. Benutzen Sie bei Bedarf nur neutrale Reinigungsmittel. Benutzen Sie keine Scheuermittel, Metallschwämmchen oder Lösungsmittel (Azeton, Trichloräthylen usw.).
Was tun, wenn ... 27 Transport des Gerätes Halten Sie sich bei einem Transport des Gerätes (Umzug usw.) an folgende Anweisungen: 1. Netzstecker ziehen. 2. Den Wasserhahn schließen. 3. Den Wasserzulauf- und den Ablaufschlauch abnehmen. 4. Ziehen Sie das Gerät zusammen mit den Schläuchen heraus. Lassen Sie das Gerät beim Transport nicht umkippen. Was tun, wenn ... Der Geschirrspüler startet nicht oder hält während des Betriebs an.
Was tun, wenn ... Fehlercode und Störung • Kontrolllampe des laufenden Programms blinkt ständig, • 3 Abfolgen von Tönen • Die Kontrolllampe Programmende blinkt 3 Mal, Mögliche Ursachen und Abhilfe • Schließen Sie den Wasserhahn und wenden Sie sich an den lokalen Kundendienst. Aquasafe-Einrichtung ist ausgelöst. Das Programm startet nicht. • Tür des Geschirrspülers nicht richtig geschlossen. Die Tür schließen. • Netzstecker nicht eingesteckt. Netzstecker einstecken.
Technische Daten 29 Das Spülergebnis ist nicht zufriedenstellend Das Geschirr ist nicht sauber • Wahl eines falschen Spülprogramms. • Geschirr falsch geladen, so dass das Spülwasser nicht alle Teile des Geschirrs erreicht hat. Die Körbe dürfen nicht überladen werden. • Falsche Beladung behindert die Drehung der Sprüharme. • Die Filter im Spülraumboden sind verstopft oder falsch eingesetzt. • Zu hohe oder zu geringe Reinigungsmitteldosierung.
Hinweise für Prüfinstitute Höchst. Gewicht kg 38 Hinweise für Prüfinstitute Die Prüfung muss nach EN 60704 bei voller Beladung mit dem Testprogramm (siehe Tabelle "Spülprogramme") durchgeführt werden. Die Prüfung muss nach EN 50242 mit vollem Salz- und Klarspülmittelbehälter und mit dem Testprogramm (siehe "Spülprogramme") durchgeführt werden.
Hinweise für Prüfinstitute Unterkorb mit Besteckkorb Besteckkorb 1) Eventuell auf der linken Seite vorhandene Tassenablagen entfernen.
Aufstellung Installationsanweisungen Aufstellung WARNUNG! Der elektrische Anschluss des Gerätes und alle sonstigen Installationsarbeiten dürfen nur von qualifizierten Elektrikern und Installateuren ausgeführt werden. Entfernen Sie vor dem Aufstellen der Maschine das gesamte Verpackungsmaterial. Das Gerät möglichst in der Nähe eines Wasserhahns und eines Wasserablaufs aufstellen. Der Geschirrspüler ist zum Einbau unter einer Küchen-Arbeitsplatte bestimmt.
anstoßen. Die Geräteausrichtung ggf. durch Anziehen oder Lockern der Stellfüße nachstellen. Wasseranschluss Das Gerät möglichst an eine Kaltwasserleitung anschließen. Bei einem Anschluss an eine Warmwasserzufuhr darf die zulässige Wassertemperatur nicht 60°C überschreiten. Warmwasserversorgung ist bei sehr schmutzigem Geschirr nicht immer wirksam, da dabei das Spülprogramm stark gekürzt wird.
schlauch zu lecken beginnt, unterbricht das Sicherheitsventil die Wasserversorgung. Berücksichtigen Sie bei der Verlegung des Wasserschlauchs: • Das Elektrokabel des Sicherheitsventils befindet sich in dem doppelwandigen Wasserschlauch. Den Wasserschlauch oder das Sicherheitsventil nicht in Wasser tauchen. • Ziehen Sie sofort den Netzstecker, wenn der Wasserschlauch oder das Sicherheitsventil beschädigt ist.
Der Abwasseranschluss muss sich in einer Höhe von mindestens 30 cm und maximal 100 cm vom Boden des Geschirrspülers befinden. Der Ablaufschlauch kann nach rechts oder links verlegt werden. Stellen Sie sicher, dass der Ablaufschlauch nicht geknickt oder gequetscht wird, da das den Wasserablauf behindern kann. Der Spülbeckenstöpsel darf während des Abpumpens des Gerätes nicht eingesetzt sein, da dadurch das Wasser wieder in die Maschine gesaugt werden kann.
Elektrischer Anschluss Elektrischer Anschluss WARNUNG! Die Sicherheitsbestimmungen schreiben die Erdung des Gerätes verbindlich vor. Stellen Sie vor der ersten Benutzung des Gerätes sicher, dass die Netzspannung und -frequenz mit den auf dem Typenschild angegebenen Anschlusswerten übereinstimmen. Die Nennwerte der Sicherung sind ebenfalls aus dem Typenschild ersichtlich. Benutzen Sie für den Netzstecker immer eine berührungssichere Steckdose.
sorgen Sie das Verpackungsmaterial entsprechend ihrer Kennzeichnung bei den kommunalen Entsorgungsstellen in den dafür vorgesehenen Sammelbehältern. WARNUNG! Vor der Entsorgung von Altgeräten: • Netzstecker ziehen. • Das Netzkabel abtrennen und entsorgen. • Das Türschloss entfernen. Damit verhindern Sie, dass spielende Kinder sich einschließen und gefährden können.
117981410-24082007 Subject to change without notice www.electrolux.com www.aeg-electrolux.