FAVORIT 60760 User manual Dishwasher
Contents Thank you for choosing one of our high-quality products. To ensure optimal and regular performance of your appliance please read this instruction manual carefully. It will enable you to navigate all processes perfectly and most efficiently. To refer to this manual any time you need to, we recommend you to keep it in a safe place. And please pass it to any future owner of the appliance. We wish you much joy with your new appliance.
Safety information 3 Operating instructions Safety information In the interest of your safety and to ensure the correct use, before installing and first using the appliance, read this user manual carefully, including its hints and warnings. To avoid unnecessary mistakes and accidents, it is important to ensure that all people using the appliance are thoroughly familiar with its operation and safety features.
Safety information • Keep children well away from the dishwasher when the door is open. Installation • Check your dishwasher for any transport damage. Never connect a damaged machine. If your dishwasher is damaged contact your supplier. • All packaging must be removed before use. • Any electrical and plumbing work required to install this appliance must be carried out by a qualified and competent person.
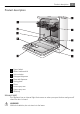
Product description 5 Product description 1 2 3 4 5 6 7 8 9 10 Upper basket Water hardness dial Salt container Detergent dispenser Rinse aid dispenser Rating plate Filters Lower spray arm Upper spray arm Worktop Internal light This appliance has an internal light that comes on when you open the door and goes off when the door is closed. WARNING! Visible led radiation, do not stare into the beam.
Control panel Internal light equipped with LED lamp CLASS 2 in accordance with IEC 60825-1: 1993 + A1: 1997 + A2: 2001. Emission wave length: 450 nm Maximum emitted power: 548 μW If it is necessary to replace the light, contact your local Service Force Centre.
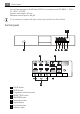
Control panel 7 10 Programme lights Indicator lights MULTITAB Indicates the activation/deactivation of the MULTITAB function (see MULTITAB function) Salt Illuminates when the special salt has run out. 1) Rinse aid Illuminates when the rinse aid has run out. 1) 1) The salt and rinse aid indicator lights are never illuminated while a washing programme is running even if filling with salt and/or rinse aid is necessary.
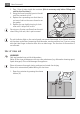
First use To cancel a set programme or a programme in progress Press and hold the RESET button until all the programme lights illuminate. The programme has been cancelled and the machine is now in setting mode.
Use of dishwasher salt 9 The water softener must be set in both ways: manually, using the water hardness dial and electronically. Setting manually The dishwasher is factory set at position 2. 1. Open the dishwasher door. 2. Remove the lower basket from the dishwasher. 3. Turn the water hardness dial to position 1 or 2 (see table). 4. Replace the lower basket. Setting electronically The dishwasher is factory set at level 5. 1. Press the On/Off button. The dishwasher must be in setting mode. 2.
Use of rinse aid 2. Pour 1 litre of water inside the container (this is necessary only before filling with salt for the first time) . 3. Using the funnel provided, pour in the salt until the container is full. 4. Replace the cap making sure that there is no trace of salt on the screw thread or on the gasket. 5. Replace the cap tightly turning it clockwise until it stops with a click. Do not worry if water overflows from the unit when filling with salt, this is quite normal.
Daily use 11 2. Add the rinse aid in the container. The maximum level for filling is indicated by "max". The dispenser holds about 110 ml of rinse aid, which is sufficient for between 16 and 40 dishwashing cycles, depending upon the dosage setting. 3. Ensure that the lid is closed after every refill. Clean up any rinse aid spilt during filling with an absorbent cloth to avoid excess foaming during the next wash.
Loading cutlery and dishes Loading cutlery and dishes Sponges, household cloths and any object that can absorb water may not be washed in the dishwasher. • Before loading the dishes, you should: – Remove all left over food and debris. – Soften remnants of burnt food in pans • When loading the dishes and cutlery, please note: – Dishes and cutlery must not impede the rotation of the spray arms. – Load hollow items such as cups, glasses, pans, etc.
Loading cutlery and dishes 13 The lower basket Load larger and heavily soiled dishes and pans in the lower basket. To make it easier to load larger dishes, all rear plate racks in the lower basket can be folded down. The cutlery basket WARNING! Sharp knives and other items of cutlery with sharp edges must be laid in the cutlery tray or in the upper basket because of the risk of injury. Place knives, small spoons and small forks in the cutlery tray which is in the upper basket.
Loading cutlery and dishes 1. Place the grid insert on the cutlery basket. 2. Place forks and spoon in the cutlery basket with their handles pointing downwards. For larger utensils, such as whisks, leave off one half of the cutlery grid. The cutlery basket can be opened out. Always make sure that you put your hand around both parts of the two-part handle when removing it from the dishwasher. 1. Place the cutlery basket on a table or work surface. 2. Open out the two-part handle. 3. Remove cutlery.
Loading cutlery and dishes The upper basket Load smaller, fragile crockery and long, sharp cutlery in the upper basket. • Arrange items of crockery on and under the folding cup racks so that they are offset from each other and water can reach all items. • The cup racks can be folded up out of the way for tall crockery items. • Lay or hang wine and brandy glasses in the slots in the cup racks. • For glasses with long stems, fold the glass rack to the right, otherwise fold it away to the left.
Use of detergent • The row of spikes on the left of the upper basket is also in two parts and can be folded away. Spikes not folded away: place glasses, mugs etc. in the upper basket. Spikes folded away: more room for serving dishes. Adjusting the height of the upper basket Maximum height of the dishes in: the upper basket the lower basket With upper basket raised 22 cm 30 cm With upper basket lowered 24 cm 29 cm The height of the upper basket can also be adjusted when it is loaded.
Use of detergent Fill with detergent 1. Open the lid. 2. Fill the detergent dispenser (1) with detergent. The marking indicates the dosing levels: 20 = approximately 20 g of detergent 30 = approximately 30 g of detergent. 3. All programmes with prewash need an additional detergent dose (5/10 g) that must be placed in the prewash detergent chamber (2). This detergent will take effect during the prewash phase. 4. When using detergent tablets, place the tablet in compartment (1) 5.
Multitab function Multitab function This appliance is equipped with the "Multitab function", that allows the use of the "Multitab" combi detergent tablets. These products are detergents with a combined cleaning, rinsing and salt functions. They can also contain other different agents depending on which kind of tablets you choose ("3 in 1", "4 in 1", "5 in 1" etc...). Check whether these detergents are suitable for your water hardness. See the manufacturers instructions.
Washing programmes 19 If you decide to turn back to the use of standard detergent system we advise that you: 1. Deactivate the "Multitab function". 2. Fill up the salt container and the rinse aid dispenser again. 3. Adjust the water hardness setting to the highest setting and perform 1 normal washing programme without loading any dishes. 4. Adjust the water hardness setting according to the hardness of the water in your area. 5. Adjust the rinse aid dosage.
Select and start a washing programme 13 - 14 Water (litres) Crockery and cutlery 1.2 - 1.3 Energy (kWh) Normal soil - Duration (minutes)2) NIGHT CYCLE Consumption values 1) Drying Programme description Final rinse Type of load Intermediate rinse Degree of soil Prewash Programme Main wash 20 1) The consumption values are intended as a guide and depends on the pressure and the temperature of the water and also by the variations of the power supply and the amount of dishes.
Unloading the dishwasher 21 4. The opening of the door will interrupt the countdown. Close the door; the countdown will continue from the point at which it was interrupted. 5. Once the delay start has elapsed the programme will start automatically. The selection of the washing programme and delay start can also occur with the door closed.
Care and cleaning • Empty the lower basket first and then the upper one; this will avoid water dripping from the upper basket onto the dishes in the lower one. • Water may appear on the sides and the door of the dishwasher as the stainless steel will eventually become cooler than the dishes. CAUTION! When the washing programme has finished, it is recommended that the dishwasher is unplugged and the water tap turned off.
Care and cleaning 23 6. Remove the flat filter from the base of the washing compartment and clean both faces thoroughly. 7. Put the flat filter back in the base of the washing compartment and ensure that it fits perfectly. 8. Place the coarse filter ( A ) in the microfilter ( B ) and press together. 9. Put the filter combination in place and lock by turning the handle clockwise to the stop. During this process ensure that the flat filter does not protrude above the base of the washing compartment.
What to do if… Moving the machine If you have to move the machine (moving house etc....): 1. Unplug it. 2. Turn the water tap off. 3. Remove the water inlet and discharge hoses. 4. Pull the machine out together with the hoses. Avoid over tilting the machine during transportation. What to do if… The dishwasher will not start or stops during operation.
What to do if… Fault code and malfunction The programme does not start. 25 Possible cause and solution • The dishwasher’s door has not been properly closed. Close the door. • The main plug is not plugged in. Insert the main plug. • The fuse has blown out in the household fuse box. Replace the fuse. • Delay start has been set. If dishes are to be washed immediately, cancel the delay start.
Technical data The wash results are not satisfactory Water drops have dried onto glasses and dishes • Increase rinse aid dosing. • The detergent may be the cause. Contact the detergent manufacturer’s consumer care line. If after all these checks, the problem persists, contact your local Service Force Centre.
Water connection 27 By removing the machine's worktop, you can install it under a close fitting sink unit or a pre-existing top, providing the dimensions of the recess correspond to those shown in the picture. Proceed as follows: 1. Remove the machine's worktop by unscrewing the two rear retaining screws, pull the worktop from the back of the machine and slide out the front slots, lifting the worktop. 2. Insert the machine after adjusting the levelling with the adjustable feet.
Water connection or pipes which have not been used for a long time, you should run the water for a few minutes before connecting the inlet hose. DO NOT use connection hoses which have previously been used for an old appliance. This appliance has been fitted with safety features which will prevent the water used in the appliance from returning back into the drinking water system. This appliance complies with the applicable plumbing regulations.
Electrical connection 29 Electrical connection WARNING! Safety standards require the appliance to be earthed. Prior to using the appliance for the first time, ensure that the rated voltage and type of supply on the rating plate match that of the supply where the appliance is to be installed. The fuse rating is also to be found on the rating plate. Always plug the mains plug into a correctly installed shockproof socket. Multi-way plugs, connectors and extension cables must not be used.
www.electrolux.com 117955430-012009 To buy accessories, consumables and spare parts at our online shop please visit: www.aegelectrolux.co.