B5731-5 User manual Built-In Electric Oven
Contents Thank you for choosing one of our high-quality products. To ensure optimal and regular performance of your appliance please read this instruction manual carefully. It will enable you to navigate all processes perfectly and most efficiently. To refer to this manual any time you need to, we recommend you to keep it in a safe place. And please pass it to any future owner of the appliance. We wish you much joy with your new appliance.
Safety information 3 The manufacturer is not responsible if incorrect installation or use results in damage. Children and vulnerable people safety • Do not let persons, children included, with reduced physical sensory, reduced mental functions or lack of experience and knowledge to use the appliance. They must have supervision or instruction for the operation of the appliance by a person who is responsible for their safety. • Keep all packaging away from children.
Safety information • When you connect electrical appliances to mains sockets, do not let cables touch or come near the hot appliance door. • Do not use multi-way plugs, connectors and extension cables. There is the risk of fire. • Do not replace or change the mains cable. Contact the service centre. • Make sure not to squash or cause damage to the mains plug (if applicable) and cable behind the appliance. • Make sure that the mains connection is accessible after the installation.
Product description 5 • When the door glass panels are damaged they become weak and can break. You must replace them. Contact the service centre. • Be careful when you remove the door from the appliance. The door is heavy! • Do not clean catalytic enamel (if applicable). Oven lamp • Disconnect the appliance from the power supply before the replacement of the oven lamp. There is the risk of electrical shock! Service centre • Only an approved engineer can repair or work on the appliance.
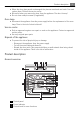
Daily use 4 5 6 7 8 9 10 11 12 13 14 Display + / - Control knob Temperature indicator Heating element Oven lamp Meat probe socket Side lamp Fan Bottom heat Oven shelf runners, removable Shelf positions Oven accessories • Oven shelf For cookware, cake tins, roasts. • Flat baking tray For cakes and biscuits. • Deep roasting pan To bake and roast or as pan to collect fat. • Meat probe To measure how far the meat is cooked. Daily use WARNING! Refer to "Safety information" chapter.
Daily use 7 1. Push the Selection button (refer to section "Clock function") again and again until the function indicator Time of day flashes. 2. Use the + / - knob to set the time. After approx. 5 seconds, the flashing stops and the display shows the time of day set. The appliance is now ready to use. For time change you must not set a clock function ( Minute Minder, Duration or End) or an oven function at the same time. Make sure that the child safety device is not set.
Daily use Residual heat indicator When you switch off the oven, the bars on the display show the residual heat. Rapid heat up With the additional function Rapid heat up you decrease the pre-heating time. Do not put the food into the oven, until Rapid heat up is completed and the oven operates in the desired function. 1. Set an oven function. 2. Push the Rapid heat up button. The bars next to the symbol come up. When the bars flash one by one, it shows that Rapid heat up operates.
Daily use 9 Inserting the Oven Accessories Put in the slide-in accessories so that the double side edges are at the back of the oven and point down to the bottom. Push the slide-in accessories between the guide-bars of one of the oven levels. The deep roasting pan and the oven shelf have double side edges. These edges and the shape of the guide-bars causes the anti-tilt safety for the oven accessories. Inserting the oven shelf and deep roasting pan together Put the oven shelf on the deep roasting pan.
Daily use 1. Switch on the appliance. 2. Put the point of the meat probe into the centre of the meat. 3. Put the meat probe into the socket on the side wall of the oven. 4. Use +/- to set the necessary core temperature. The display changes to the actual core temperature. If you do not set necessary core temperature before oven shows actual core temperature push Selection button again and again until Meat probe flashes. Then set core temperature. The core temperature is displayed from 30°C. 5.
Daily use 11 6 Rapid heat up button Setting the clock functions 1. Push the Selection button again and again until the desired function indicator flashes. or End , use the + / - knob. 2. To set the time for Minute Minder , Duration The related function indicator comes on. When the time period is completed, the related function indicator flashes, the display shows 0.00 and an acoustic signal sounds. 3.
Helpful hints and tips Oven temperature Switch-off time 30 - 120 °C 12.5 h. 120 - 200 °C 8.5 h. 200 - 250 °C 5.5 h. 250 - max. °C 3.0 h. After an automatic cut-out, switch off the oven fully. Then you can switch it on again. If you set clock function Duration or End, the automatic cut-out will not operate. Door lock The door lock is deactivated when the appliance comes from the factory. Activating the door lock: Pull the door lock forward until it locks in place.
Helpful hints and tips 13 • information about the oven functions, recommended shelf levels and temperatures for typical dishes. The temperature and baking times in the tables are guidelines only. They depend on the recipes, quality and quantity of the ingredients used. Baking General instructions • Your new oven may bake or roast differently to the appliance you had before. Adapt your usual settings (temperature, cooking times) and shelf levels to the values in the tables.
Helpful hints and tips Baking results Cake does not cook in the baking time set Possible cause Remedy Temperature too low Use a slightly higher oven temperature setting Baking on one oven level - Baking in tins Type of baking Oven function Level Temperature (°C) Time (h:min) Ring cake or brioche TRUE FAN 1 150 - 160 0:50 - 1:10 Madeira cake/Fruit cakes TRUE FAN 1 140 - 160 1:10 - 1:30 Sponge cake TRUE FAN 1 140 0:25 - 0:40 Sponge cake CONVENTIONAL 1 160 0:25 - 0:40 Flan bas
Helpful hints and tips Type of baking Oven function 15 Level Temperature (°C) Time (h:min) Fruit flans (made with yeast dough / sponge mixture)2) TRUE FAN 3 150 0:35 - 0:50 Fruit flans (made with yeast dough / sponge mixture)2) CONVENTIONAL 3 170 0:35 - 0:50 Fruit flans made with short pastry TRUE FAN 3 160 - 170 0:40 - 1:20 Yeast cakes with delicate toppings (e.g.
Helpful hints and tips Baking on more than one level - Cakes/pastries/breads on baking trays True fan 2 levels True fan 3 levels Temperature (°C) Cream puffs / Eclairs1) 1/4 --- 160 - 180 0:35 - 0:60 Dry streusel cake 1/3 --- 140 - 160 0:30 - 0:60 Type of baking Time (h:min) 1) Pre-heat oven Baking on more than one level - Biscuits/small cakes/pastries/rolls True fan 2 levels True fan 3 levels Temperature (°C) Time (h:min) Short pastry biscuits 1/3 1 / 3 /5 150 - 160 0:15 - 0:35
Helpful hints and tips Type of baking Shelf level Temperature °C Time (Mins) Apple cake, covered 1 150 - 170 50 - 70 Vegetable pie 1 160 - 180 50 - 60 bread 1) 1 250 - 270 10 - 20 flan 1) 1 160 - 180 40 - 50 Flammekuchen (Pizzalike dish from Alsace) 1) 1 250 - 270 12 - 20 Piroggen (Russian version of calzone) 1) 1 180 - 200 15 - 25 Unleavened Puff pastry 17 1) Pre-heat the oven Table for Bakes and Gratin Dish Oven function Shelf level Temperature °C Time Hr : Min Pasta ba
Helpful hints and tips The data in the table is for guidance only. Tips on using the roasting table. • Roast meat and fish that weighs more than 1 kg . • Put some water in the roasting tray to prevent meat juices or fat from burning to the pan. • Turn the meat if it is necessary (after 1/2 - 2/3 of the cooking time). • For better results, baste large pieces of meat and poultry with the cooking juices several times during the cooking time.
Helpful hints and tips 19 Lamb Type of meat Quantity Leg of lamb, roast lamb 1 - 1,5 kg Saddle of lamb 1 - 1,5 kg Oven function Shelf level Temperature °C Time (h:min) ROTITHERM 1 150 - 170 1:15 - 2:00 ROTITHERM 1 160 - 180 1:00 - 1:30 Shelf level Temperature °C Time (h:min) Game Type of meat Quantity Oven function Saddle of hare, leg of hare1) up to 1 kg CONVENTIONAL 3 220 - 250 0:25 - 0:40 Saddle of venison 1,5 - 2 kg CONVENTIONAL 1 210 - 220 1:15 - 1:45 Haunch of ven
Helpful hints and tips Always pre-heat the empty oven with the grill functions for 5 minutes. • Set the shelf in the shelf level as recommended in the grilling table. • Always set the pan to collect the fat into the first shelf level. • Grill only flat pieces of meat or fish. To see which oven function you must use please refer to the oven functions list in Daily use chapter. Food to grill Shelf level Time 1st side 2nd side Burgers 4 8 - 10 mins. 6 - 8 mins. Pork fillet 4 10 - 12 mins.
Helpful hints and tips 21 Stone fruit Preserve Pears, quinces, plums Temperature in °C Time until simmer- Continue to cook at ing in mins. 100°C in mins. 160 - 170 35 - 45 10 - 15 Vegetables Preserve Temperature in °C Time until simmer- Continue to cook at ing in mins. 100°C in mins.
Care and cleaning • Put the oven shelf in the first shelf level from the bottom. To see which oven function you must use please refer to the oven functions list in Daily use chapter.
Care and cleaning 23 Folding down the heating element 1. Remove the shelf support rails. 2. Hold the heating element with the two hands at the front 3. Pull it forwards against the spring pressure and out along the support on both sides. 4. The heating element folds down. The oven ceiling is ready to clean. Installing the heating element 1. Install the heating element in opposite sequence. Install the heating element correctly on the two sides above the support on the inner wall of the oven. 2.
Care and cleaning Before you change the oven lamp: • Switch off the oven. • Remove the fuses in the fuse box or switch off the circuit breaker. Put a cloth on the bottom of the oven for protection of the oven light and glass cover. Replacing the oven light bulb/cleaning the glass cover 1. Turn the glass cover anti-clockwise to remove it. 2. Clean the glass cover. 3. Replace the oven light bulb with applicable 300°C heat-resistant oven light bulb. 4. Install the glass cover.
What to do if… 25 3. Close the oven door until the first position (angle approximately 45°). 4. Hold of the oven door with one hand on each side and pull it away from the oven at an upwards angle. Put the oven door with the outer side down on a soft and level surface to prevent scratches 5. Now you can remove the inner glass panels and clean them. To install the door follow the procedure in reverse.
Installation Problem Possible cause Remedy The oven does not heat up The oven is not switched on Switch on the oven The oven does not heat up The clock is not set Set the clock The oven does not heat up The necessary settings are not set Control the settings The oven does not heat up The fuse in the fuse box is released Control the fuse. If the fuse is released more than one time, refer to a qualified electrician.
Installation 542 10 560 min. 20 590 530 10 10 522 546 584 21 594 467 550 567 114 3 10 592 alternativ 100 560 300 300 70 alternativ 100 H05VV-F H05RR-F min.
Environment concerns 90º 2x3,5x25 Environment concerns The symbol on the product or on its packaging indicates that this product may not be treated as household waste. Instead it should be taken to the appropriate collection point for the recycling of electrical and electronic equipment.
892939315 - A - 022010 www.electrolux.