B5741-5 User manual Built-In Electric Oven
Contents Thank you for choosing one of our high-quality products. To ensure optimal and regular performance of your appliance please read this instruction manual carefully. It will enable you to navigate all processes perfectly and most efficiently. To refer to this manual any time you need to, we recommend you to keep it in a safe place. And please pass it to any future owner of the appliance. We wish you much joy with your new appliance.
Operating Instructions 3 Operating Instructions 1 Safety instructions Electrical safety • This appliance must be only connected by a registered electrician. • In the event of a fault or damage to the appliance: Take the fuses out or switch off. • Repairs to the appliance must only be carried out by qualified service engineers. Considerable danger may result from improper repairs. If repairs become necessary, please contact our Customer Services or your dealer.
Description of the Appliance • Do not store any moist foods inside the oven. This could damage the oven enamel. • After switching off the cooling fan, do not keep uncovered dishes in the oven. Moisture may condense in the oven interior or on the glass doors and may get into the units. 3 Note on enamel coating Changes in the colour of the oven’s enamel coating as a result of use do not affect the appliance’s suitability for normal and correct use.
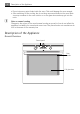
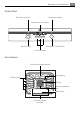
Description of the Appliance Control Panel Oven Power Indicator Oven Power Indicator Temperature / Time Display Temperature / Time Selection Oven Functions Function buttons Oven Features Top heat and heating elements Oven lighting Shelf positions Fat Filter Fan heating element Fan Bottom Heat Oven shelf runners, removable 5
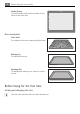
Before Using for the first time Inside of door You will find the shelf position number on the inside of the oven door. Oven accessories Oven shelf For cookware, cake tins, roasts and grilled foods. Baking tray For cakes and biscuits. Roasting Pan For baking and roasting or as a pan for collecting fat. Before Using for the first time Setting and changing the time 3 The oven only operates when the time has been set.
Before Using for the first time 7 When the appliance has been connected to the electrical supply or when there has been a power cut, the function indicator Time of day flashes automatically. 1. To change a time that has already been set, press the Selection button repeatedly until the function indicator Time of day flashes. 2. Using the time. / control knob, set the current After approx. 5 seconds, the flashing stops and the clock displays the time of day set. The appliance is now ready to use.
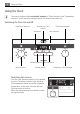
Using the Oven Using the Oven 3 The oven is equipped with retractable buttons for “Oven functions” and “Temperature selection”. To use, press the relevant button. The button then sticks out. Switching the Oven On and Off Oven Power Indicator Oven Power Indicator Temperature / Time Display Speedcook Heat indicator Button Speedcook Selector Button Oven Functions Change display Switching the oven on Turn the oven functions selector to the desired function. The power indicator light lights up.
Using the Oven 9 Changing the oven temperature Turn the / knob to raise or lower the temperature. The setting changes in 5 °C steps. Checking the temperature Press Rapid heat up and Selection buttons at the same time. The current oven temperature appears in the temperature display. Switching the oven off To turn the oven off, turn the oven functions selector to the OFF position. 3 Cooling fan The fan switches on automatically in order to keep the appliance’s surfaces cool.
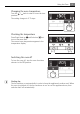
3 Using the Oven Heat indicator Indicates warming up When the oven function has been switched on the bars that slowly light up one after the other indicate how far the oven has heated up. Fast heat indicator When the fast heat function has been switched on the bars that flash one after the other indicate that fast heat is operating. In addition the bars next to the symbol light up.
Using the Oven 11 When the temperature set is reached, the bars of the heat indicator light up and the bars next to the symbol go out. An audible signal sounds. The oven now continues heating according to the pre-set oven function and temperature. You can now place the food in the oven. 3 The Rapid heat up function can be switched on with the oven functions Precision fan , Fan Baking , Conventional and Rotitherm .
Using the Oven Inserting the baking tray or roasting pan Push the baking tray or roasting pan between the guide bars of the selected oven level. Inserting the oven shelf: Insert the oven shelf so that the feet point downwards. Push the oven shelf between the guide bars of the selected oven level. 3 The high rim around the oven shelf is an additional device to prevent cookware from slipping. Inserting the oven shelf and roasting pan together Lay the oven shelf on the roasting pan.
Using the Oven 13 Inserting/Removing the Fat Filter Only use the fat filter when roasting to protect the rear heating elements from fat splashes. Inserting the fat filter Hold the fat filter by the grip and insert the two mounts downwards into the opening on the rear wall of the oven (fan opening). Taking out the fat filter Hold the fat filter by the grip and unhook it.
Using the Oven Time of day To set, change or check the time (See also section “Before Using for the First Time”). 3 How to use the clock functions • After a clock function has been selected, the corresponding function indicator flashes for about 5 seconds. During this period, the desired times can be set or modified using the / dial. • When the desired time has been set, the function indicator continues to flash for approx. 5 seconds. After that the function indicator is then lit.
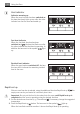
Using the Oven When the time has elapsed, ”0.00“ and the function indicator flash. An audible signal sounds. To stop the flashing and the audible signal: Press any button. Duration 1. Select the oven function and temperature. 2. Press the Selection button repeatedly until the function indicator Duration flashes. 3. Using the / cooking time. control knob set the desired The function indicator Duration lights up and the oven comes on immediately.
Using the Oven When the time has elapsed, ”0.00“ and the function indicator flash. An audible signal sounds for 2 minutes. The oven switches itself off. To stop the flashing and the audible signal: Turn the oven functions dial to ”0”. End 1. Select the oven function and temperature. 2. Press the Selection button repeatedly until the End function indicator flashes. 3. Using the / control knob set the desired switch-off time. The function indicator End lights up and the oven comes on immediately.
Using the Oven 17 When the time has elapsed, ”0.00“ and the function indicator flash. An audible signal sounds for 2 minutes. The ovenswitches itself off. To stop the flashing and the audible signal: Turn the oven functions dial to ”0”. Duration 3 and End combined Duration and End can be used simultaneously, if the oven is to be switched on and off automatically at a later time. 1. Select the oven function and temperature. 2. Using the Duration function, set the time that the dish needs to cook.
Using the Oven The Duration and End function indicators light up and the temperature is shown in the display. In this example, 200°C. The oven switches on automatically at the time calculated. In this case, at 13:05. And switches itself off again when the cook time entered has elapsed. In this case, at 14:05. Other functions Oven’s child safety device The oven is fitted with a child safety device. As soon as the child safety device is activated, the oven cannot be switched on.
Uses, Tables and Tips 19 Switching on after an automatic cut-out Switch the oven off completely. It can then be switched on again. 3 The automatic cut-out is cancelled if the clock function Duration or End Uses, Tables and Tips Baking Oven function: Precision fan Baking tins • For Conventional • For Precision fan or Conventional dark metal and non-stick tins are suitable. bright metal tins are also suitable. Oven levels • Baking with Conventional is possible on one oven level.
Uses, Tables and Tips General instructions • Insert the tray with the bevel at the front. • With Conventional or Precision fan you can also bake with two tins next to one another on the oven shelf at the same time. This does not significantly increase baking time. 3 When frozen foods are used the trays inserted may distort during cooking. This is due to the large difference in temperature between the freezing temperature and the temperature in the oven.
Uses, Tables and Tips Type of baking Oven function 21 Oven level Temperature °C Time Hr: Mins. Flan base - sponge mixture Precision fan 3 150-170 0:20-0:25 Apple pie Conventional 1 170-190 0:50-1:00 Apple pie (2tins Ø20cm, diagonally off set) Precision fan 1 160 1:10-1:30 Apple pie (2tins Ø20cm, diagonally off set) Conventional 1 180 1:10-1:30 Savoury flan (e.
Uses, Tables and Tips Type of baking Oven function Oven level Temperature °C Time Hr: Mins.
Uses, Tables and Tips Precision fan Type of baking Rolls Small cakes (20per tray) Precision fan Shelf positions from bottom 2 levels 3 levels 1/4 --- 1/4 --- 23 Temperature in °C Time Hours: Mins.
Uses, Tables and Tips Fan Baking table Shelf position Temperature °C Time Hr: Mins.
Uses, Tables and Tips 25 Frozen ready meals table Food to be cooked Oven function Shelf position Temperature °C Time Frozen pizza Conventional 3 as per manufacturer’s instructions as per manufacturer’s instructions Chips1) (300-600 g) Rotitherm 3 200-220 as per manufacturer’s instructions Baguettes Conventional 3 as per manufacturer’s instructions as per manufacturer’s instructions Fruit flans Conventional 3 as per manufacturer’s instructions as per manufacturer’s instructions 1)
Uses, Tables and Tips Roasting table Type of meat Quantity Ovenfunction Shelf position TemperaTime ture Hours mins. °C Beef Pot roast 1-1.5 kg Conventional 1 200-250 2:00-2:30 per cm. of thickness Roast beef or fillet - rare per cm. of thickness Rotitherm 1 190-2001) 0:05-0:06 - medium per cm. of thickness Rotitherm 1 180-190 0:06-0:08 - well done per cm. of thickness Rotitherm 1 170-180 0:08-0:10 Shoulder, neck, ham joint 1-1.
Uses, Tables and Tips Type of meat 27 TemperaTime ture Hours mins. °C Shelf position Quantity Ovenfunction 1.5-2 kg Rotitherm 1 180-200 1:15-1:45 Goose 3.5-5 kg Rotitherm 1 160-180 2:30-3:30 Turkey 2.5-3.5 kg Rotitherm 1 160-180 1:45-2:30 Turkey 4-6 kg Rotitherm 1 140-160 2:30-4:00 1-1.
Uses, Tables and Tips Defrosting Oven function: Defrost (no temperature setting) • Unwrap the food and place it on a plate on the oven shelf. • Do not cover with a plate or bowl, as these can substantially lengthen the defrosting time. • For defrosting, place the shelf in the 1st oven level from the bottom. Defrosting table Defrosting time mins. Further defrosting time (mins.
Uses, Tables and Tips Oven level Temperature in °C 1 level 2 levels Time in hours (Guideline) Plums 60-70 3 1/4 8-10 Apricots 60-70 3 1/4 8-10 Apple slices 60-70 3 1/4 6-8 Pears 60-70 3 1/4 6-9 Food to be dried 29 Fruit Making preserves Oven function: Base heat • For preserving, use only commercially available preserve jars of the same size. • Jars with twist-off or bayonet type lids and metal tins are not suitable.
Cleaning and Care Cleaning and Care 1 Warning: First switch off the appliance and let it cool down before carrying out any cleaning. Warning: For safety reasons, do not clean the appliance with steam blasters or highpressure cleaners. Attention: Do not use any corrosive cleaning fluids, sharp objects or stain removers. Do not clean the glass oven door with abrasive fluids or metal scrapers, which could scratch the surface. The glass could crack and shatter.
Cleaning and Care 31 Pyrolytic cleaning 1 Warning: The oven gets extremely hot during this process. Young children must be kept away. 1 Important! Before carrying out pyrolytic cleaning, all removable parts including the side rails, must be removed from the oven. 3 If you use the oven shelf runners that are available as special accessories, these must be removed before pyrolytic cleaning. If the side rails or oven shelf runners are still in place, ‘C1’ appears in the clock display.
Cleaning and Care Shelf Support Rails The shelf support rails on the left and right hand sides of the oven can be removed for cleaning the side walls. Removing the shelf support rails First pull the front of the rail away from the oven wall (1) and then unhitch at the back (2). Fitting the shelf support rails 3 Important! The rounded ends of the guide rails must be pointing forwards! To re-insert, first hook the rail into place at the back (1) and then insert the front and press into place (2).
Cleaning and Care 33 Oven lighting 1 Warning: There is a danger of electric shock! Prior to changing the oven light bulb: – Switch off the oven! – Remove the fuses in the fuse box or switch off the circuit breaker. 3 Place a cloth on the oven floor to protect the oven light and glass cover. Replacing the oven light bulb/cleaning the glass cover 1. Remove the glass cover by turning it anticlockwise and then clean it. 2.
Cleaning and Care 4. Take hold of the oven door with a hand on each side and pull it away from the oven at an upwards angle (Take care: It is heavy) 3 Lay the oven door with the outer side facing downwards on something soft and level, for example, a blanket in order to prevent scratches. Hanging the oven door back on its hinges 1. From the handle side take hold of the oven door with a hand on each side and hold at an angle of approx. 45°.
Cleaning and Care 35 3. Fold up the clamping levers (A) on both door hinges back into their original positions. 4. Close the oven door. Oven door glass The oven door is fitted with four panels of glass mounted one behind the other. The inner panels can be removed for cleaning. 1 Important Rough handling, especially around the edges of the front panel, can cause the glass to break. Removing door glass panels 1. Open the oven door as far as it will go. 2.
Cleaning and Care 3. Close the oven door as far as the first position (approx. 45°). 4. Take hold of the door trim (B) on the upper edge of the door at both sides and press inwards to release the clip seal. Then remove the door trim by pulling it upwards. 5. Take hold of the door glass panels on their upper edge one after the other and take them out of the guide by pulling them upwards.
Cleaning and Care 2. Take hold of the door trim (B) at each side, position it on the inside edge of the door and plug the door trim (B) into the upper edge of the door. 3 On the open side of the door trim (B) there is a guide bar (C). This must be pushed between the outer door panel and the guide corner (D). The clip seal (E) must be snapped in. 3. Open the oven door as far as it will go.
Cleaning and Care 4. Fold up the clamping levers (A) on both door hinges back into their original positions. 5. Close the oven door.
What to do if … 39 What to do if … Problem The oven does not heat up Possible cause Remedy The oven has not been switched on Switch on the oven The clock has not been set to the current time Set the clock to the current time The required settings have not Check the settings been set The oven’s automatic cut-out has been triggered.
Disposal Disposal 2 Packaging material The packaging materials are environmentally friendly and can be recycled. The plastic components are identified by markings, e.g. >PE<, >PS<, etc. Please dispose of the packaging materials in the appropriate container at the community waste disposal facilities. 2 Old appliance W on the product or on its packaging indicates that this product may not The symbol be treated as household waste.
Installation Instructions 41 Installation Instructions 1 Attention: The new appliance may only be installed and connected by a registered expert. Please comply with this. If you do not, any damage resulting is not covered by the warranty. 1 Safety information for the installer • The electrical installation is to be set up so that the appliance can be isolated from the mains with a minimum 3mm all-pole contact separation. Suitable separation devices include e.g.
Installation Instructions
Installation Instructions 43
Installation Instructions
Guarantee/Customer Service 45 Guarantee/Customer Service European Guarantee This appliance is guaranteed by Electrolux in each of the countries listed at the back of this user manual, for the period specified in the appliance guarantee or otherwise by law.
Guarantee/Customer Service p t b Norge +47 81 5 30 222 Risløkkvn. 2 , 0508 Oslo Österreich +43 18 66 400 Herziggasse 9, 1230 Wien Polska +48 22 43 47 300 ul. Kolejowa 5/7, Warszawa Portugal +35 12 14 40 39 39 Quinta da Fonte - Edificio Gonçalves Zarco - Q 35 2774 - 518 Paço de Arcos Romania +40 21 451 20 30 Str. Garii Progresului 2, S4, 040671 RO Schweiz/Suisse/ Svizzera +41 62 88 99 111 Industriestrasse 10, CH-5506 Mägenwil Slovenija +38 61 24 25 731 Electrolux Ljubljana d.o.o.
Service 47 Service In the event of technical faults, please first check whether you can remedy the problem yourself with the help of the operating instructions (section “What to do if…”). If you were not able to remedy the problem yourself, please contact the Customer Care Department or one of our service partners. In order to be able to assist you quickly, we require the following information: – Model description – Product number (PNC) – Serial number (S No.
387 997 246-A-240609-01 Subject to change without notice www.electrolux.