B5741-5 User manual Oven
Contents Thank you for choosing one of our high-quality products. To ensure optimal and regular performance of your appliance please read this instruction manual carefully. It will enable you to navigate all processes perfectly and most efficiently. To refer to this manual any time you need to, we recommend you to keep it in a safe place. And please pass it to any future owner of the appliance. We wish you much joy with your new appliance.
Safety information 3 • For the correct operation of the appliance. Always keep these instructions with the appliance also if you move or sell it. The manufacturer is not responsible if incorrect installation or use results in damage.
Safety information Electrical connection • The appliance must be earthed. • Make sure that the electrical data on the rating plate agree with your domestic power supply. • Information on the voltage is on the rating plate. • Always use a correctly installed shockproof socket. • Do not use multi-way plugs, connectors and extension cables. There is the risk of fire. • Do not replace or change the mains cable. Contact the service centre.
Safety information 5 • For your personal safety and the safety of your property, only clean the appliance with water and a soap. Do not use flammable products or products that can cause corrosion. • Do not clean the appliance with steam cleaners, high-pressure cleaners, sharp objects, abrasive cleaning agents, abrasive sponges and stain removers • If you use an oven spray, follow the instructions from the manufacturer. • Do not clean the glass door with abrasive cleaning agents or metal scraper.
Product description PRODUCT DESCRIPTION General Overview 2 3 4 5 6 1 7 5 8 4 13 3 9 2 10 1 11 12 1 2 3 4 5 6 7 8 9 10 11 12 13 Control panel Power indicator Control knob for oven functions Display + / - Control knob Power indicator Heating element Oven lamp Fan Fan heating element Bottom heat Shelf support rails, removable Shelf positions Oven accessories • Oven shelf For cookware, cake tins, roasts. • Flat baking tray For cakes and biscuits.
Daily use 7 DAILY USE WARNING! Refer to "Safety information" chapter. Initial Cleaning • Remove all parts from the appliance. • Clean the appliance before first use. Refer to chapter "Care and Cleaning". Setting the time The oven only operates after time set. 1. Push the Selection button (refer to section "Clock function") again and again until the function indicator Time of day flashes. 2. Use the + / - knob to set the time. After approx.
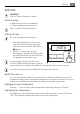
Daily use Switching the oven off Turn the oven functions selector to the OFF position. Cooling fan When the appliance operates, the cooling fan switches on automatically. If you switch off the appliance, the cooling fan continues to operate until the appliance cools down. Heat- up indicator If you switch on an oven function, the bars on the display come on one by one. The bars show that the oven temperature increases.
Daily use Oven function 9 Application TRUE FAN To bake on maximum three oven levels at the same time. Decrease the oven temperatures (20-40°C) compared with Conventional. FAN BAKING To bake on one oven level food with a more intensive browning and a crispy base. Decrease the oven temperatures (20-40°C) compared with Conventional. CONVENTIONAL To bake and roast on one oven level. ROTITHERM To roast larger joints of meat or poultry on one level. Also to gratinate and brown.
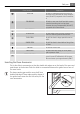
Daily use Inserting the oven shelf and deep roasting pan together Put the oven shelf on the deep roasting pan. Push the deep roasting pan between the guide-bars of one of the oven levels. Clock Functions 1 6 1 2 3 4 5 6 5 2 3 4 Temperature / Time display Heat indicator Clock function indicators Selection button Change display Rapid heat up button Setting the clock functions 1. Push the Selection button again and again until the desired function indicator flashes. or End , use the + / - knob. 2.
Daily use 11 With Minute Minder an acoustic signal also sounds when 90% of the time period is completed. With the functions Duration and End the oven switches off automatically. Clock function Application Time of day Shows the time. To set, change or check the time. Minute minder To set a countdown time. A signal sounds, after the time period is completed. This function has no effect on the operation of the oven. Duration To set how long the oven has to be in operation.
Helpful hints and tips Door lock The door lock is deactivated when the appliance comes from the factory. Activating the door lock: Pull the door lock forward until it locks in place. Deactivating the door lock: Push the door lock back into the panel. Opening the appliance door: 1. Push and hold the door lock. 2. Open the door. Do not push the door lock when closing the appliance door! Switching off the appliance does not cancel the mechanical door lock.
Helpful hints and tips 13 • If you cannot find the settings for a special recipe, look for the one that is almost the same. • Baking time can be extended by 10-15 minutes, if you bake cakes on more than one level. • Cakes and pastries at different heights do not always brown equally at first. If this occurs, do not change the temperature setting. The differences equalize during the baking procedure.
Helpful hints and tips Type of baking Oven function Level Temperature (°C) Time (h:min) Apple pie (2 tins, Ø 20 cm, diagonally off set) TRUE FAN 1 160 1:10 - 1:30 Apple pie (2 tins, Ø 20 cm, diagonally off set) CONVENTIONAL 1 180 1:10 - 1:30 Level Temperature (°C) Time (h:min) 1) Pre-heat oven Baking on one oven level - Cakes/pastries/breads on baking trays Type of baking Oven function Plaited bread/bread crown CONVENTIONAL 3 170 - 190 0:30 - 0:40 Christmas stollen1) CONVENTIO
Helpful hints and tips Type of baking Level Temperature (°C) Time (h:min) TRUE FAN 3 140 0:20 - 0:30 Viennese whirls 1) CONVENTIONAL 3 160 0:20 - 0:30 Biscuits made with sponge mixture TRUE FAN 3 150 - 160 0:15 - 0:20 Pastries made with egg white, meringues TRUE FAN 3 80 - 100 2:00 - 2:30 Macaroons TRUE FAN 3 100 - 120 0:30 - 0:60 Biscuits made with yeast dough TRUE FAN 3 150 - 160 0:20 - 0:40 Puff pastries1) TRUE FAN 3 170 - 180 0:20 - 0:30 Rolls1) TRUE FAN 3 160 0
Helpful hints and tips True fan 2 levels True fan 3 levels Temperature (°C) Rolls 1 /4 --- 160 0:30 - 0:45 Small cakes (20 per tray)1) 1 /4 --- 140 0:25 - 0:40 Type of baking Time (h:min) 1) Pre-heat oven Fan baking table To see which oven function you must use please refer to the oven functions list in Daily use chapter.
Helpful hints and tips Dish Shelf level Temperature °C Time Hr : Min ROTITHERM 1 160-170 0:15-0:30 Sweet bakes CONVENTIONAL 1 180-200 0:40-0:60 Fish bakes CONVENTIONAL 1 180-200 0:30-1:00 ROTITHERM 1 160-170 0:30-1:00 Baguettes topped with melted cheese1) Stuffed vegetables Oven function 17 1) preheat the oven Ready meals Food to be cooked Chips1) Oven function ROTITHERM Shelf level Temperature °C Time 3 200-220 refer to instructions of the manufacturer 1) Comment: Turn ch
Helpful hints and tips Type of meat Quantity Oven function Shelf level Temperature °C Roast beef or fillet Time (h:min) for each cm of thickness - rare1) for each cm of thickness ROTITHERM 1 190 - 200 0:05 - 0:06 - medium for each cm of thickness ROTITHERM 1 180 - 190 0:06 - 0:08 - well done for each cm of thickness ROTITHERM 1 170 - 180 0:08 - 0:10 Shelf level Temperature °C Time (h:min) 1) preheat the oven Pork Type of meat Quantity Oven function Shoulder, neck, ham joi
Helpful hints and tips Type of meat Quantity Haunch of venison 1,5 - 2 kg Oven function 19 Shelf level Temperature °C Time (h:min) 1 200 - 210 1:30 - 2:15 Shelf level Temperature °C Time (h:min) CONVENTIONAL 1) preheat the oven Poultry Type of meat Quantity Oven function Poultry portions 200 - 250 g each ROTITHERM 1 200 - 220 0:35 - 0:50 Half chicken 400 - 500 g each ROTITHERM 1 190 - 210 0:35 - 0:50 chicken, poulard 1 - 1,5 kg ROTITHERM 1 190 - 210 0:45 - 1:15 Duck 1.
Helpful hints and tips Food to grill Shelf level Time 1st side 2nd side Filet steaks, veal steaks 4 6 - 7 mins 5 - 6 mins. Filet of beef, roast beef ( approximately 1 kg) 3 10 - 12 mins. 10 - 12 mins. Toast 1) 3 4 - 6 mins. 3 - 5 mins. Toast with topping 3 6 - 8 mins. ------- 1) Do not pre-heat Preserving • • • • • • • Only use usual preserving jars of the same dimension. Do not use jars with twist-off or bayonet type lids and metal tins. Use the first shelf level from the bottom.
Helpful hints and tips 21 Drying • Cover the oven shelves with baking parchment. To see which oven function you must use please refer to the oven functions list in Daily use chapter.
Care and cleaning Dish Defrosting time (mins) Further defrosting time (mins) Comments Butter, 250g 30-40 10-15 ------- Cream, 2 x 200g 80-100 10-15 Cream can also be whipped when still slightly frozen in places Gateau, 1400g 60 60 ------- Information on acrylamides Important! According to the newest scientific knowledge, if you brown food (specially the one which contains starch), acrylamides can pose a health risk.
Care and cleaning 4. Pyrolytic cleaning starts. During pyrolytic cleaning the light does not operate. When the oven reaches pre-set temperature, the door locks. The bars of the heat indicator come up, until the door unlocks again. Shelf Support Rails Removing the shelf support rails 1. Pull the front of the shelf support rail away from the side wall. 2. Pull the rear shelf support rail away from the side wall and remove it.
Care and cleaning 4. Install the glass cover. Oven door and glass panels To clean the oven door remove it. CAUTION! Be careful when you remove the door from the appliance. The door is heavy! Removing the oven door 1. Open the oven door as far as it goes. 2. Lift up clamping levers (A) on the two door hinges fully. A A 3. Close the oven door until the first position (angle approximately 45°). 4. Hold of the oven door with one hand on each side and pull it away from the oven at an upwards angle.
What to do if… 25 2. Pull the door trim to the front to remove it. 3. Hold the door glass panels on their top edge one by one and pull them upwards out of the guide 4. Clean the door glass panels. To install panels follow the procedure in reverse. Insert the smaller panel first, then the larger. WHAT TO DO IF… WARNING! Refer to "Safety information" chapter.
Technical data Problem Possible cause Remedy The time display shows an error Electronic error code which is not in the list Switch the appliance off and on again through the fuse or the safety switch in the fuse box. If the display shows the error message again, refer to the Service Force Centre If you cannot find a solution to the problem yourself, contact your dealer or the service centre. The necessary data for the service centre is on the rating plate.
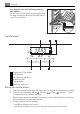
Installation instructions max. R1200 mm 140 130 alternativ 100 H05VV-F H05RR-F min.
Environment concerns 2x3,5x25 ENVIRONMENT CONCERNS The symbol on the product or on its packaging indicates that this product may not be treated as household waste. Instead it should be taken to the appropriate collection point for the recycling of electrical and electronic equipment.
892944105-B-032011 www.aeg.